
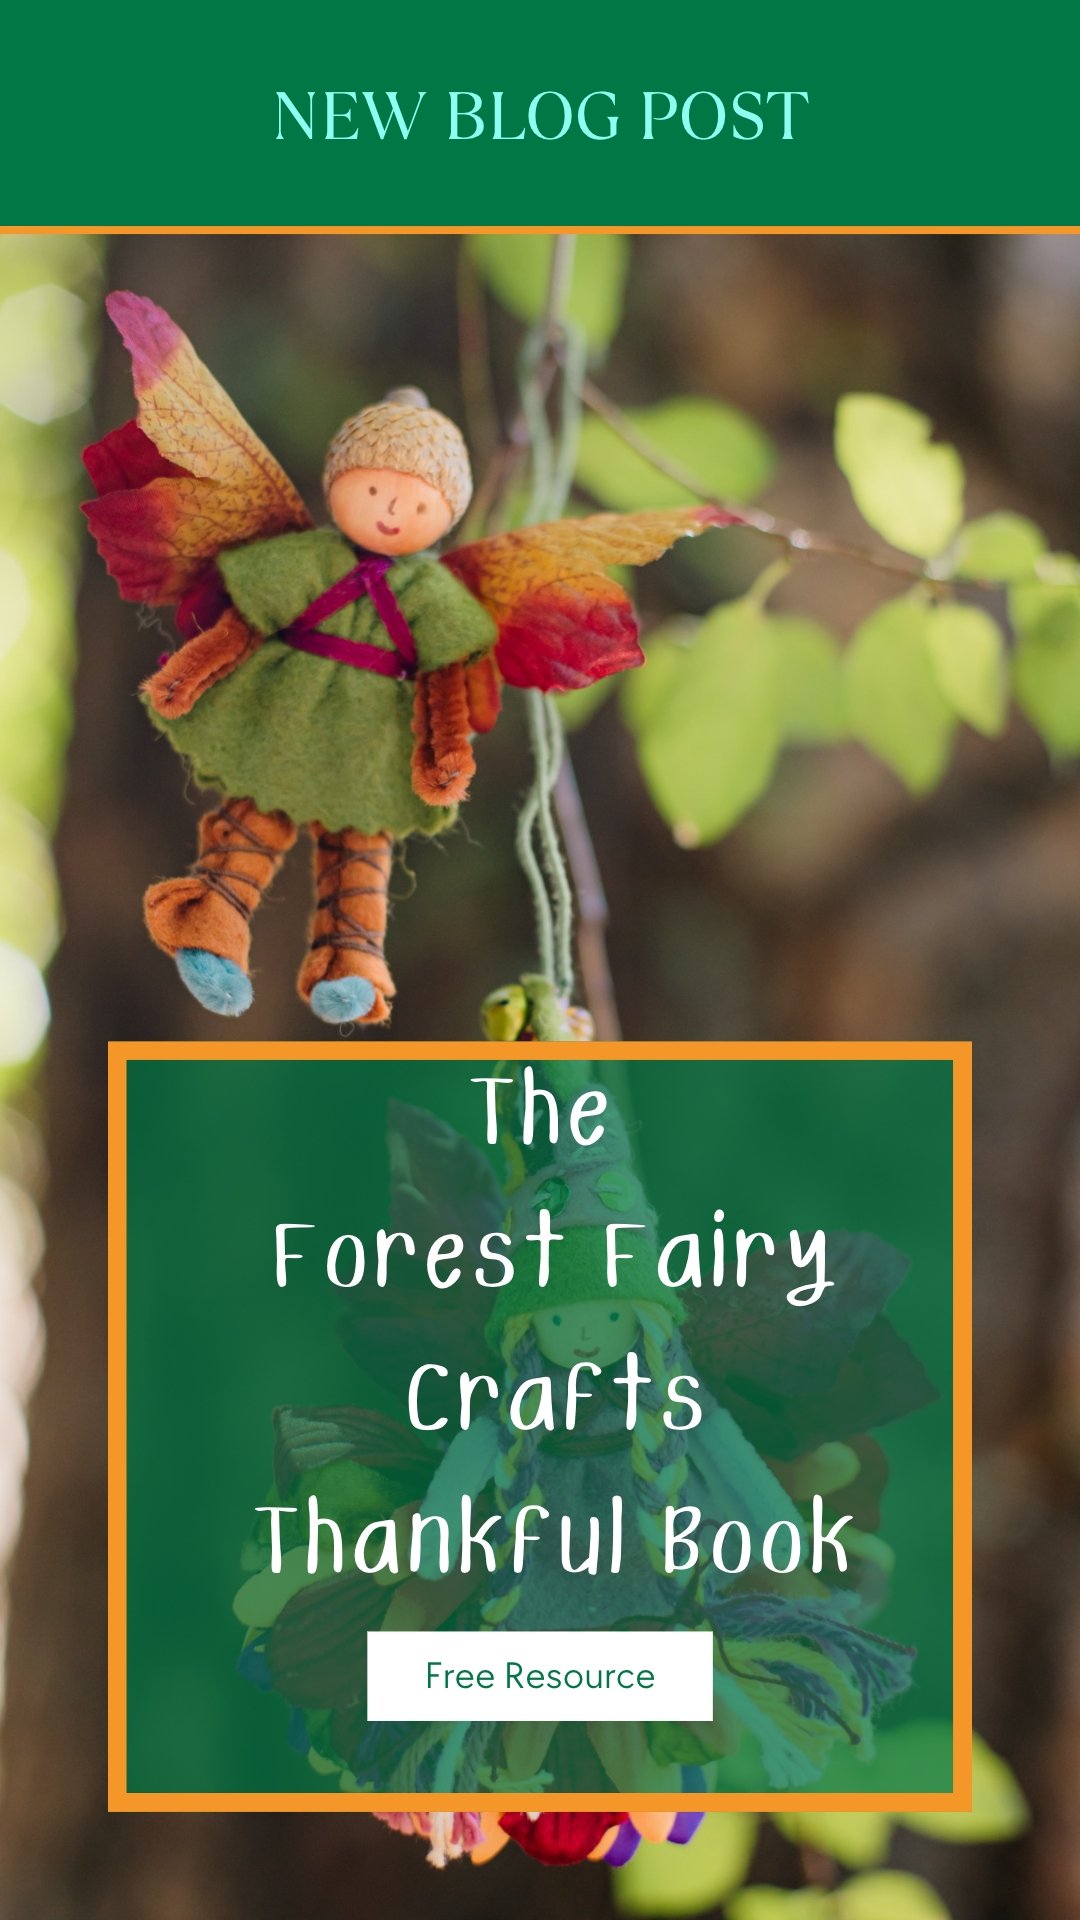
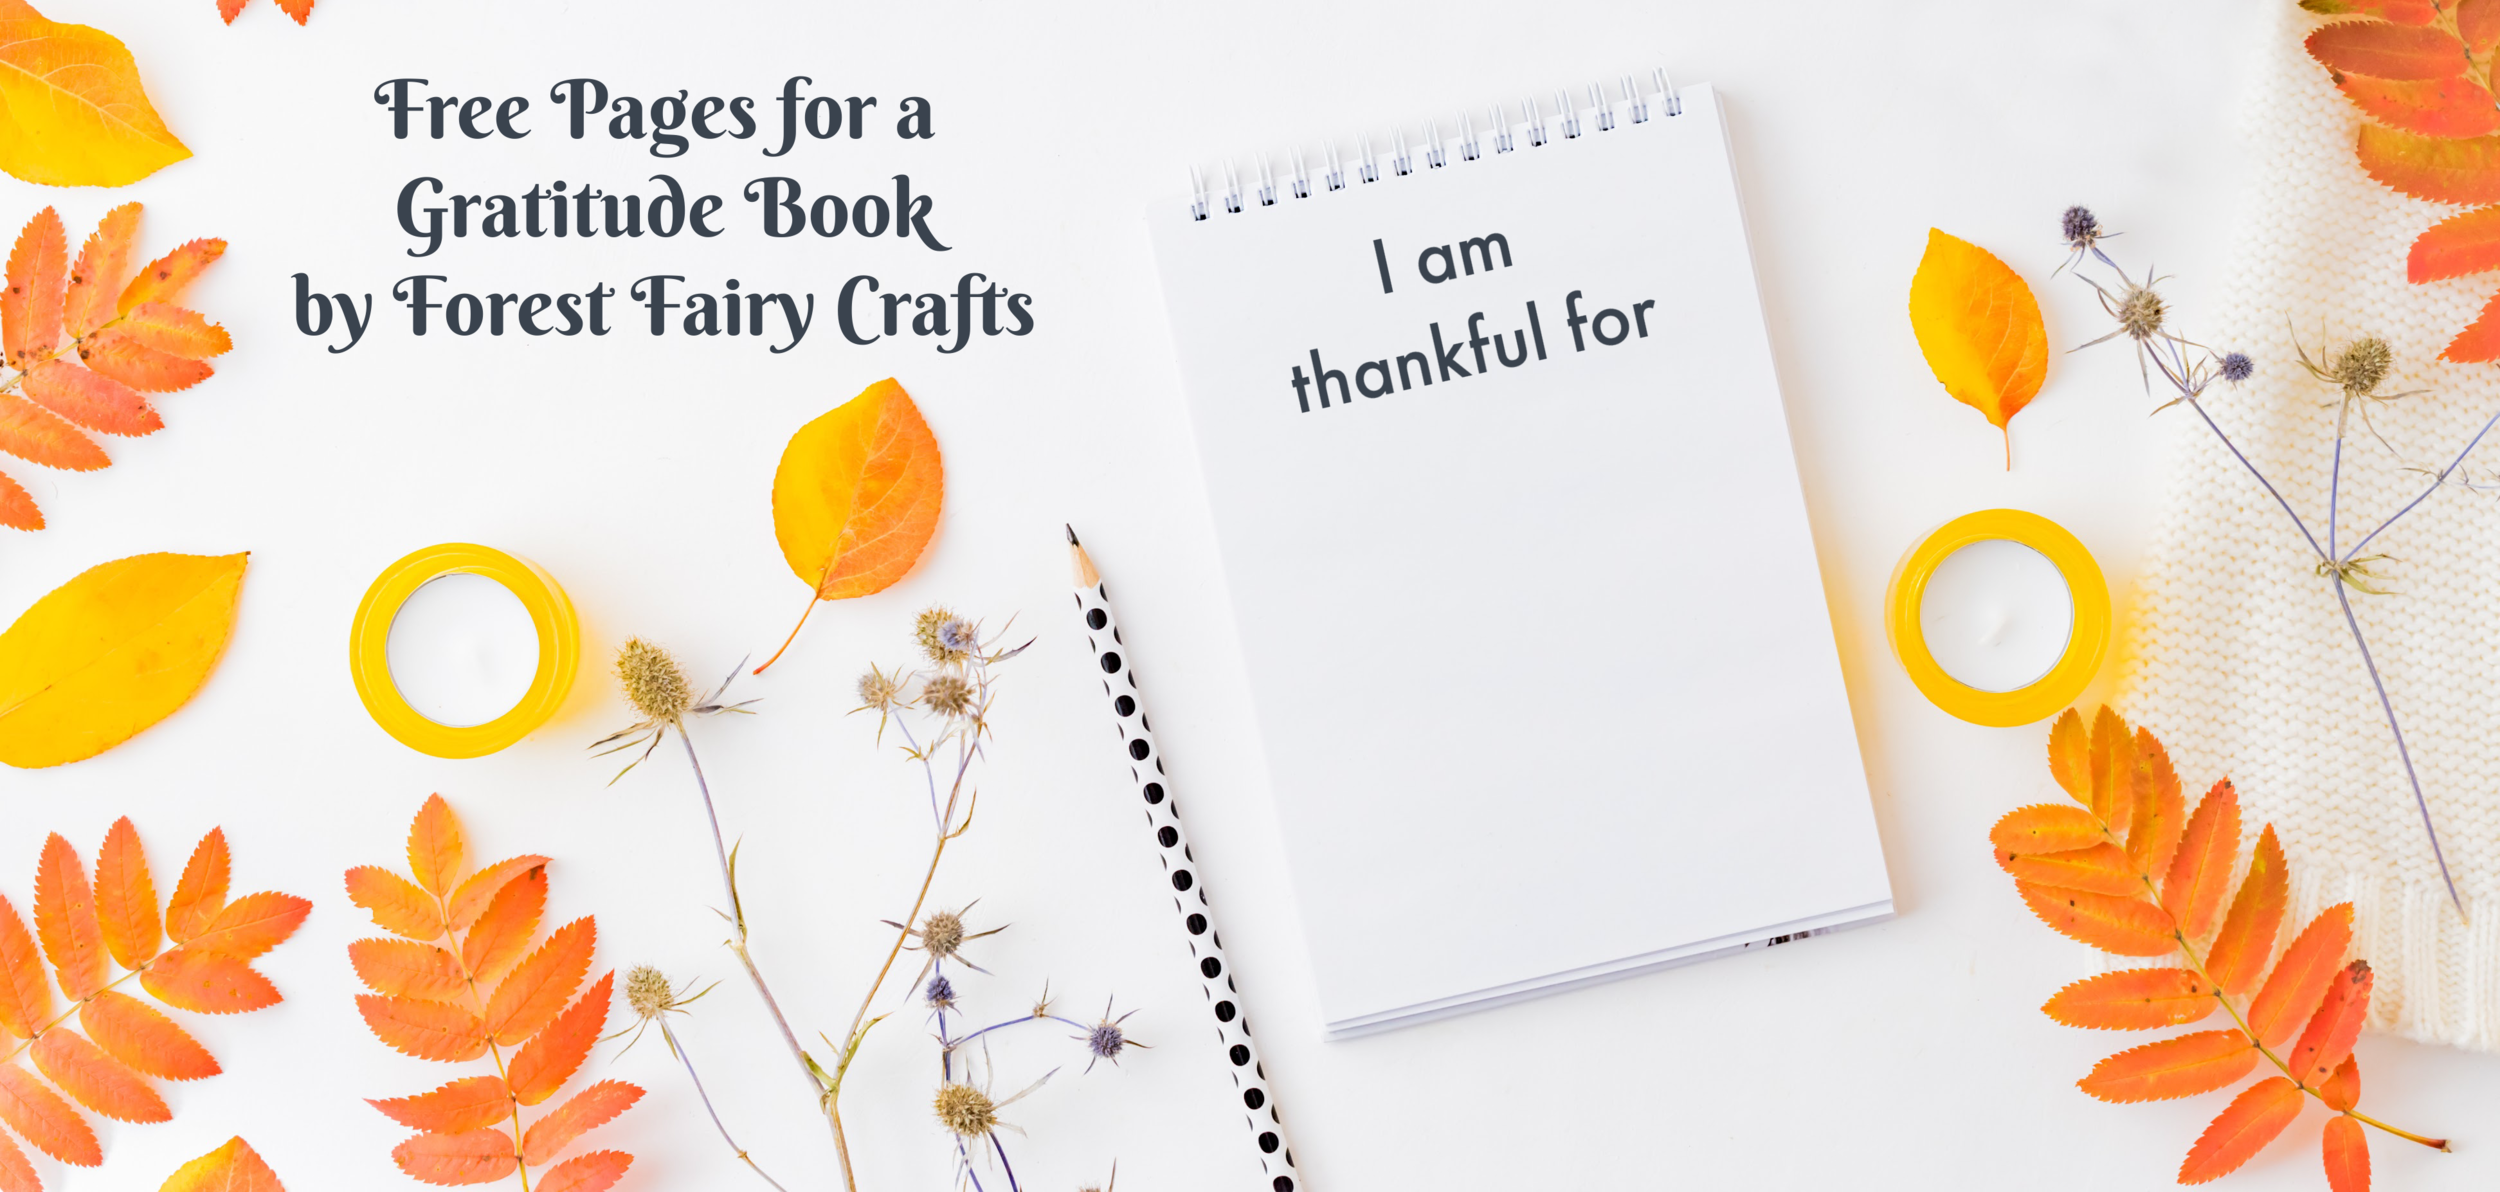
Thankful Book for Fall
In early November, we start our book of gratitudes. Each day we add a page or two or three. We collect the loose pages right before Thanksgiving. And we have a lovely read aloud for our family celebration. In my classroom, the pages became an activity center. At home, we write spend time together creating a child and adult version. Children appreciate hearing about adult gratitudes too.
A guideline that I gave myself was to not give children ideas. Beyond a vague, “family, pets, etc.” Some would go big with “air, earth, water.” Others went more detailed. Eventually, the obvious answers (in their mind) were written down. And then resistance, “I’m out of ideas.” And then the real opportunity- “I’m going to remember grapes to write, they’re so good.” Or, “I’m thankful for goodnight stories.” They took their authorship away from the table to open their mind to ideas away from the table. Which, for me, is the real goal all along. To recognize the many gifts in our day.

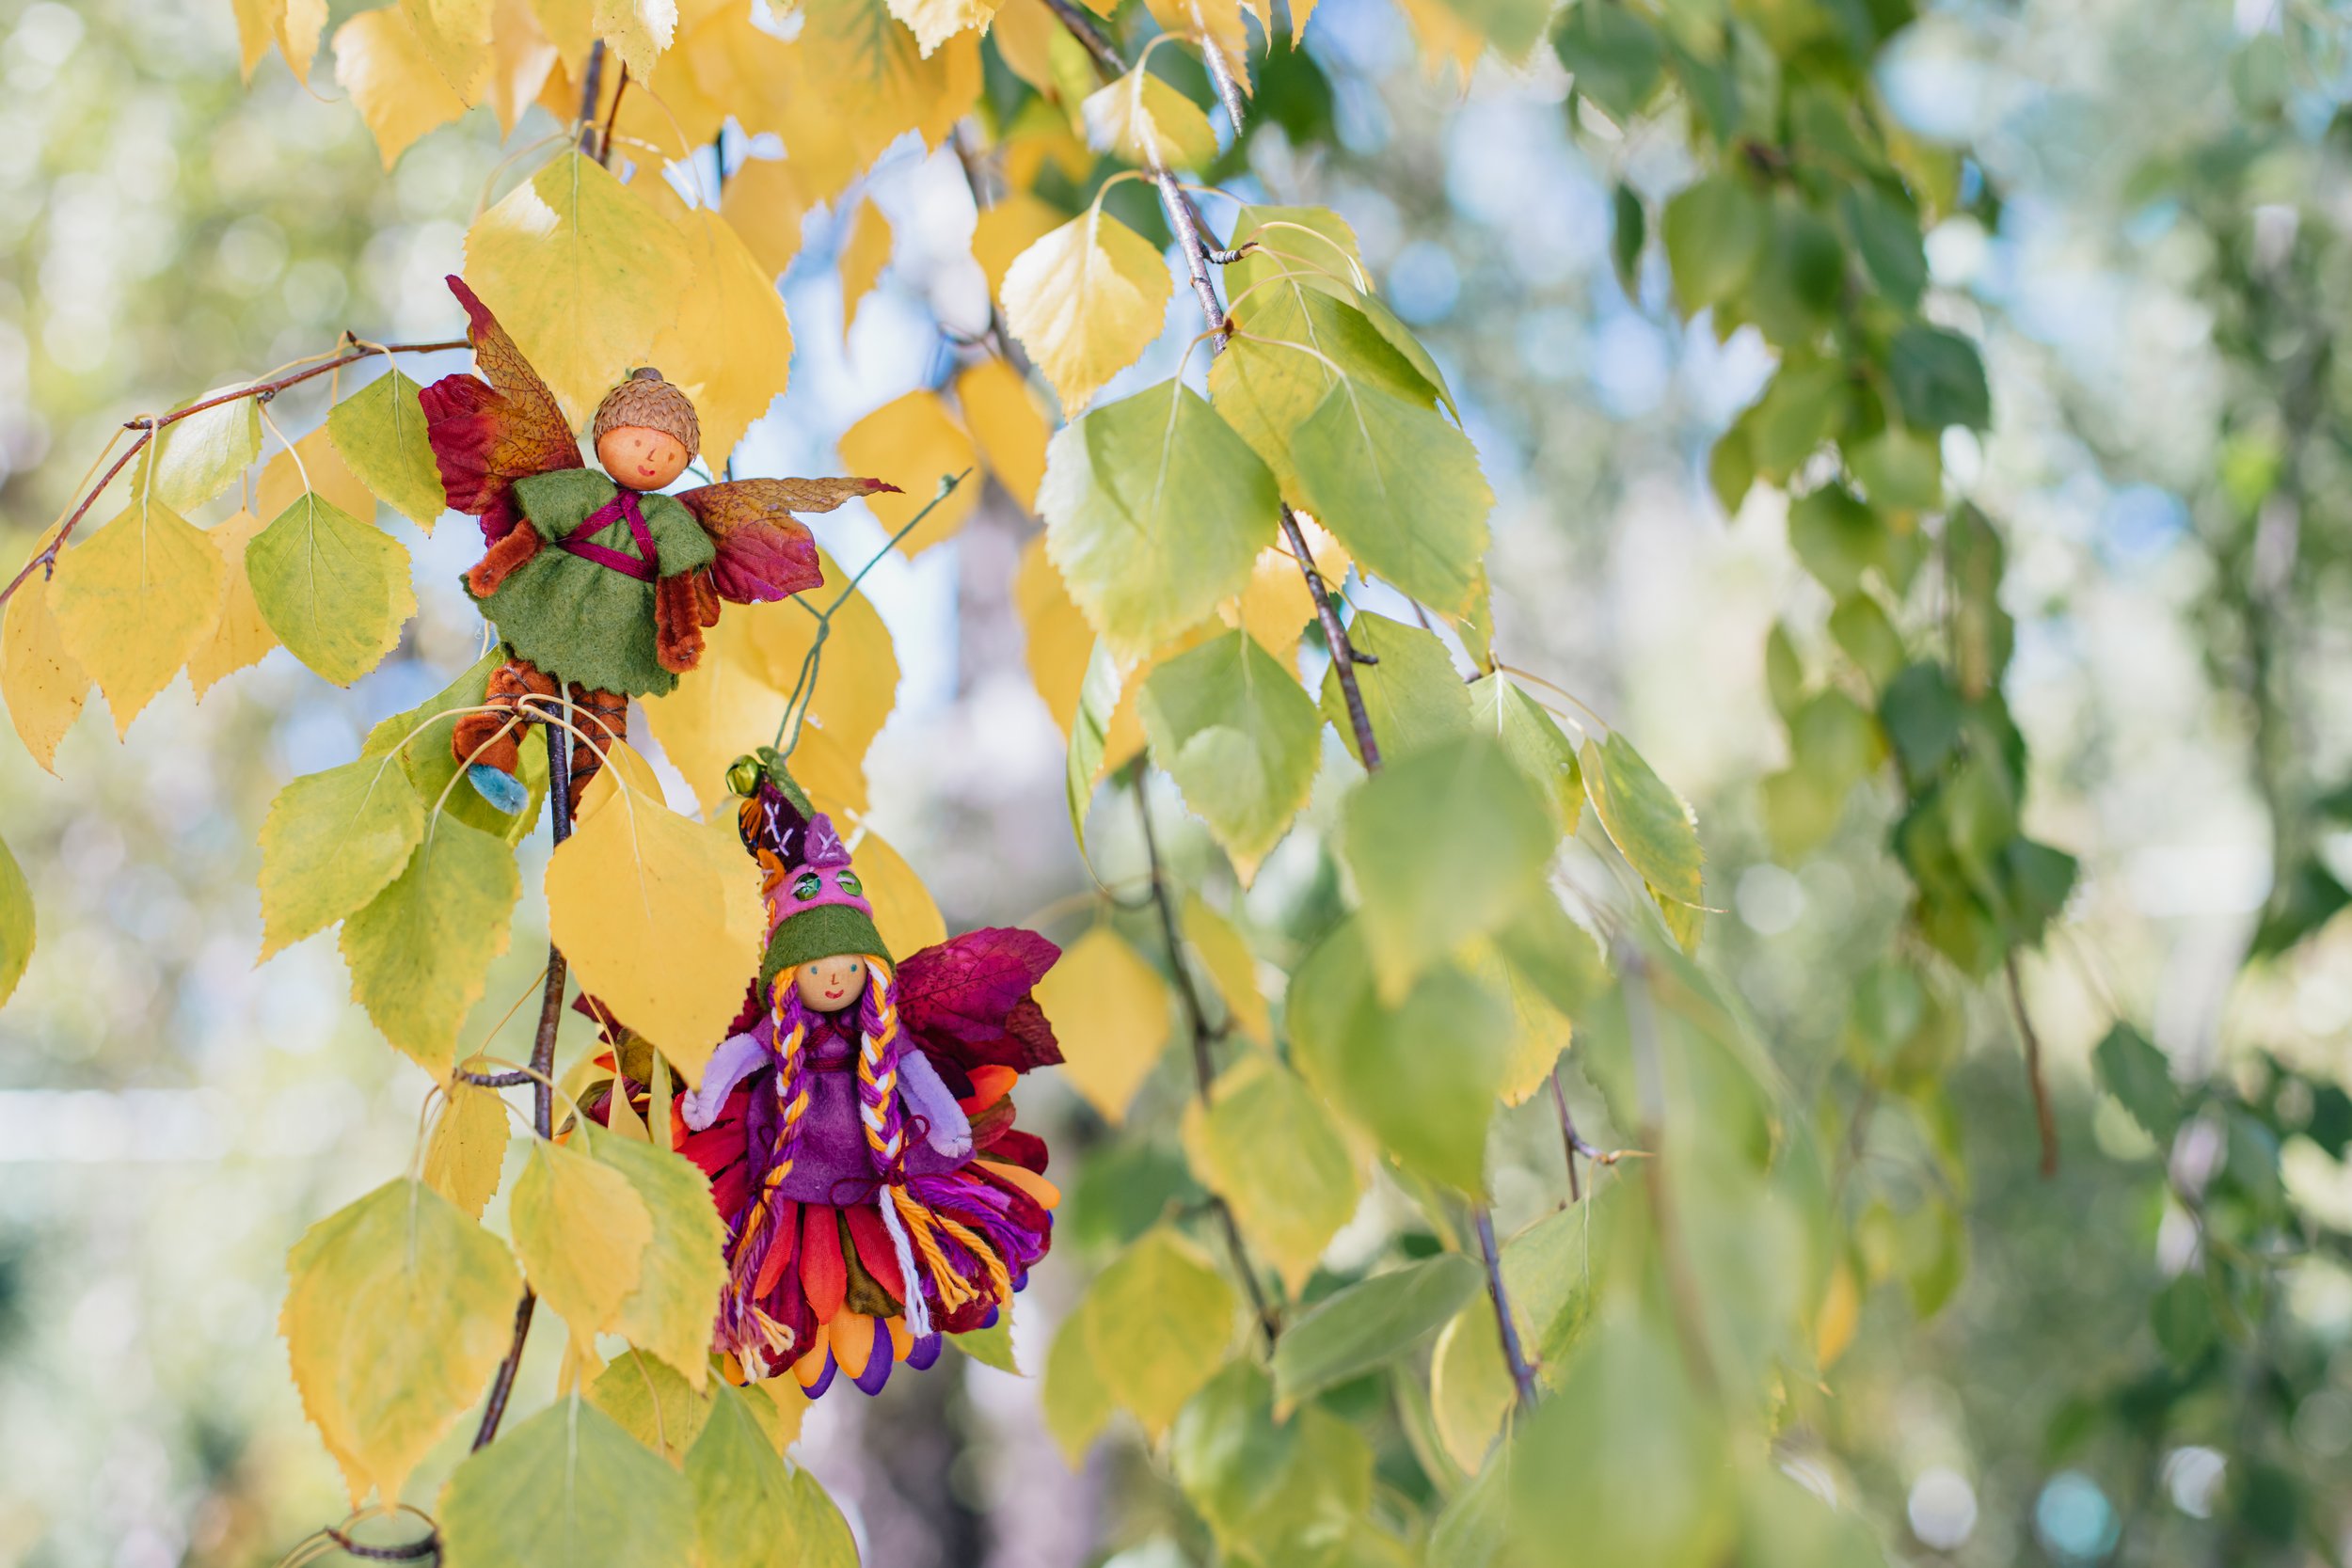
Autumn Fairy in Magical Forest Fairy Crafts Through the Seasons
I created book pages that you can download to use with children in your life. *Not for sale or resale. When you download, you’ll notice the book has 4 pages. Why would I do that? This way, each family or child gets to create their own number of pages. Save them as loose leaves until the day before Thanksgiving. That way, an author won’t run out of pages, or face a pile of empty pages on the last night before binding. Customize your book.
For older authors (6 and above), I use the smaller version which fits two pages on one piece of paper. I recommend cutting in half before binding, or you will have blank pages. Since writing instructions don’t often come easy for authors, here is my ladder of support. A conversation with authors that they understand is that the audience matters. Is this for Grandma and Grandpa to admire? Or is it just for the author? Because one way, the spelling may be more important that the other. And the main goal for a young author is to feel proud of their work. Not for us adults to judge or micromanage to the point that writing feels like a chore, but simply for the author to celebrate what they created. You may choose different styles of support based on the audience for the book.
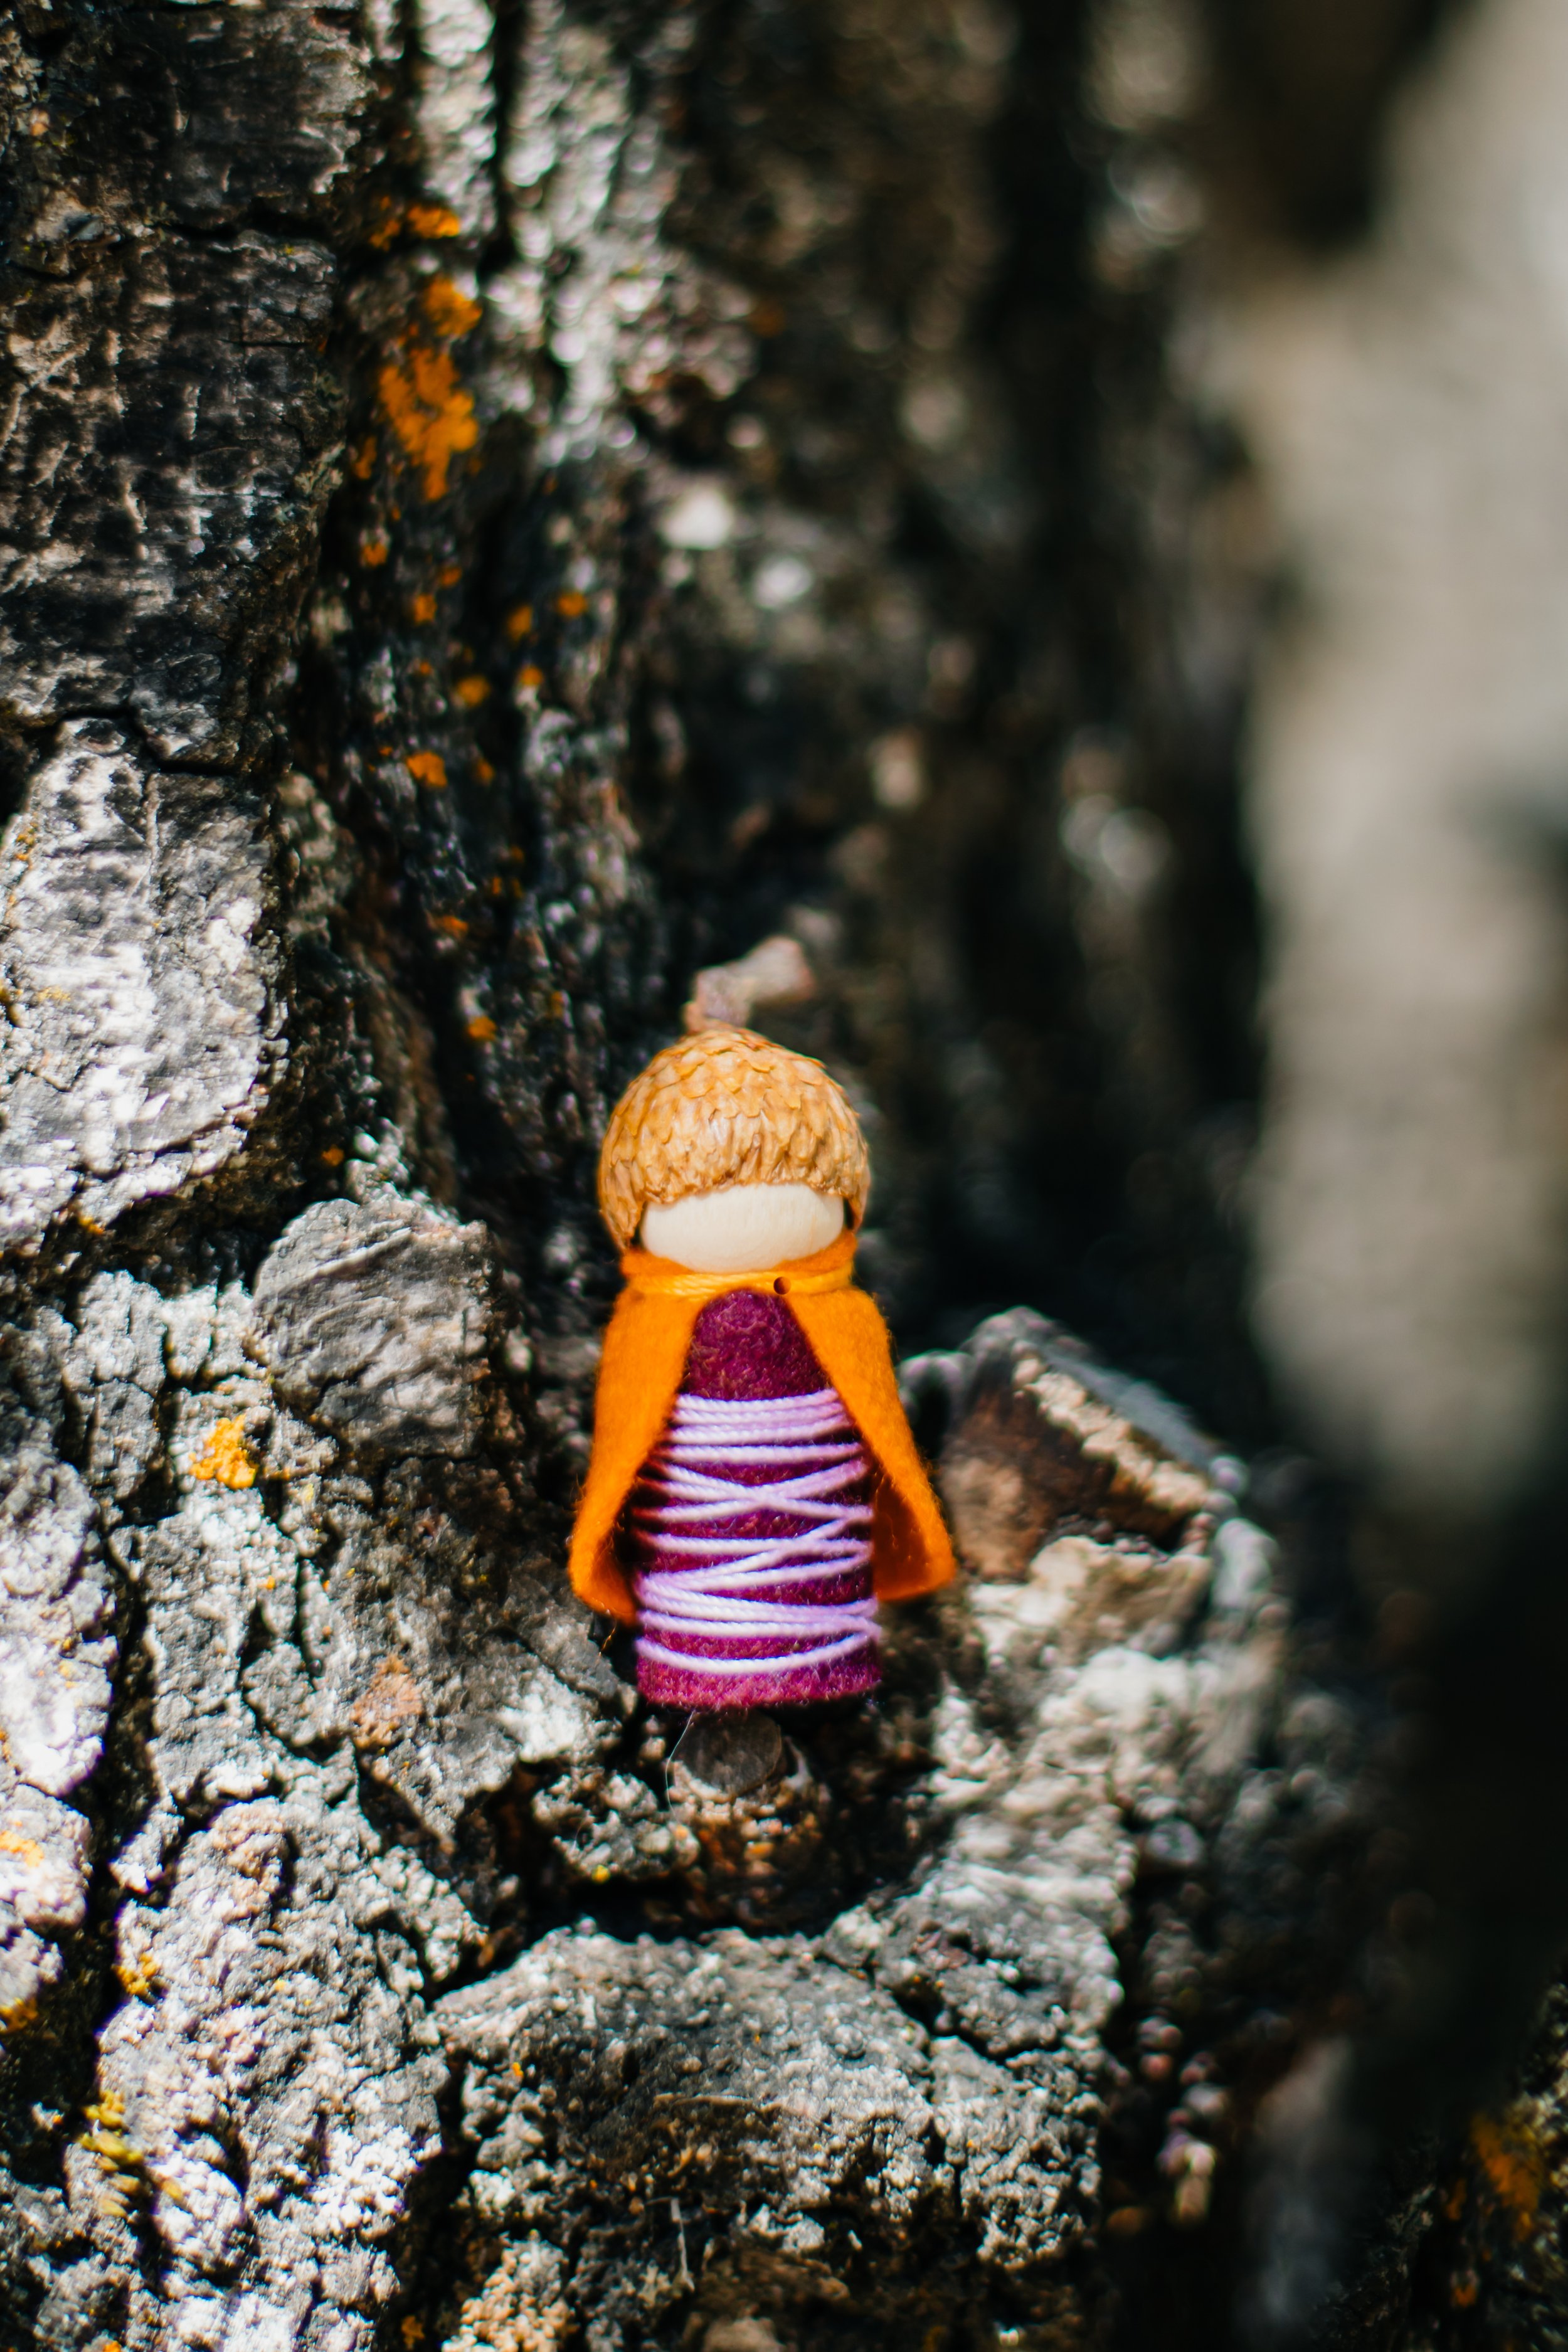
Autumn Gnome in Magical Forest Fairy Crafts Through the Seasons

Also, many supports may be appropriate for different learning challenges. I let my dyslexic daughter dictate while I typed well into high school. She’s in college now and doesn’t ask me to type any of her papers anymore. So give writers the support they need to express their ideas. Which may change from day-to-day.
You can mix and match within the same day/on the same page. They can write until they’re turned and then an adult can finish. Choose a ladder plan, then adjust as needed.
Step 1- writing for the author, letting the author dictate. This is the way to catch all the thoughts and details. This can happen alongside scribbles or attempts at “sounding out” words so that they can be read and understood later.
Step 2- writing and tracing. Use a highlighter or light handwriting that the student can trace with their own pencil. If used, the dictation from above with a step for authors to explore writing it themselves.
Step 3- Write what you hear. This may look incoherent to adults. As long as the child can read it late, then it accomplished the purpose of writing to remember your words later. It doesn’t really accomplish the write-and-share idea, but I can’t read books in other languages, so, for this stage, I let the author reading their own work be enough
Step 4- Write to share. This time, another person needs to be able to understand your words. They don’t seem to be spelled perfectly or have all the right spaces, but another person may want to read them one day. This can be supported with verbal spelling help and room to make spelling mistakes.
Step 5- Write to impress. By this time, sight words should be pretty intuitive. Writing shouldn’t be so much work by this time. Now, spelling corrections and punctuation are involved in the process.

Autumn fairies in Magical Forest Fairy Crafts Through the Seasons
Realistically, think about how long this book will be around. This was created as a process-project meant to help authors notice the world with a spirit of gratitude. Many of these books will go into recycling. You may want to keep them. But then they’ll be a time capsule of where your author’s writing skills were at that point in time. I want young authors to enjoy writing. This project is close to my heart for inspiring young authors.
Feel free to print for personal or small-group use. Print pages 2-3 (large) or 2 (small) for as many middle pages as you may like. Usage rights do not include other teaching sites or third-party websites or sales. I appreciate sharing resources with you.
Add the last page as a bookend, because we are thankful for each and every author.
And of course, Autumn Fairies love to help write these books or hear these books read aloud. They’re always up for an adventure to find more things to appreciate!
We are thankful for you!
The Creative Process and Try, Try Again
Do you talk with children about ideas that didn't work? Children are fascinated when I share that I tried about forty other ways before figuring out the classic Forest Fairy Craft criss-cross thread. This little fairy was my learning process while creating the Valentine Fairy. I wanted hearts and hearts and hearts. And it worked for her hat, but the wings didn’t quite turn out how I had hoped they would look.
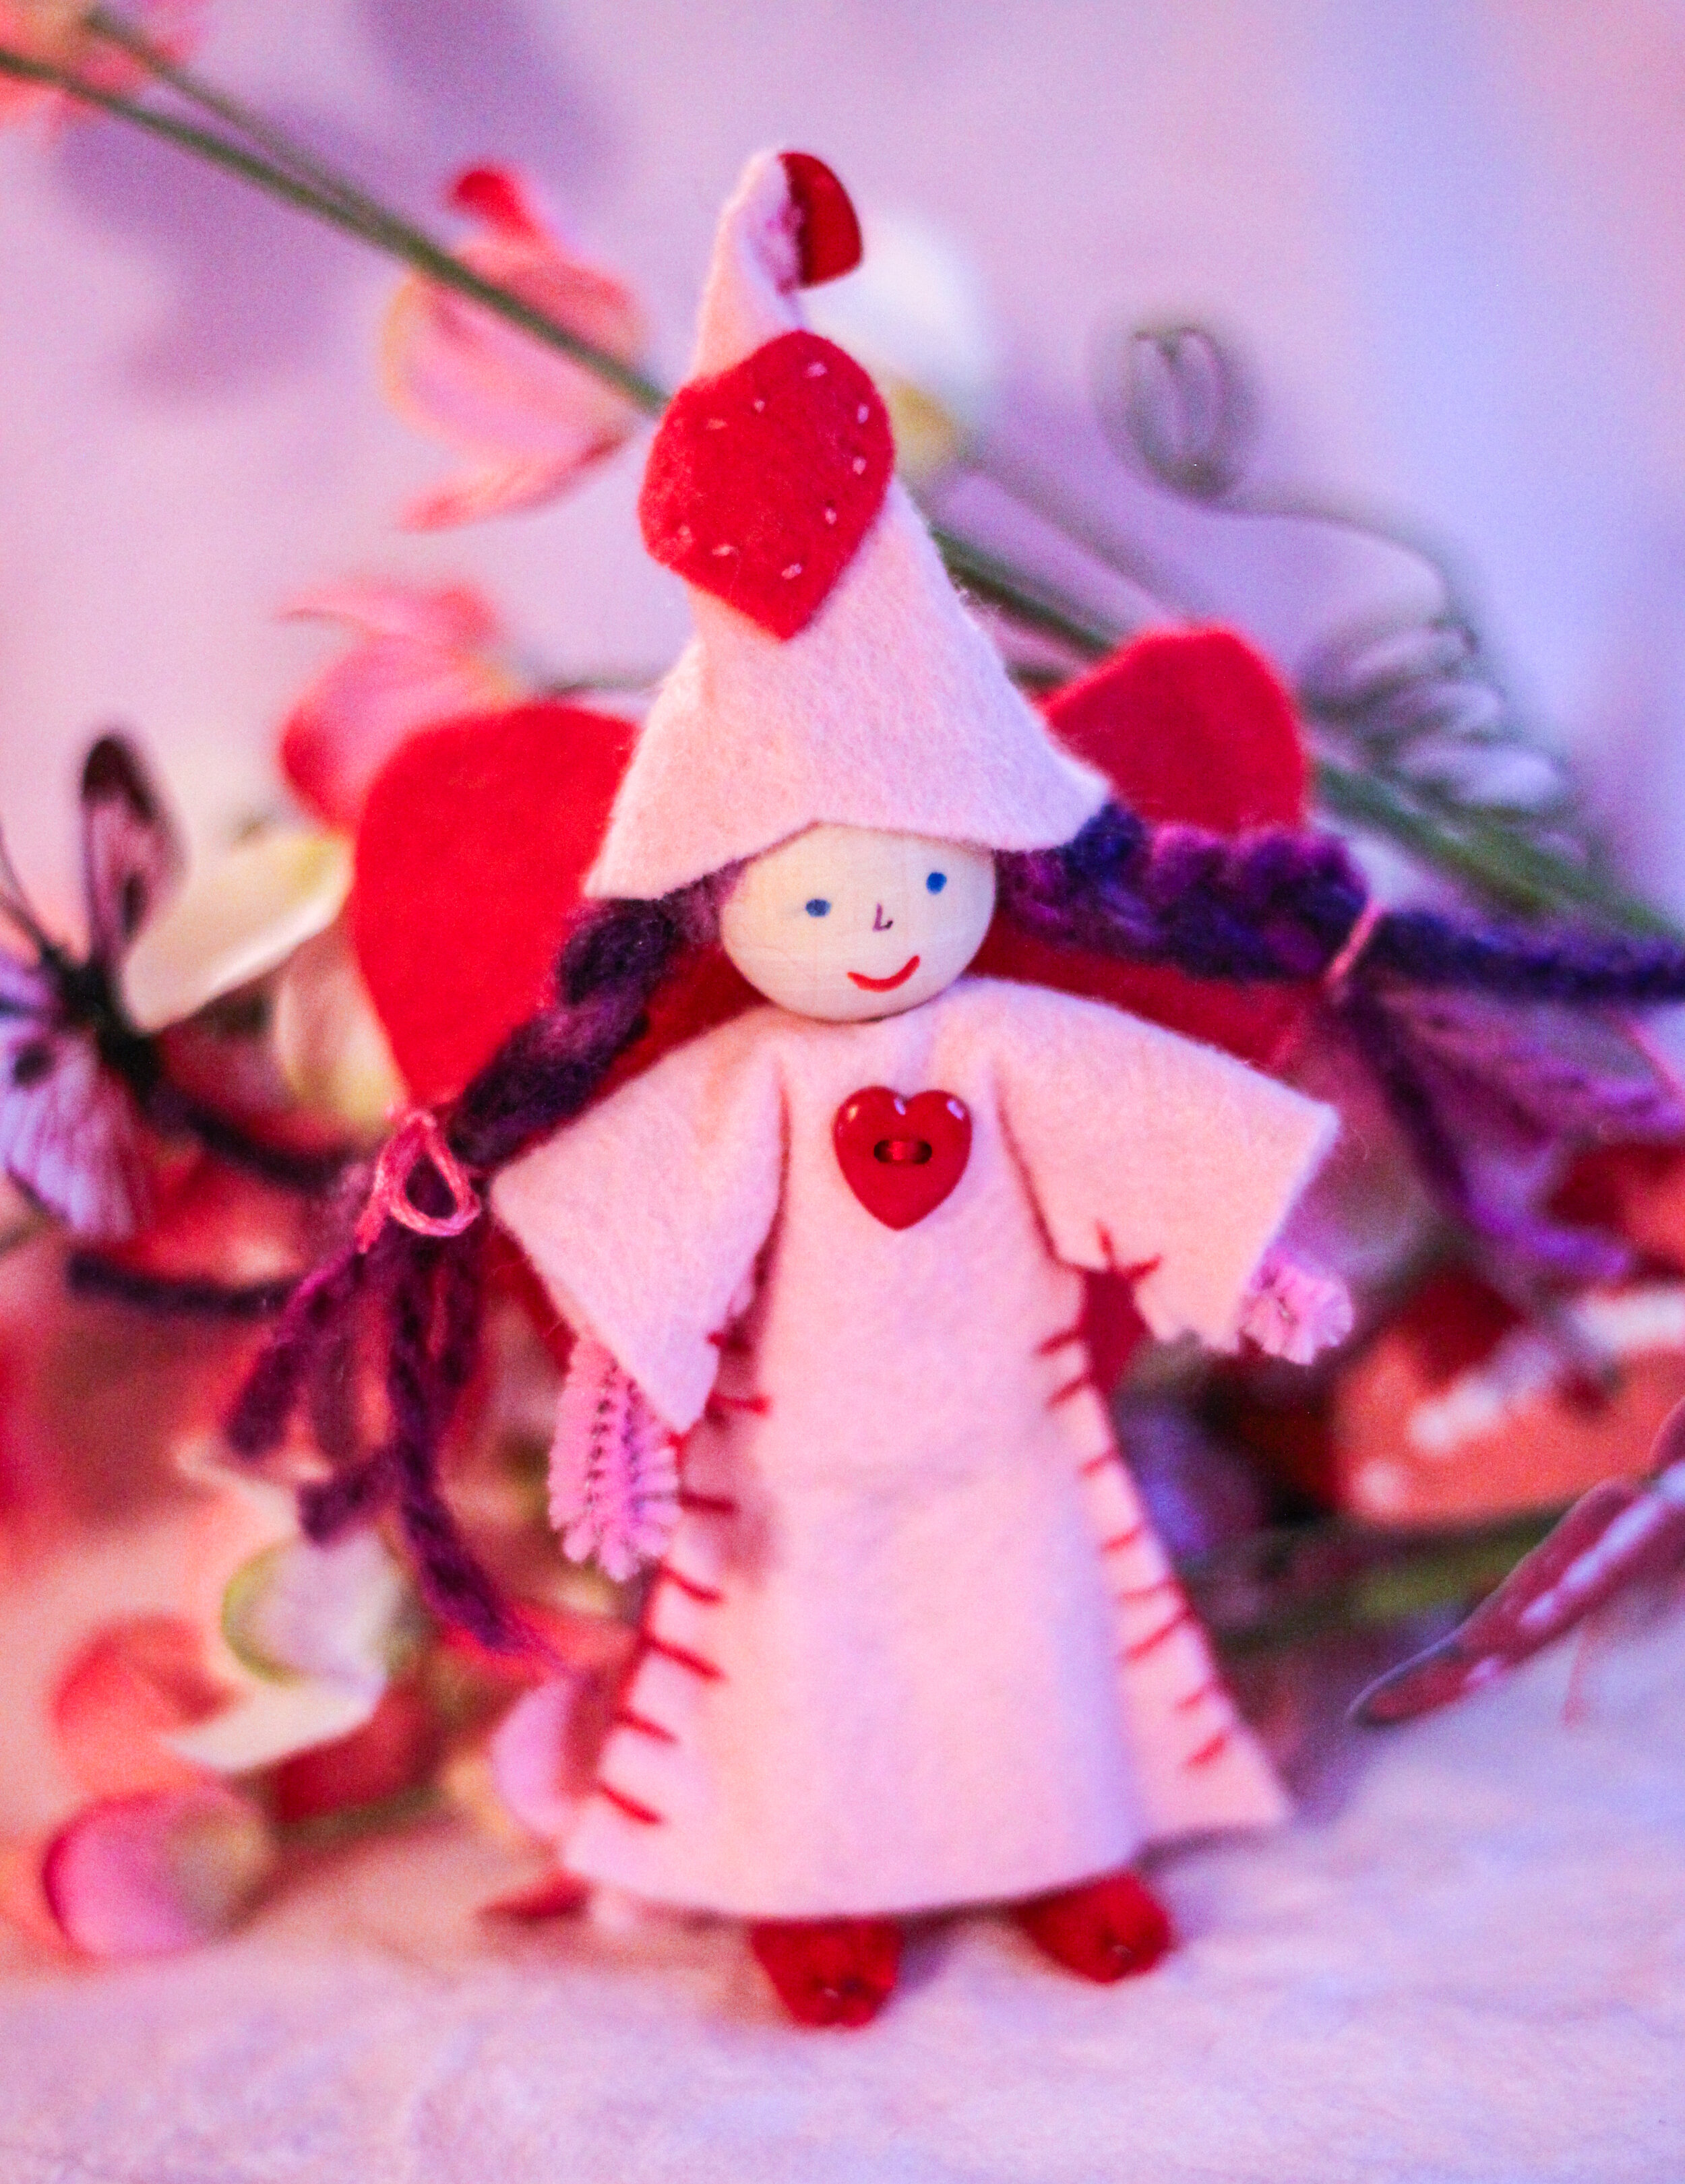

Children value hearing that everyone, even adults, need to try things that don't work in order to discover what does work. I enjoyed this version of her heart-shaped hat, which is in the book. Her wings, though, were a draft on the way to a design that I liked better. And I knew that sewing all the little seams wouldn't work in a classroom setting. Creating is learning.
I had many, many discussions with students about what we called “The Mind of a Maker.” After all, people who make things of all sorts face challenges, frustration, and inspiration. Children really enjoying discussing how everyone, even adults, keeps learning and growing. Sometimes the most valuable part of crafting isn't the craft after all ❤️

A Gratitude Book
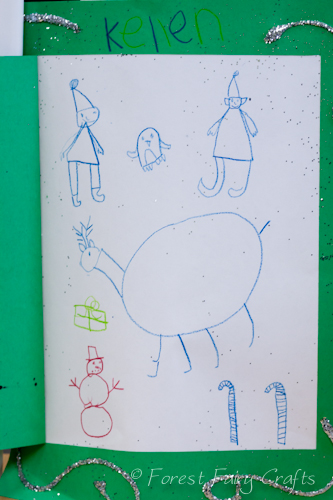
The first day of November starts one of my favorite classroom projects- the gratitude books. The idea is simple enough. Each day, children wrote one page for a book that I put together for them to bring home before Thanksgiving. We created books for a number of years, which gave me additional ideas and perspectives on how to inspire and support students along the way. The good news for all of you this year is that I made printable PDF pages to jumpstart your child’s creativity.
You can start the book anytime (and any time of year). You can complete one page a day or a page a week or multiple pages a day. Whatever works best for your children or students.
All of our projects are invitations. Take the idea and make it your own. The templates are set up to be half pages that you can print, cut in half, then staple or punch holes to thread yarn for binding the book. Your book can be 5 pages or 50 pages. I recommend not binding the book until you reach the end of the project. That way you don’t find yourself either with blank unfinished pages or running out of pages. I kept them in a folder. This way, too, I could shuffle pages that a child had already completed, and they could read the pages to me before adding a new page (massive reading practice reinforcement). And students could plan the order of pages before we assembled the final book.
Creating pages itself is fun. The real magic, however, is what happens as children plan pages.
The idea is simple. Make a stack of pages- blank or use our template or make your own. Each day, the child adds another page. They write the sentence (or more if they want) and illustrate it. The only guidance is that each page needs to be different- choosing dogs, dogs, dogs, every day becomes repetitive. However, if they want to vary the dogs- thankful for black dogs and spotty dogs, that’s fine. Here’s why-
They start noticing things throughout the day.
In the beginning, I say that it’s fine to use obvious/easy answers. Some children go right to “air” and “food”. They eventually run out of easy answers. And that’s when they start paying attention to plan the next day’s page. If they get stuck, I’ll ask for details. What’s your favorite food? Or your favorite place to go? But mostly I try to stay quiet and let them simmer ideas and choose on their own time. They know that they need an idea for the next day, and eventually, they realize that paying attention can give them an idea before they sit at the table to write.
The original book project was a daily activity during group time. You could easily change the duration of the project for whatever is available for your family, classroom, or group. The pages can be made in an afternoon or over a number of weeks.
One way that I make it easier for younger children is to write the beginning of the sentence because the goal for me is thinking and writing unique ideas. The templates use a gray font because I would encourage children to trace the written letters if possible. Tracing takes less brain-power and reinforces the spelling for later. If students are tired or overwhelmed by that quest, skip tracing the letters.
A supportive idea for their own words is that they could tell you the end of the sentence and you write the letters lightly for them to trace, or they use a colored pencil over your letters to make it colorful. For very young children, you can write the words and they draw the pictures.

As with all my projects, I ask myself, “What is the goal?” If the book is going to be shared around at Thanksgiving, you may want to pay closer attention to correct spelling and neatness. If the goal is an immersive celebration of all the wonders of a child’s life, then don’t worry too much about neatness and correct spelling.
And I guarantee you, they love reading this book. By having the first words exactly the same on every page, it builds confidence for early readers.
With older children, I encouraged looking for details. Why say cats when you mean super fluffy cats? Why say food when you mean garlic mashed potatoes with gravy?
I encourage adults to create their own books as well. Show that appreciation continues through all of our years. This year, in particular, brings massive challenges. Yet the appreciations are so sweet. I appreciate my fluffy black and white dog that cuddles throughout the day.
Further ideas and notes: you can make the book resemble a scrapbook. Collect leaves or look through old magazines for images that inspire. Add them to pages. Use watercolors or paint or stickers. Give students room to imagine how each page can express their ideas. By assembling at the end, you won’t worry about paints smearing onto other pages. Feel free to let children express their creativity. I am so grateful for that!
Our template has a text box and another page with a line. You can add more lines, or a top line and dashed middle line if that matches your child’s learning process. It’s easier to add lines than remove them :)
If a child wants to write more than one page a day, that’s totally fine. Some students wanted to write many, many pages. When you assemble the book on a date instead of binding it in the beginning, making a page a work of art won’t damage other pages.
We hope that you enjoy the project! The Gratitude Book was a delight to create and read with students. And they were so proud of their books (as they should be).
As an added bonus, children went to Thanksgiving celebrations with plenty of answers to “What are you thankful for?”
We’ve included a “print” font version and a “handwriting” font for practicing cursive. Both can be printed on printers. Enjoy!

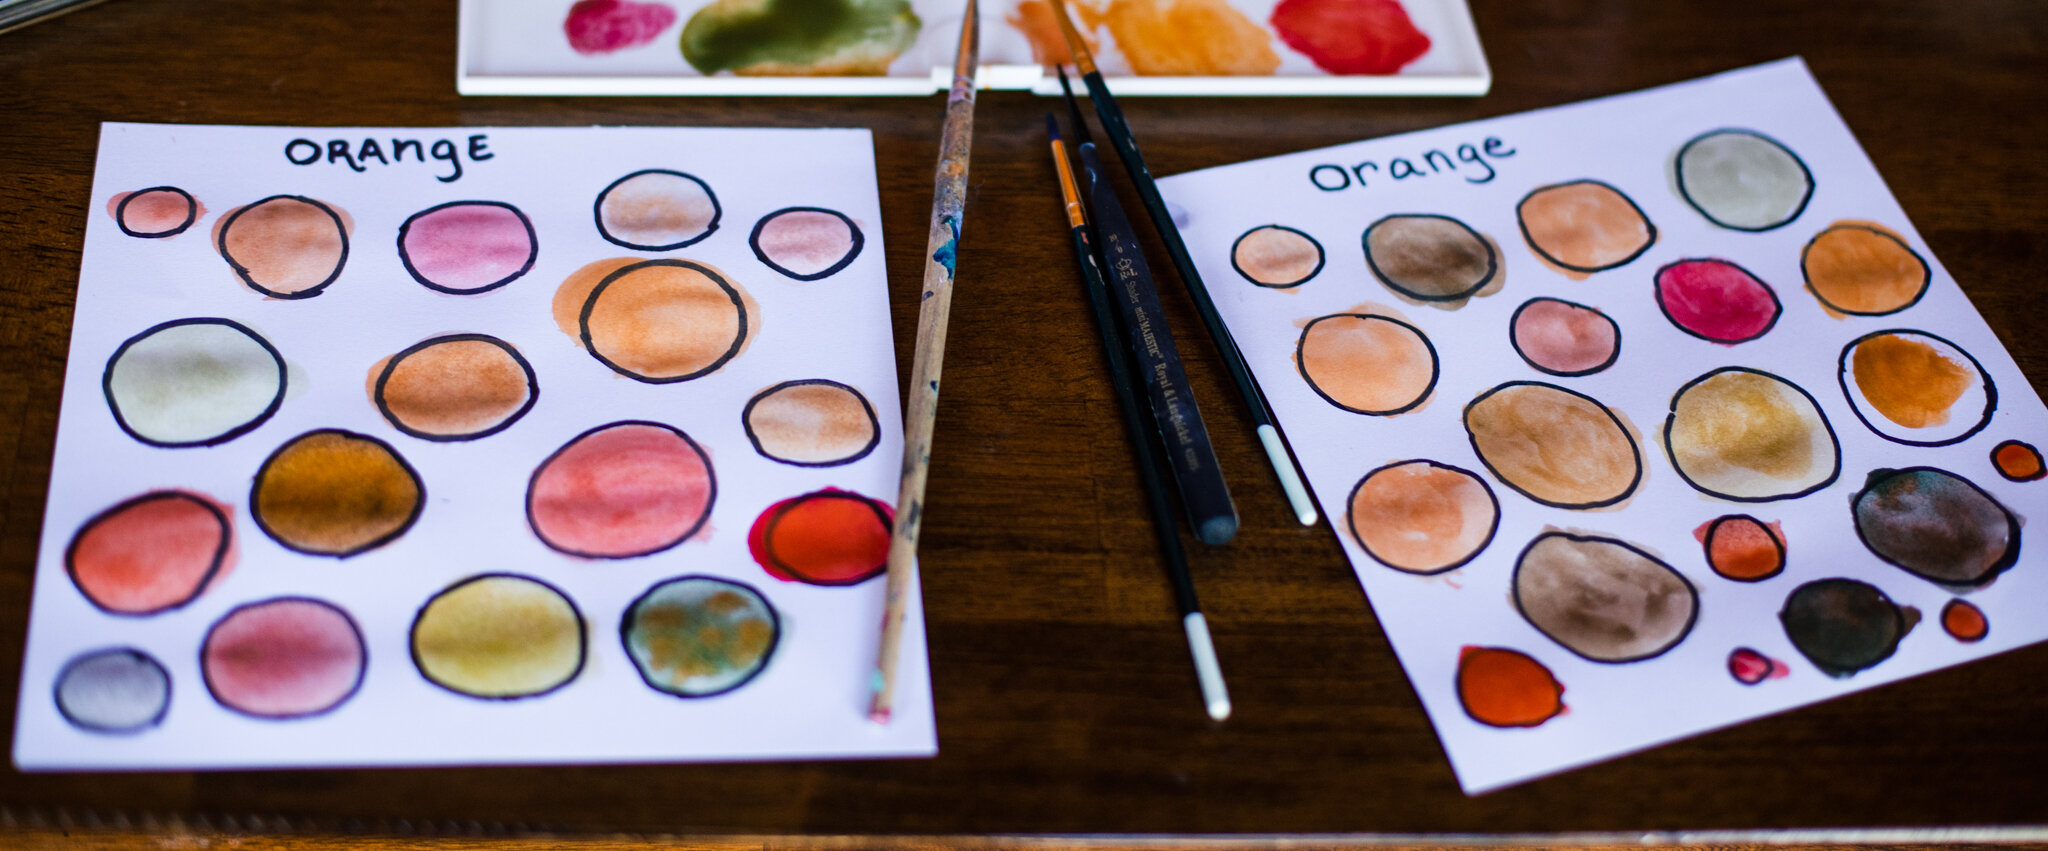
Art Inspiration with Color

This week we are juggling middle school distance learning with * waves towards everything else *. And we are so fortunate to have the ability to stay at home. I manage to work from home, though productivity is extremely challenging. This project was simple and engaging. I approached it as a science, open-ended process art project. And he actually loved the results. So win-win!
Prep:
Using a sharpie, I wrote the main color- his favorite color- at the top of the page. He could have written it himself but I wanted to make it an “easy onramp” because the resistance to “work” is real (and exhausting). To be honest, I get it because I feel that undertow too. I know that engaging in activities is rewarding, though, so I made this as easy as possible to start. Anyway, I drew circles across the page. Imperfect circles with different sizes (easier for me) with a sharpie. It has to be a pen that doesn’t react to water because that will mix with the paint.

Painting:
I set it up with him with the question- how do colors interact with orange? Mix them on your brush or on your paper. What causes different shades of orange?
We also talked about water tension and that if he didn’t have water go outside the circle, the paint would stay in the circle as well. Then we ended up going outside the lines a bit too.
He really enjoyed creating different shades of orange. And we got to continue the conversation when the page dried and colors changed slightly.

What we learned:
The paper influences the mixing a lot. We used a sketching paper that soaked the water quickly so it didn’t work to mix in the circle as well. We ended up mixing more directly dipping the brush from one to another color. Once he mixed two, I suggested three. We also mixed on the lid of the paint tray. Our paints, by the way, are Lyra watercolors available on A Child’s Dream Come True.
It would be fun to try with watercolor paper where you could drop one color onto the other on the page and see them interact.

This is a fantastic project for scientific “what if” questions. There really isn’t a wrong lesson for children to learn. I ended up painting beside him because it was fun to try different combinations.
Oh, and it may be surprising to see how some colors “play well together”. If you group warm colors together, and cool colors, similar colors (warm-warm or cool-cool) will enhance the chosen color. This can also be called analogous colors on a color wheel. But adding the opposite, like adding blue to orange, makes the orange look gray-green. Why? It connects to the idea of complementary colors that react differently with the chosen color. You can learn more about colors by researching.
We strongly encourage children’s curiosity, especially if they ask, “Why?” That gives you an opportunity to go learn more. The first step is observing, which means letting children try things and ask their own questions. Art is a wonderful way to explore ideas.
Of course, you can use different shapes, too. Squares, rectangles, triangles… lots of creative potential. We hope you have fun experimenting with color 🧡

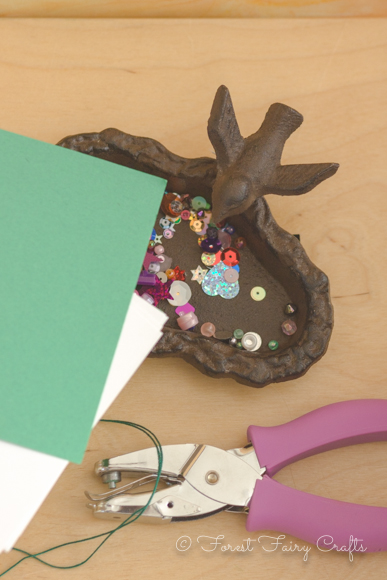
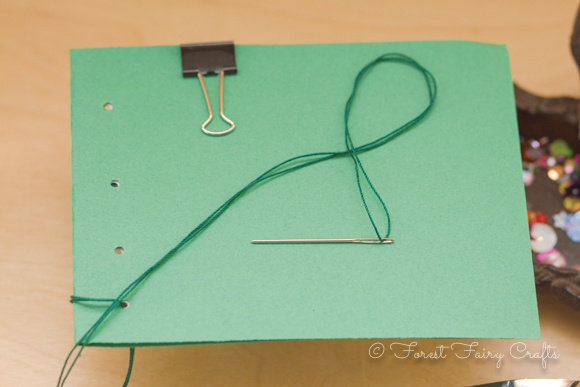
Sew a Book
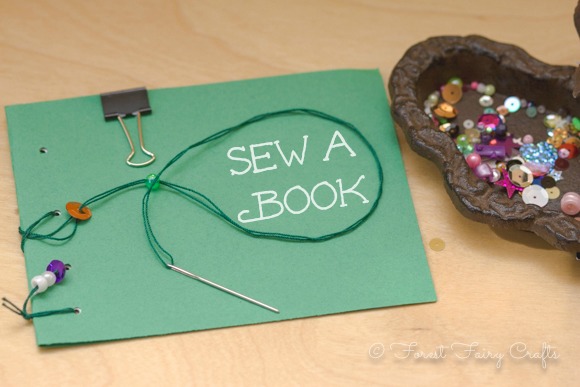
Once upon a time, books were treasures. They were kept in castles. They were guarded. And only a few very chosen people were allowed to read them. They were valued like gold and jewels. Because each and every book was made by hand. People worked hard to create paper. They lettered each word with ink and a feather. And then they had all these pages. How did they hold the pages together?
They sewed them.
Children found this idea fascinating. We looked in books to see the bindings. Most have modern glues. We did find a few with stitching.
I shared a few ideas for stitching their own books. They loved becoming authors and illustrators after sewing. I invited them to write about anything they wanted. What freedom! It could be fiction or non-fiction. A field guide to flowers in your yard or to dragons. We saw books about kittens. Books about the seasons. Books about unicorns. And books about flowers. I plan to revisit the idea and make more complex designs throughout the year. A wonderful first sewing project for all ages.
Ages
- All ages (these were with 5-8 year olds). Older children got into the history of bookmaking. They also dove into the writing and illustrating of their own stories. Younger children enjoyed threading beads and sequins.
Supplies
- Paper
- Construction Paper (or watercolor, anything for a cover)
- Needle and Thread
- Hole Punch
- Binder clip
- Sequins and beads
Preparation
- I cut the paper (any size works). I cut the construction paper so it could fold around the white paper (double the length of the white paper)
- I folded the construction paper around the white paper and secured with a binder clip
- I punched four holes along the folded binding edge. All the papers were now held together with the binderclip, keeping the holes aligned. Aha! moment :)
- I doubled and knotted thread on the needles (tips about our needle and thread choices are in our book
)
- I tied the thead around the first hole- actually went through and then back up through the loop in the thread. Any knotting will do. The books were ready for sewing!
With Children
- We talked about history and sewing. We talked about taking our time. I showed how the needle can go back through a hole more than once to create a decorative binding.
- We talked a lot about not taking the binderclip off until after you sew through the holes. Pages will slip!
- Children threaded beads and sewed beads and sequins along the way.
- They discussed what they would write and draw. We talked about books with no pictures and books with no words. They really got to thinking about the process of creating a book.
I tied off threads and they drew and wrote. As long as the threads didn't wrap around the open side of the book, it was all good. They loved their books for many reasons. And wanted to make more! Which is always good. Love inspiration :)

Wishing you happy sewing today!
Please note: This post contains an affiliate link. Should you decide to purchase our book, a small percentage returns to the forest. Your price remains the same. Thank you!
Playing with Craft
Children love inspiration. Don't we all?
Making toys inspires children. They delight in the power of their hands and ideas. I recently sewed these lovely baby leprechauns with six year old students. Children sewed all their own sequins, around the fairy baby, and added stuffing. They were delighted with the little toys they made.What a treat, to see that magic through their eyes. Look what we can create!
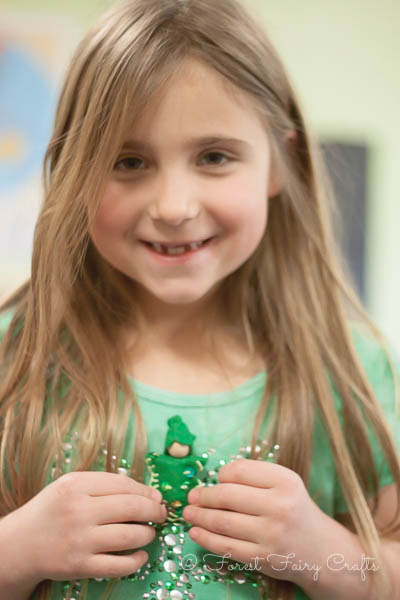
Sorry this one is a little blurry- classrooms have tricky lighting for my camera :)
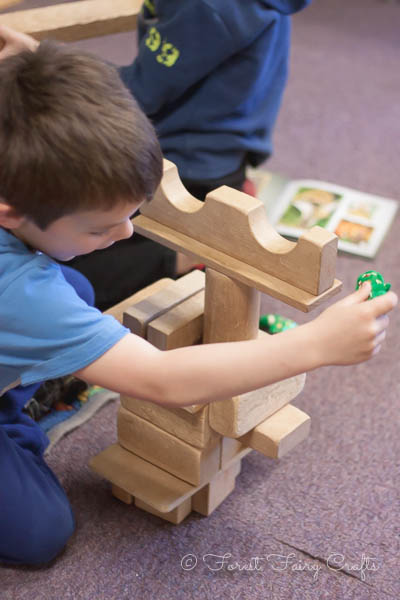
Then the children reminded me the real fun of sewing and crafting. Crafting is inspiration. And the craft is just the beginning. Crafts inspire play. And play inspires storytelling. And learning.
Now that they had little friends, they needed houses. What could build a house?
Blocks of course!

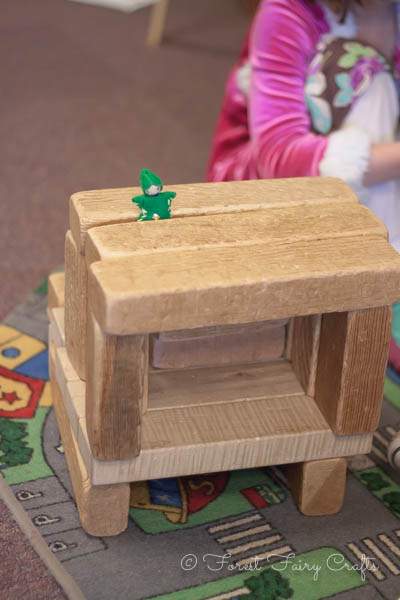
And some homes need a diving board into a lovely cool pool.

With a luxury view from the bedroom.
Legos also make awesome homes. With an open door :)


I encourage students to leave blank faces so they can imagine any expression, but a few insist on adding features. I let go when they have strong feelings towards needing eyes or mouths. After all, if I wanted it to look 'my way', I would make my own :)
I loved her idea to put a ring over the ruffled hat for an even fancier crown.
And finally, dollhouses are wonderful homes. Especially when they come with a pet tiger :)

Enjoy what you create!
Happy day :)
Many of our crafts are "Keepsake Crafts", meaning they look nice for years and become a treasured memory alongside the sweet sewing. Every now and again, I sew "Process Crafts" with children. These are the crafts to shove in pockets and forget outside after playing in the trees. They are the crafts that are meant for playing. They are a chance to let go. Don't worry overmuch about colors or forever. Let them become a memory. Become part of a story. Have fun crafting and playing :)
P.S.- if you would like detailed directions for making little fairy/gnome friends, check out our Forest Fairy Craft Book. Please note- is an affiliate link. Thank you from the forest should you decide to purchase one! Directions for the little hats are online here. Enjoy!
Thankful for Nature

Our world is amazing. Whether we live in a forest, or a meadow, or a city, magic is right outside our doors. This time of year, we love talking about gratitude with family, friendships, food. One of my personal favorite actitivies is bringing children outside and asking them, "What do you appreciate here?"
Having things to touch and explore and collect helps children notice the world that can easily be taken for granted. We can walk past trees or building. It's easy to focus on the destination: going to school, to the park, to the store...
This time I just go outside. I invite children to collect one treasure (maybe two). I wander. On purpose.
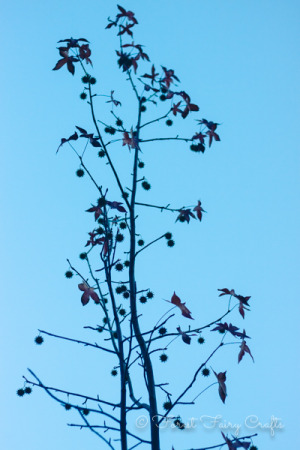
We look up.
We look down.
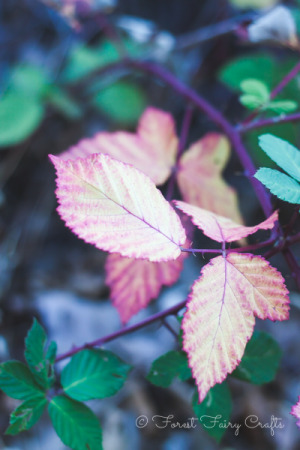
We notice the passing beauty all around. And we ask questions. We become curious. "What are the spiky things on that tree?" "Why do these leaves change colors?"
This appreciation is simple. And lasting. Children share their treasures.

I love photos because I can take a picture, then they can leave nature in the forest (or side of the parking lot, which is where he found this tiny pine cone).
They are so excited by their discoveries.

We slow down and notice how the air feels. How does the sun feel on our face? The breeze in our hair?
We are so fortunate, to have these gifts around us every day. No small things.
When we finish the walk, we write poems to remember those feelings. Those discoveries.
To remind us. The world is an amazing place. We have so much to be thankful for :)
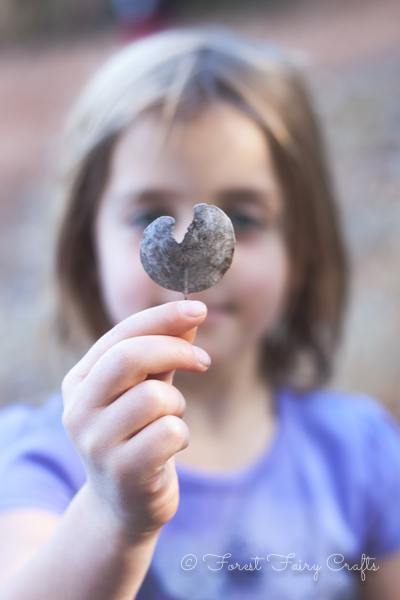
She found a leaf shaped like a heart.
We also place our treasures in a display. Since we are a class, one or two things from each child create a diverse collection of leaves, acorns, and tiny pine cones (these are returned to nature within a few days). With my family, each child collects a little more.
I have ideas to look for colors as we wander. Appreciate red in our world. Appreciate green :)
Appreciate now :)
I write the poem with them by asking for feelings, not stories. Their individual contributions create a lovely poem :). I usually write the closing sentiment to tie it all together.
- Take a walk
- Wander
- Slow down and share the moment (say how it feels)
- Collect treasures (gently, no living things)
- Create a display
- Draw or paint an image of a favorite treasure or scene
- Write a sentence about the walk or what was discovered
- Write poems (or a group poem)
- Put photos, drawing, and/or poems togegther for a fall book
P.S. If you would like to bring a fairy along on your walk, that would be lovely! Give your fairy a tour of our magical world :)
Enjoy autumn :)
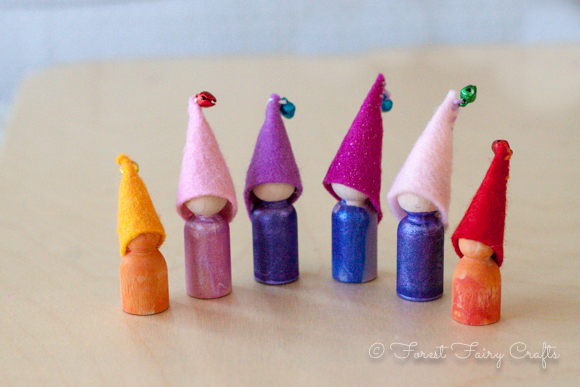
Game Token Gnomes
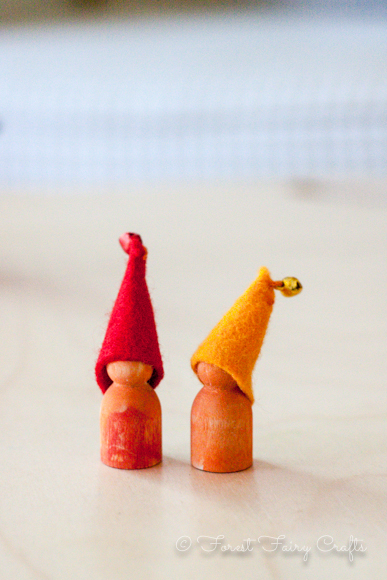
We are delighted to team up with the lovely people at SewMamaSew. The free tutorial for Gnome Game Tokens is posted here.
I love to share a little behind-the-scenes :)
The entire project inspired us! I used to make these games and tokens with my second grade students. We drew a game-board and sewed gnomes to travel through the game. I adore the creativity that children bring to game-making.
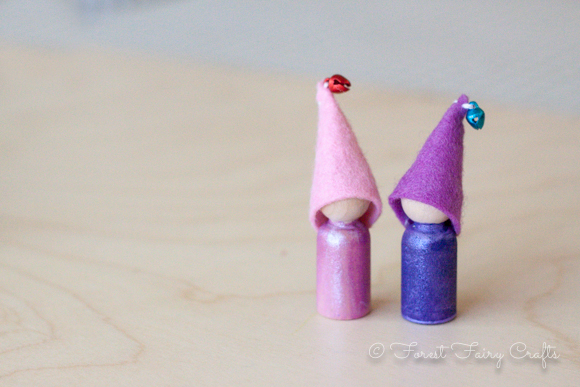
Even younger children love making gnomes. We decided to use paint this time around. It worked really well. We used regular watercolor paints. Ian chose the wee size gnomes. Of course he chose orange, orange, orange.
Anika is a unicorn-and-rainbow-girl these days, so her game featured a forest and garden where the unicorns could play. We drew the boards, then decided paint would be great, too. This project kept us busy for awhile :)
Our neighbor-friend came over and made a couple of gnomes, too. Here is the finished family! Our paint had a tinge of sparkle in the watercolor which gives them a shine. You could add a little glue and glitter after the paint dries for a similar effect.
We had to talk Ian into one red hat. He wanted orange, orange, orange, until we explained that we needed to tell the gnomes apart.
The gnomes ended up traveling on a few trips with us. I didn't worry about losing them since the process was so fun and we can easily make more. Every once in awhile, a craft becomes a treasure and I don't want it to be lost at the park or on a far-flung adventure. These were perfect pocket-pals.
Afterwards, Anika decided that her game needed cards with specific instructions. Their games kept growing as they thought of new fun additions. We used dice from another game box. The finished activitiy was just as fun as creating the games. We are all inspired to create new ones :)
We hope that everyone enjoys the tutorial! Thanks again to SewMamaSew for the opportunity! What fun :)
Math Sculpture Game
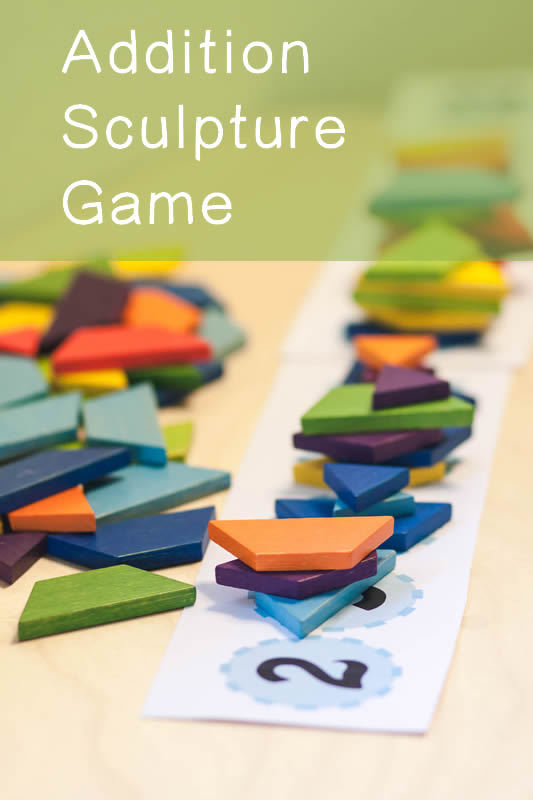
In my class, we love playing games to learn. A big skill is learning addition so it isn't a chore- with 'automoticity' as we teachers like to say. We want addition to be easy like 1+1. Which means lots of practice. I created this game to encourage practice while having fun.
The Math Scultpure Game goes beyond the game where children roll to cover all of the numbers. This time, use a material that can build: pattern blocks, little flat stones, Legos, whatever can make a tower. For this game, keep adding an item to a number with every roll of the dice. See which tower grows the tallest!
What fascinated me with the game were a few fun effects. One, children kept building even after covering their numbers. They wanted to keep growing the sculptures. We called them towns and we called them glaciers and we called them coral reefs. You can make the building match whatever thematic idea you like. This was an unending game (which I loved). And very cooperative.
Second, the children noticed a pattern. The buildings in the middle grew the tallest. 2 and 12 were usually the shortest. This led to early observations about probability and the many ways that you can make 5 with two dice vs. 12 (only 6+6). These mathematical and scientific deductions were fun to facilitate.
Finally, this was an engaging game for single or paired children. Originally, I had students take turns by passing the dice, rolling, and adding. Then they realized they could each roll a dice and add the results together. Turns every turn! Which is real invested learning- hurrah!
As a bonus, I created a board with 1-6 for my early learners who are still practicing number recognition. For this game, they used one dice and stacked to match the number of dots to the written number. This game was more straighforward and gave excellent practice for a necessary skill.
The game boards are free to download for personal and classroom use. Enjoy!
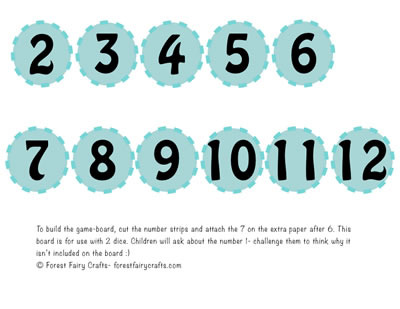
Click to Download the Math Sculpture Gameboard PDF

Click to Download the Number Recognition Gameboard PDF
All PDFs are the property of Forest Fairy Crafts. Please contact us for commercial use permissions. Thank you!
Christmas Sketches
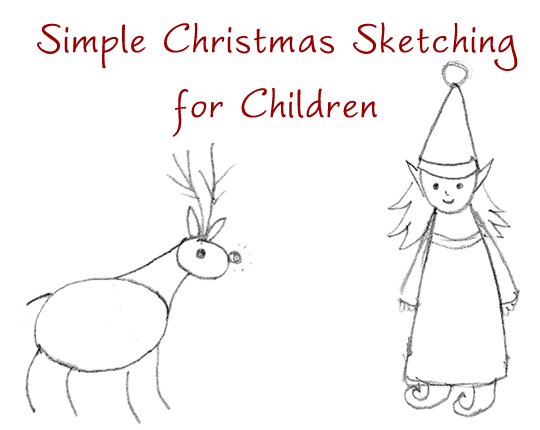
We draw a lot in our classroom. And, every year, students ask me for help.
"How do I draw an elf? How do I draw a reindeer?"
As often as possible, I encourage their own ideas. "What shapes do you see? Where can you start?"
My students are 5 and 6 years old. Especially around the holidays, overwhelm may rise up at any moment. So this year I decided that a little inspiration could go a long way. I made simple sketches for them in an easy, one page format.

Clicking on the image will bring you to a larger size you can print for personal or classroom use. I also have a PDF you can download with both pages.
At first, I planned to fill the back-page with more drawings. Except I ran short on quick, easy ideas.
Then I had my own inspiration. Words!
Of course! Children love to make cards and decorations. They could use a word-bank for holiday ideas.

As often as possible, I used a visual cue to help show the written word. This helps our early readers.
We realized that I forgot an angel and train along the way, so they are on the back too. I print these out double sided and keep them available throughout the season. Children love to color them and use them for project ideas. Children usually take my basic shapes and create with a lot more detail in their finished projects.
So fun!
Please be aware, I drew these with student-help after school in pencil :). They are a little rough through my eyes. When I scanned them, the pencil transferred light so they may not print perfectly. If I wait to make them perfect, though, they will never be posted for you :). Also, the light writing gives children a nice chance to trace letters!
I hope these sketches inspire us to create more winter scenes. Let's draw together :)
Enjoy!
Christmas Sketches and Words PDF Dowload
All resources are property of Forest Fairy Crafts. Please contact us for commercial use permissions. Thank you!
Gratitude to Day 5

We wrote sweet ideas to catch up over the weekend. They were thankful for their pets, their school, and their imaginations. And their friends. Once the ideas start flowing, they cascade into a beautiful collection. I look forward to seeing the new page tomorrow. I hope you are keeping your books writing a little each day. We will get there together :)
Best wishes!
Gratitude Day 2
Students love this project! We wrote a few pages today since we won't see each other over the weekend. We also had gratitude circle today. They veered into silly-land for a little while with "I am grateful for my hair, and I am grateful for this candle." Then one boy had that wonderful moment where he said, "I am grateful for my hair and for my eyes and for myself."
Our page for the day!
Gratitude for ourselves. After all, we are, all of us, miracles :)
Wishing you a joyful day!
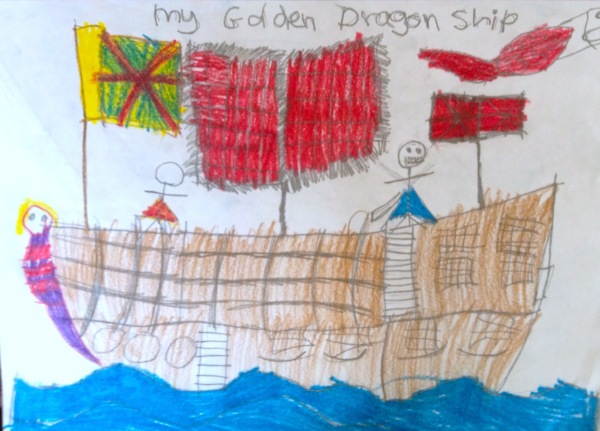
Pirate Week Adventures
This year I focus on a mini-theme each week in the Dragonfly Class. We are a kindergarten/first grade class. Our activities become a rotation during Groups or a whole class writing adventure. Activities need to be very flexible for many different skills. And my goal is high interest opportunities for learning. I want them to take these activities home and add to their ideas.
My hope is to have photos to share, but that didn't happen for Pirate Week. Too busy :) ... Wait, I have their ship drawings to assemble the Pirate Fleet Book. I took two photos to add, hurrah.
I still want to write our activities to capture them for the future, because I know I will sit down next year and think, "Now, what did I do last year?"
Pirate Maps: I cut brown paper bigger than usual so they could roll their maps. These turned into spyglasses very quickly. We marked the treasure and drew a path to find the treasure along with landmarks. Children loved these outside at recess.
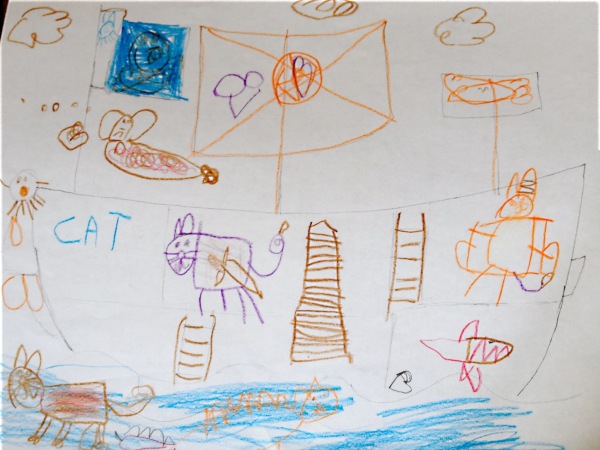
Pirate Fleet: I drew a pencil sketch of a pirate boat very simply and made a copy for each child. We discussed how pirates lived on boats and had to bring everything along with them. Each child then got to design their own fantasy ship. I drew with a cut-away design so they could show me the Captain's Quarters and add a hot tub if they liked. Some chose to color the outside of the ship, which was fine too. We had Kitten Ships and Ninja Ships and Mermaid Ships. Children became very creative and excited about the adventures these ships would find. Which led to....
Pirate Fleet Stories: I met with each child so they could tell me the story of their pirate boat. We had danger, beauty, and adventure on the high seas!
Pirate Flash Fiction: This was an idea that I had for groups for a shared writing project. What is each student wrote (or dictated) one sentence to their parent helper at group-time. At the end, we would read the sentences for a story about the Dragonfly Pirates. We had a lot of treasure-hiding and treasure-seeking and battles with Kraken. The children loved hearing their separate pieces come together to make a whole story.
Bonus topics during our two days (yes we did this is two days since I teach part time) included discovering the world, monsters of the deep (giant squid), and pirate discipline. Pirate captains gave time-outs too! Except they tied someone to the mast for awhile. We didn't go into great detail about pirate discipline, but the children found boat-life fascinating. I became the pirate captain and they all called, "Aye, aye, captain!" when I gave a direction like, "Wash hands for lunch."
Oh, and we talked about pirate flags and communicating on the high seas. Cell phones didn't exist in pirate-times so they needed to announce their arrival in a scary way. Children were fascinated by the idea of using images to communicate. They enjoyed designing their own flag on their pirate ship for the pirate fleet. I could make this a separate activity and even use fabric to create flags.... Another year :)
I also had the idea to develop a pirate persona with a chosen name, outfit, and companion (pet). This could connect to the pirate boats. So many ideas! And the children loved it because the idea of sailing the high seas searching for gold is always an adventure! Not to mention, sprinkling a few arghs! and avasts! into everyday sentences is great fun!
A pirates' life for us :). I am glad I remembered to write everything down.So this was a lot longer than I expected. We packed a lot of pirate fun into our days! I hope you get to enjoy life's treasures today!
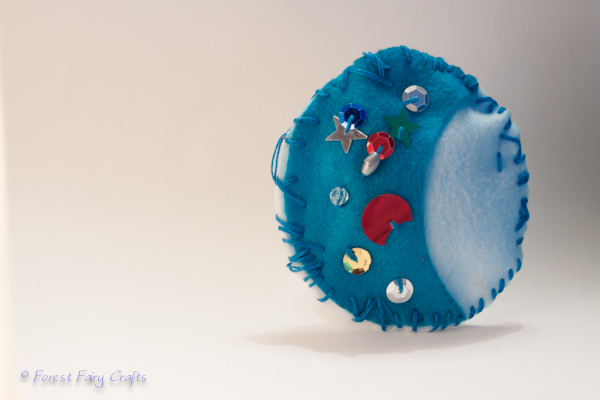
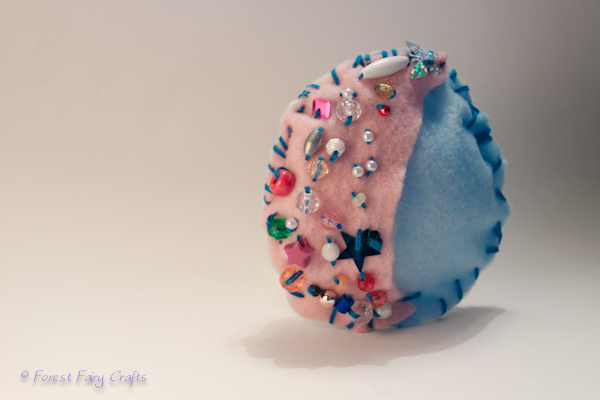
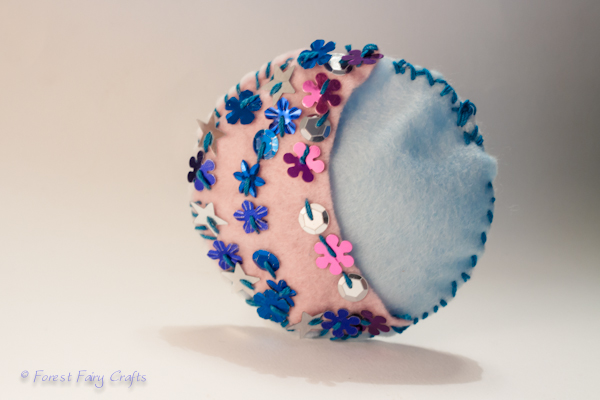
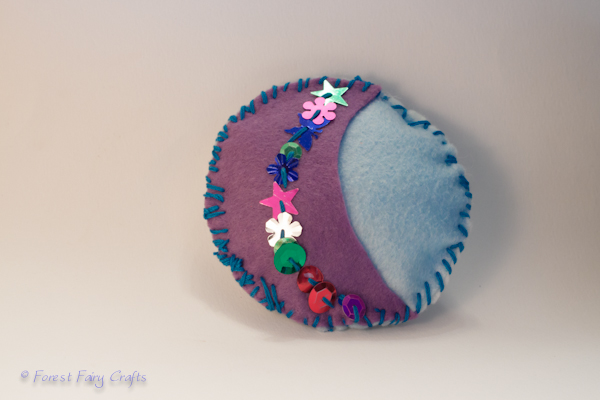
Moon Pocket

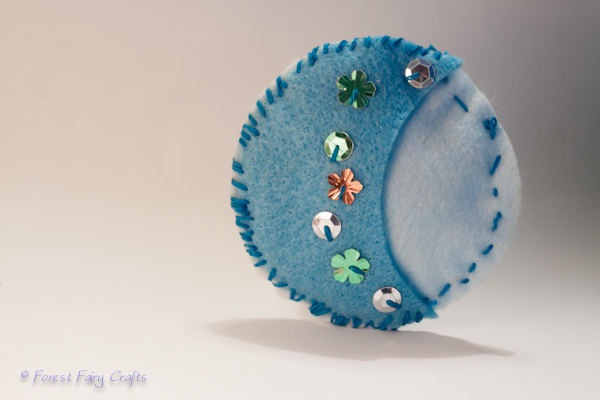
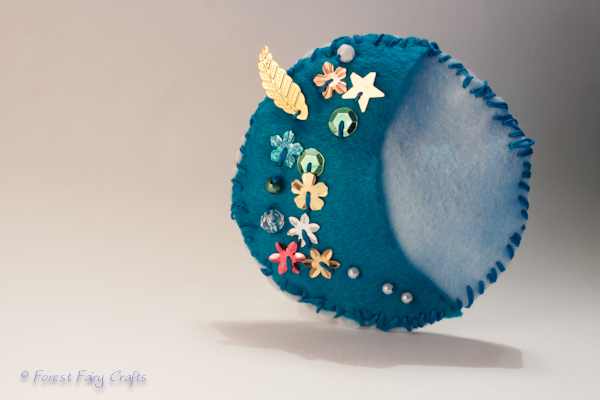
These Moon Pockets brought sunshine into my day. Students in our first grade class sewed these beauties. I am in constant awe how we can provide students with the exact same supplies and directions, yet every project reflects the crafter in colors and stitching.
Before sewing, we discussed treasures. The moon on the front is a pocket where children can keep teeth for the tooth fairy or little notes or any little keepsake. Our last step is stringing a little ribbon to hang them.
Children are careful, conscious crafters. This moon has a pattern of flower, moon, flower, moon. This meant choosing them from the bowl of mixed-up sequins. What a lot of work!

A big challenge for grown-ups helping sew is how much to help, and how much to let go. Hopefully these images might inspire Letting Go as a help-strategy. Even wild stitiching is lovely!
At first I thought I would photograph a few to share the idea, but I couldn't choose a favorite! They are all charming.

This next one always inspires a smile.
And simplicity is amazing, too. I like how this student used a whipstich around the moon and a running stitch to finish the pillow. I wouldn't have taught it that way, but it works. And the one simple line of sequins is beautiful.
I love when sequins break out of the felt 'boundary'. This little leaf sequin seems to be floating down to land in just that spot. Very sweet. And these tight tiny whipstitches are so careful!
Another simple line of sequins frames the moon. I can see where the crafter started to get tired and stitches got farther apart. Sewing is hard work!
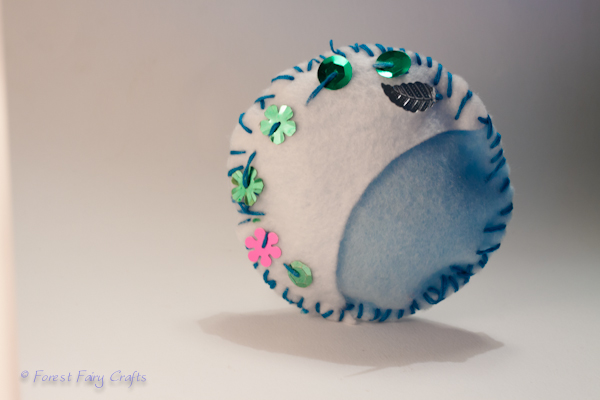
Here the sequins found many lines. This crafter was careful with colors as well. I notice patterns again, flower, moon, flower, moon. What dedication.
Another line of overlapping sequins. Again, those tiny little whipstitches amaze me.
We teach a K/1 class and our first graders stay in the afternoon. We have a much easier time sewing with the smaller group. These children are 6-7 years old. They had experience sewing with us last year so they know the basics of controlling the needles and adding decorations. This year will be fun for crafting!
Asia and I are working on directions for these Moon Pockets that will be available soon. If you would like hints about sewing with children, visit our Tips and Tricks. For now, I hope these inspire you like they inspired me! Best wishes!
Sweet Simple Reading Nook

We woke to cloudy skies. Cozy sounded perfect. So we pulled out a few goodies and created a lovely reading space.
We used our old crib mattress and lots of pillows. The big ah-ha moment happened when I pulled out a sheer curtain. What a perfect roof! It is light and airy and easy to tuck behind cusions. The light filters though with just a little magic.
The kids were in love.

For less than ten minutes of construction, I enjoyed ages of shared reading. They laughed and read to one another.
To be truthful, after the reading, the tent became a horse-home and that game lasted quite awhile. Until the tired horses discovered books again.
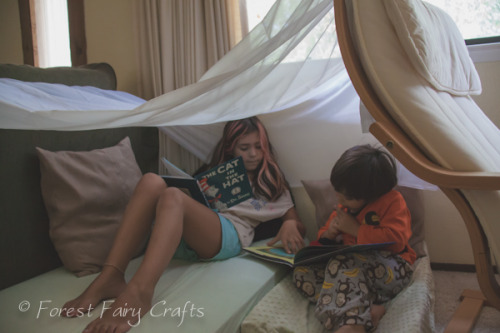
Amazing what magic a curtain panel can inspire :)
I hope you get to make a nook of your own :)
P.S. I was inspired by these fancy book nooks- maybe one day :)
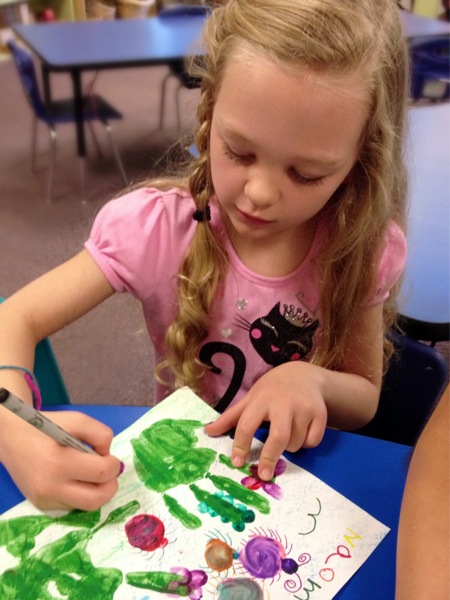
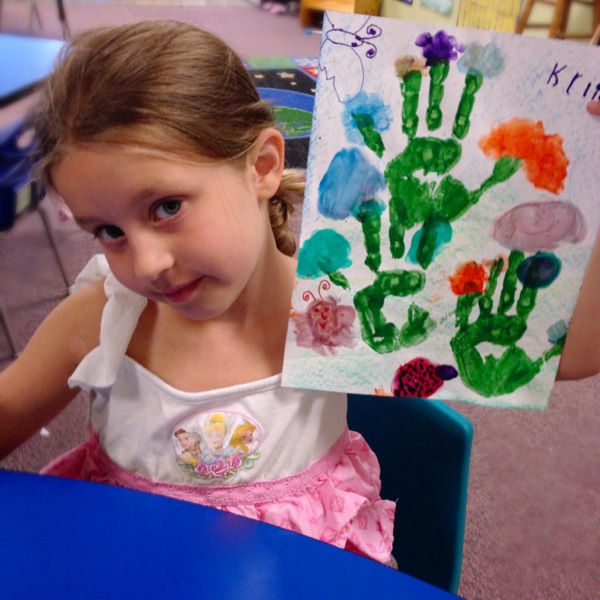
Handprint Gardens
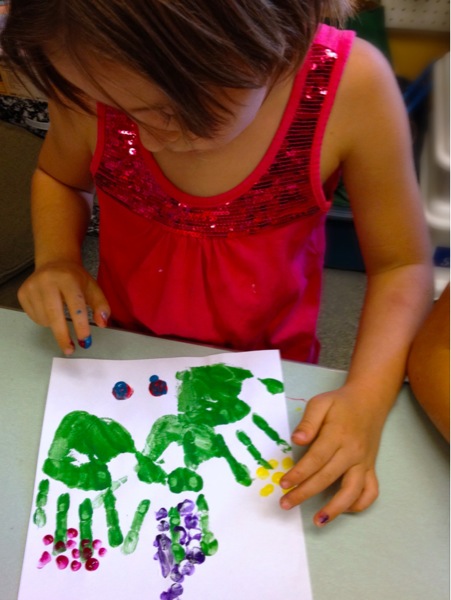
Children loved creating these gardens. A few steps steps led to wild, wonderful gardens. We are using them for Grandparents Day cards, but they would be lovely any time of year. In fact, for winter, we might make trees with fingerprint snow and bright birds. One idea leads to another :)
Step one: make handprints with green tempera paint (or acrylic, if you a brave). We made three prints of the same hand because I was working with an entire class and they needed a clean hand to turn on the faucet. At home, you could print both hands. Let the handprints dry.
Aside: I later realized we should use a color for the background- perhaps and layer of green over blue for ground and sky. Since we printed onto white paper, I used beeswax crayons to lightly shade ground and sky. The first graders painted their petals, bugs, and clouds before I shaded- both ways worked. A few children shaded their own. I had to watch that the colors wouldn't get too thick and cover their handprints. Next time, I will have them shade grass and sky first.
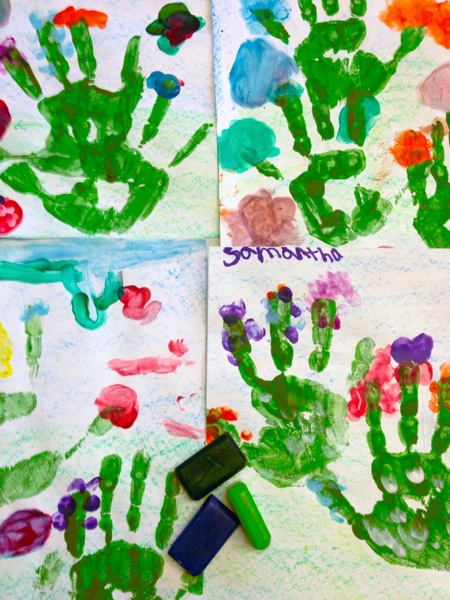
Step two: Add petals, leaves, and clouds. Use fingers! They loved dreaming up ways to create butterflies and different flowers like lupins. we did not use water to switch colors. Instead, we wiped our fingers clean with a paper towel. This kept the paint from getting drippy. I did supervise so they didn't start smearing too many colors together, or covering up their handprints with heavy petals. Let your colors dry.
Step three: Use markers to add embellishments. Add butterfly details, ladybug legs, and spiders.
I told them that they could only color small areas- a few wanted to cover the paper with marker. I also told them to stop when the details started to overwhelm the painting. An art of childhood creativity is learning when to say Done. For personal projects that reflect their inner vision, I let them go until they say done. But every once in awhile, I say done.
A lovely moment within their gardens were the stories they shared while they drew. In my home, I would scribe their stories to go along with the illustrations. Spiderwebs and ladybug tea parties and rainbow butterflies. Beautiful!
We are gluing the gardens on colored paper-mats and writing I love you on the other side. Another adorable addition that everyone appreciates is a few open-ended prompts, like I love when my grandparents _______ and I hope they take me to the __________ and My grandparents are good at ________.
My favorite art catches personality and the moment. My favorite art is shared with proud smiles. These gardens grow wild and wonderful.
I hope you have fun painting them!
Sensory Discovery: Numbers

We love creative learning. Today, our numbers in math were 0, 6, 9, and 8. These numbers all begin with a curving line.
We connect art and writing often in the classroom. Curving lines, straight lines. And we love multi-sensory learning.
So I found dishes with a small lip around the edge, then filled them with a layer of birdseed. Before the birdseed, we drew the numbers big, using our entire bodies. We stretched up to the ceiling, then swept our arms all the way to the ground. Depending on the number, we reached up or around to make huge numbers in the air.
We also drew the numbers with a finger on our palms. The goal is to engage our muscles, fire-up our senses so that the numbers change from abstract concepts to concrete understanding. Sometimes we sit with a partner so we can use our finger to trace the letter on a friend's back (maybe we will do this tomorrow).
Their favorite part of the day was birdseed writing. We traced the numbers into the birdseed plates. They formed the circles over and over just to feel the seeds with their fingers.

And when I handed out the written practice, they happily wrote the numbers without questions or concerns. Only excitement. "Look at my numbers! And can I do the birdseed during Creative Choice? Please?"
Yes. Keep playing and learning!
PS: This activity is also fun with sand, salt, or anything with grains. They love small pebbles, too. Lots of ways to engage the body and inspire the brain :). Enjoy!