Heartfelt Hearts with Children
Invite children to decorate to their heart’s content. This felt sewing project is an opportunity for children to add many decorations. The resulting heart is lovely to hang as decoration or gift to loved ones.
As with all of our projects, be mindful of a child’s abilities and the sharpness of the needle. If you’re using a blunter needle (like a tapestry needle), more layers may be too many layers of felt.
You can also make the heart any size. We recommend not making it a size where the felt becomes floppy and won’t hang straight. You can draw your own pattern on a piece of paper before cutting out of felt. Or we have a heart pattern in Forest Fairy Crafts Through the Seasons.
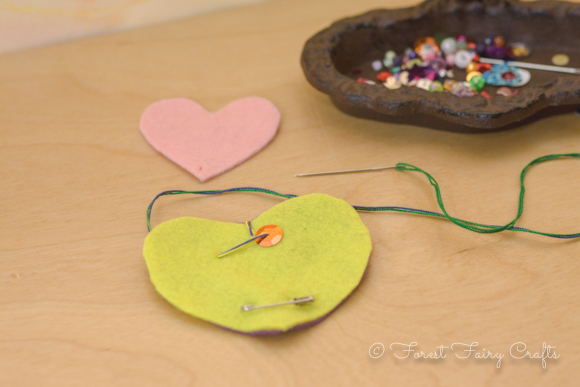
For any version of the heart, cut out your felt heart shapes. We use crochet thread which doesn’t tangle as easily as embroidery thread. For children, we always put the thread through the eye of the needle, fold in half, then tie slipknot securing both ends together. This prevents the needle from pulling off when they pull the thread taut. The multicolor thread in the photos is due to a variegated thread which changes color on its own.
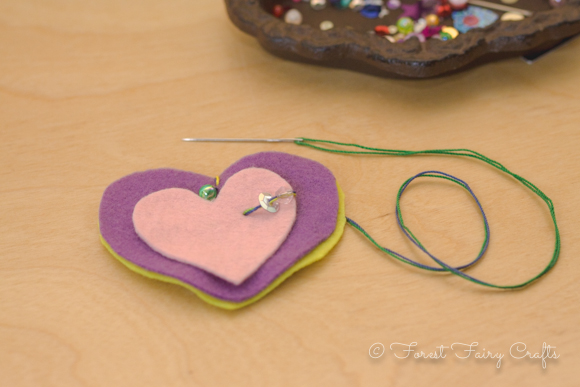
Use a safety pin to hold the felt hearts together at first. Sew through one piece of felt so the knot will be “sandwiched” between the two felt hearts. Loop around the first stitch so the hearts won’t wiggle (or you can secure with more than one safety pin). Lay a smaller heart on your hearts after a stitch or two.
The direction is to “add decorations, push your needle through, then add decorations.” Repeat and repeat.


These can be strung together to make a garland or mobile. We enjoyed a class collection hanging from the ceiling overhead. They become such expressions of whoever sews them. May your heart’s wish come true!


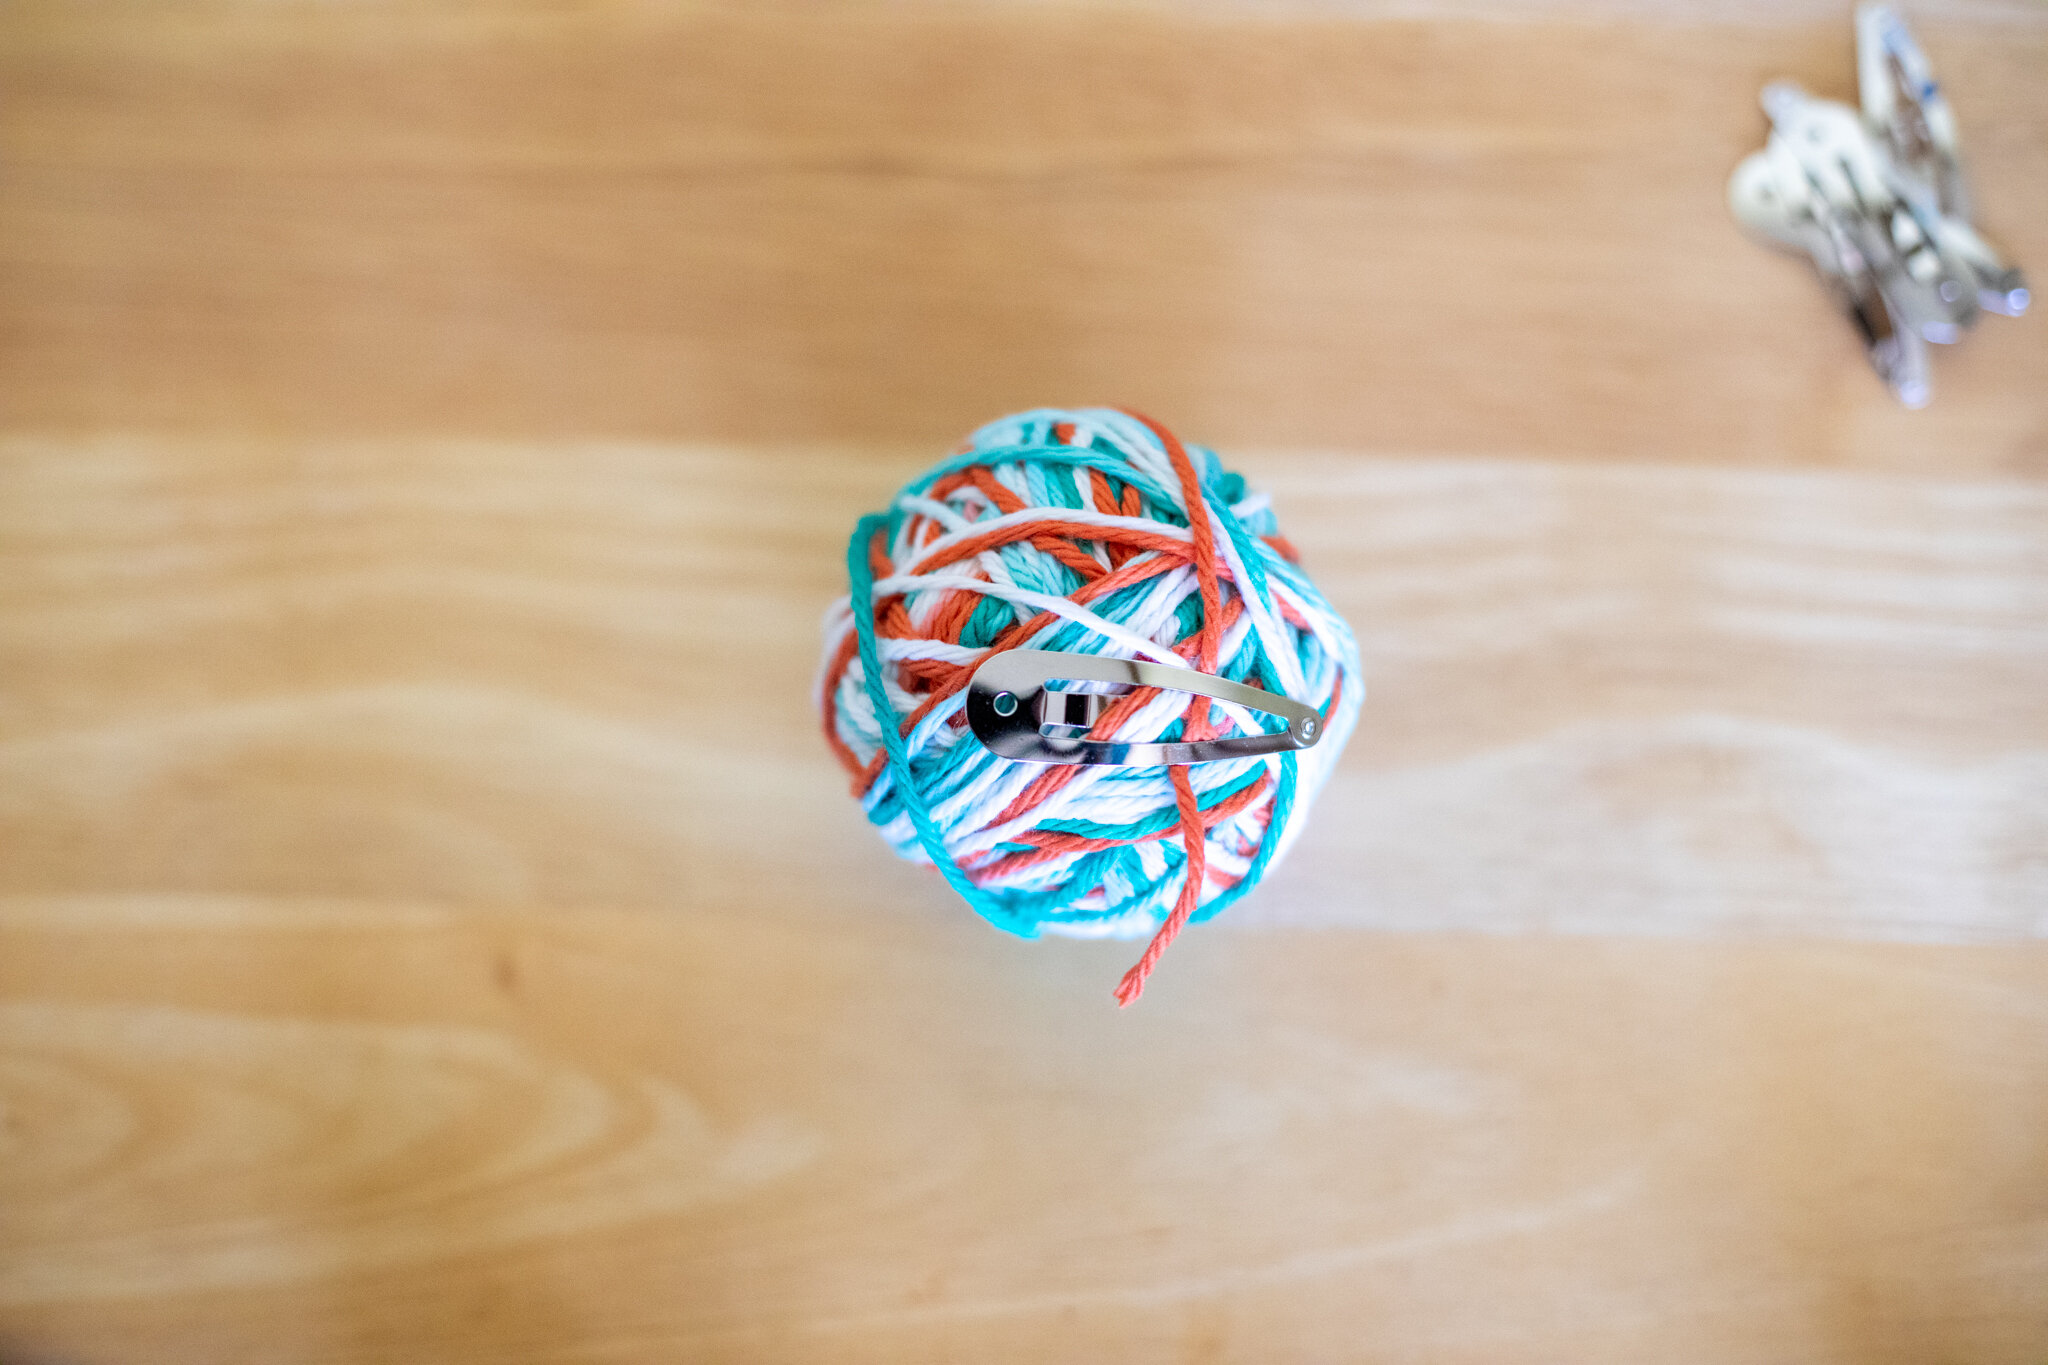
Another Way to Wind Yarn Balls
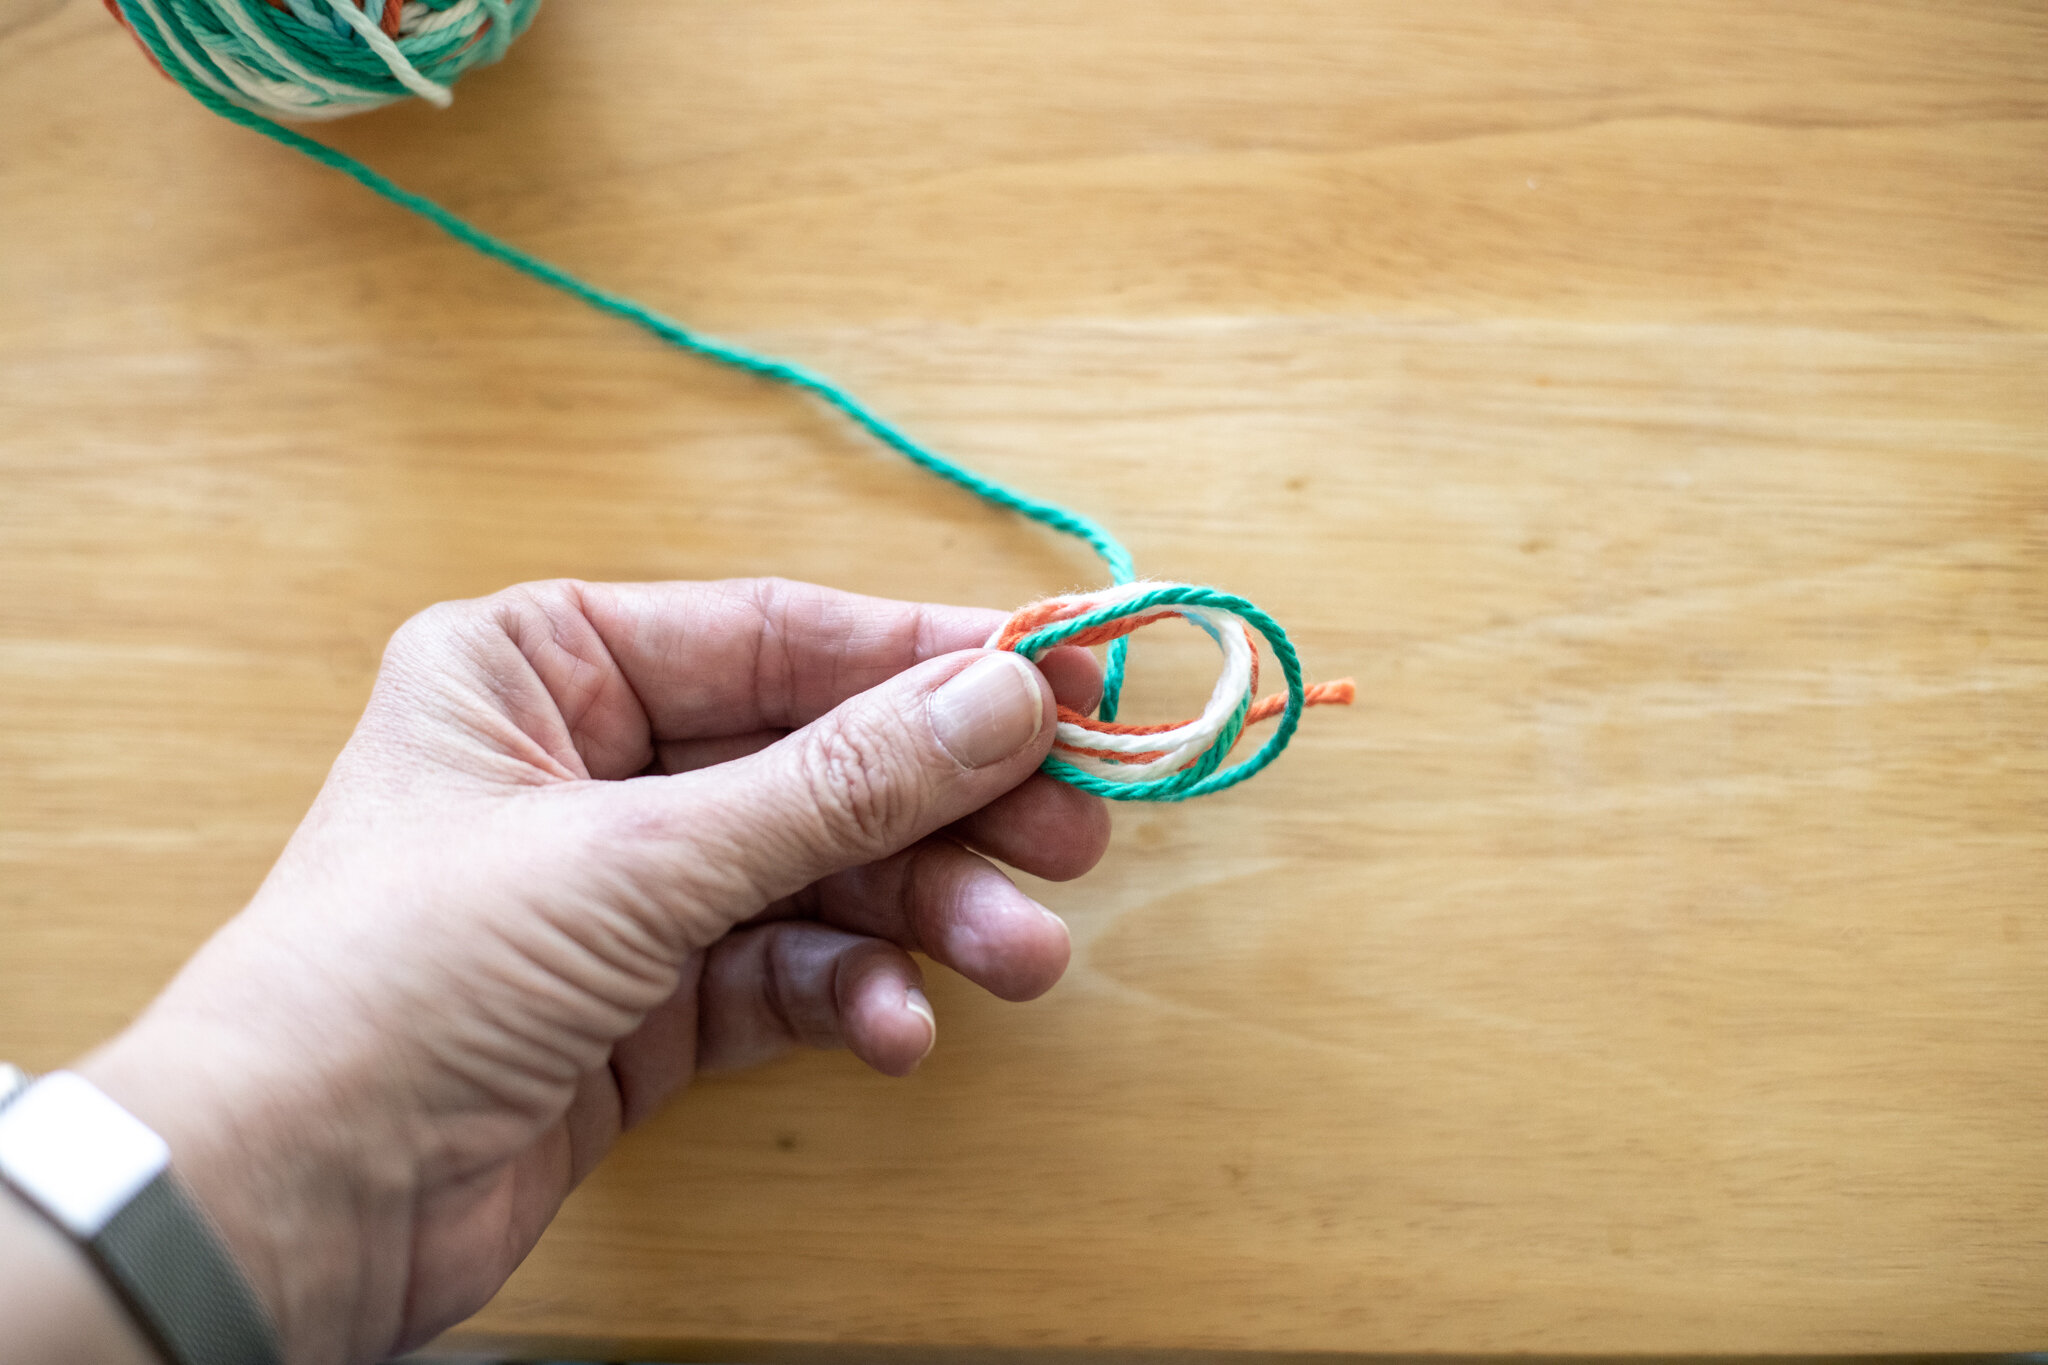
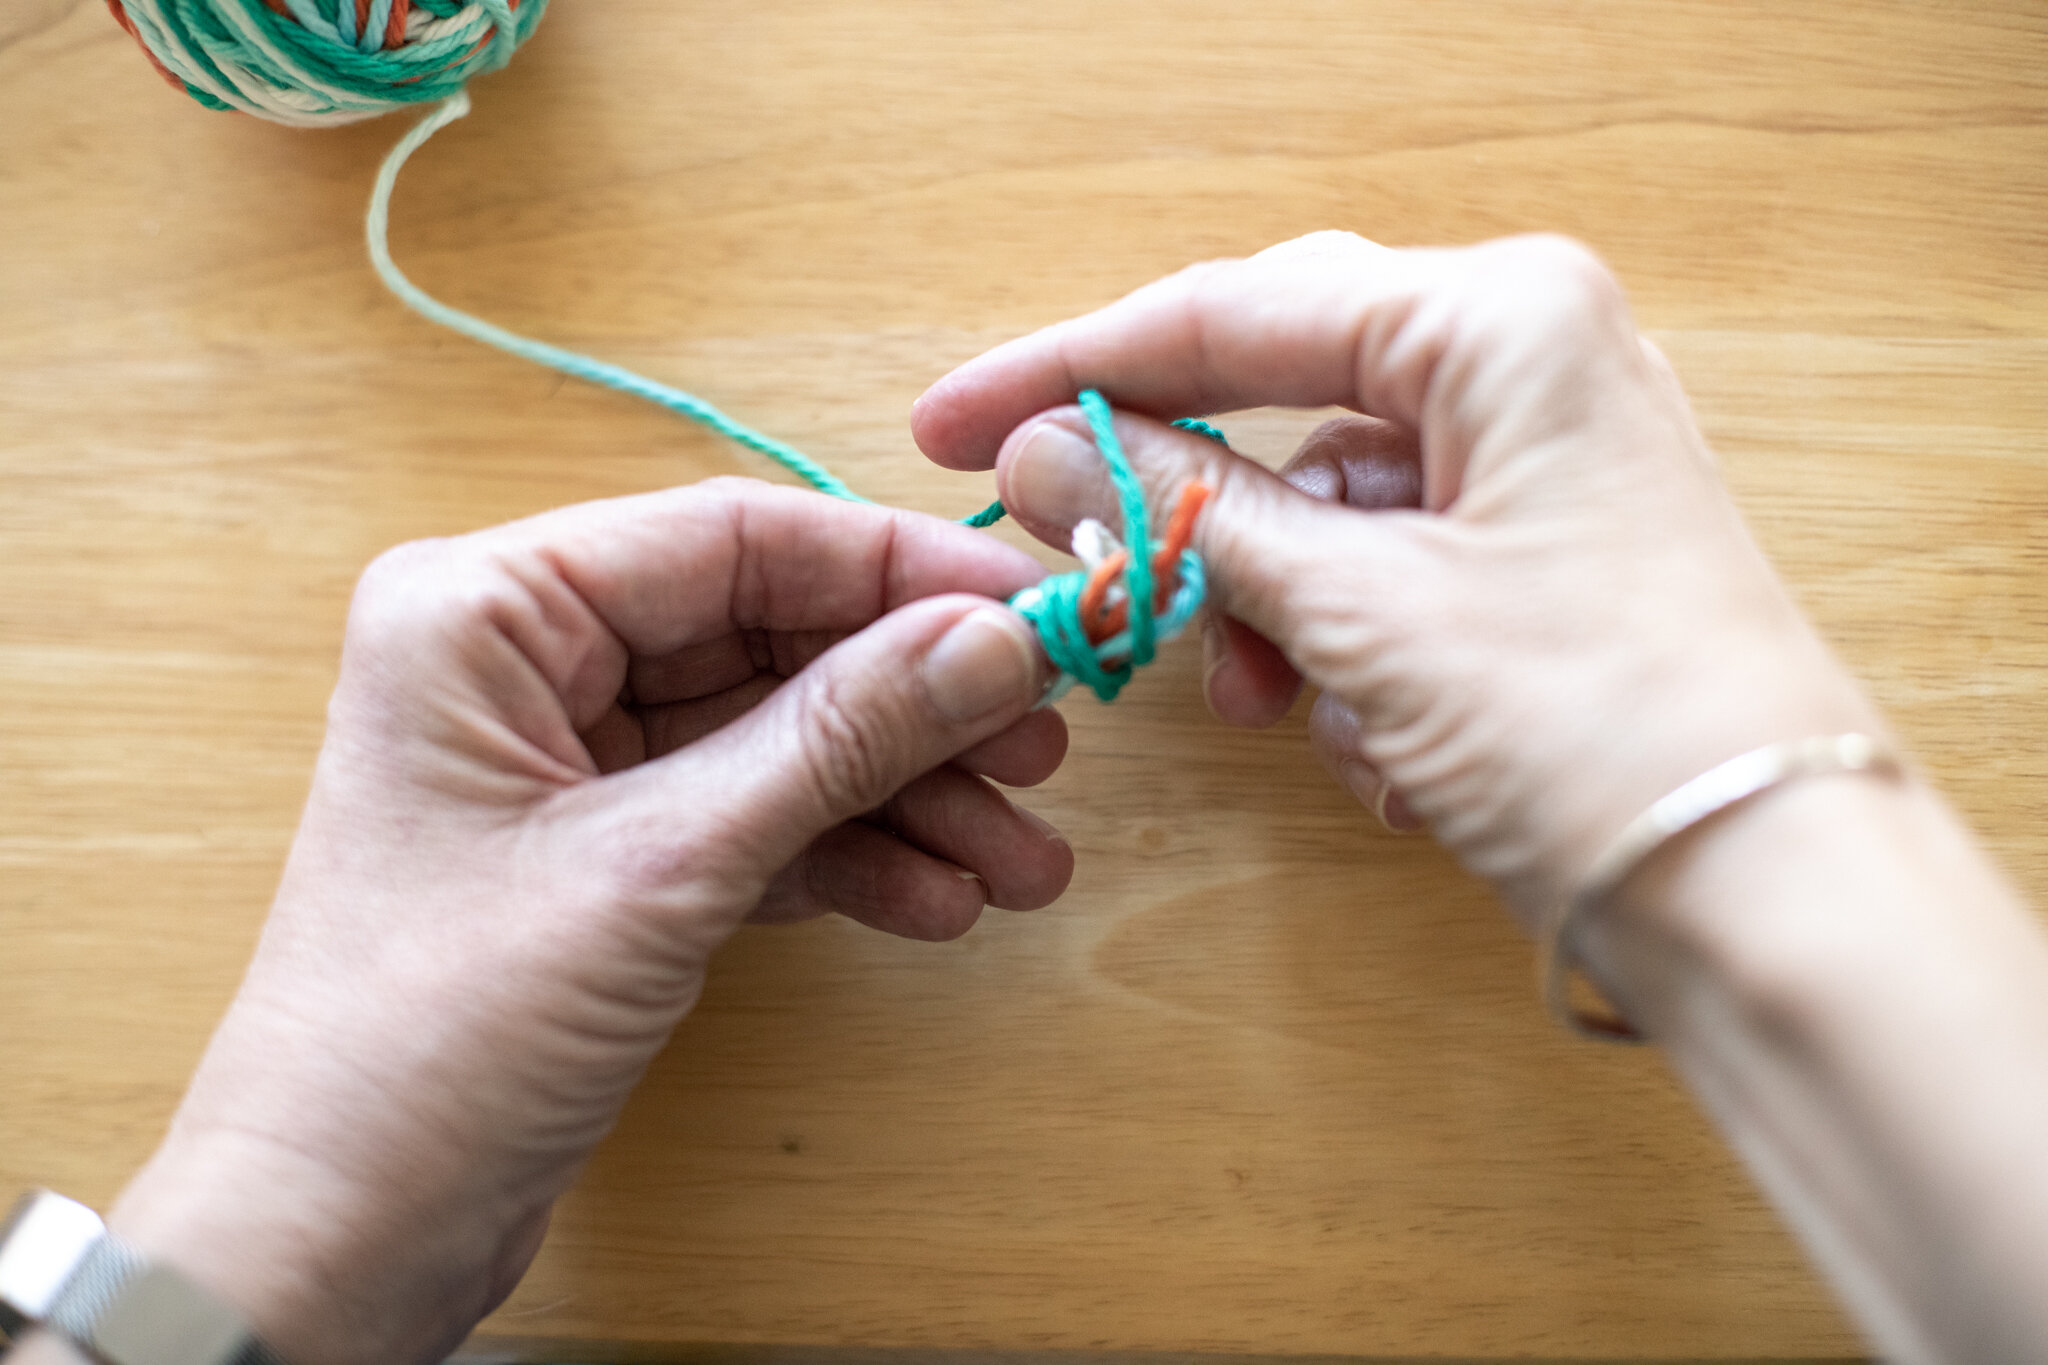
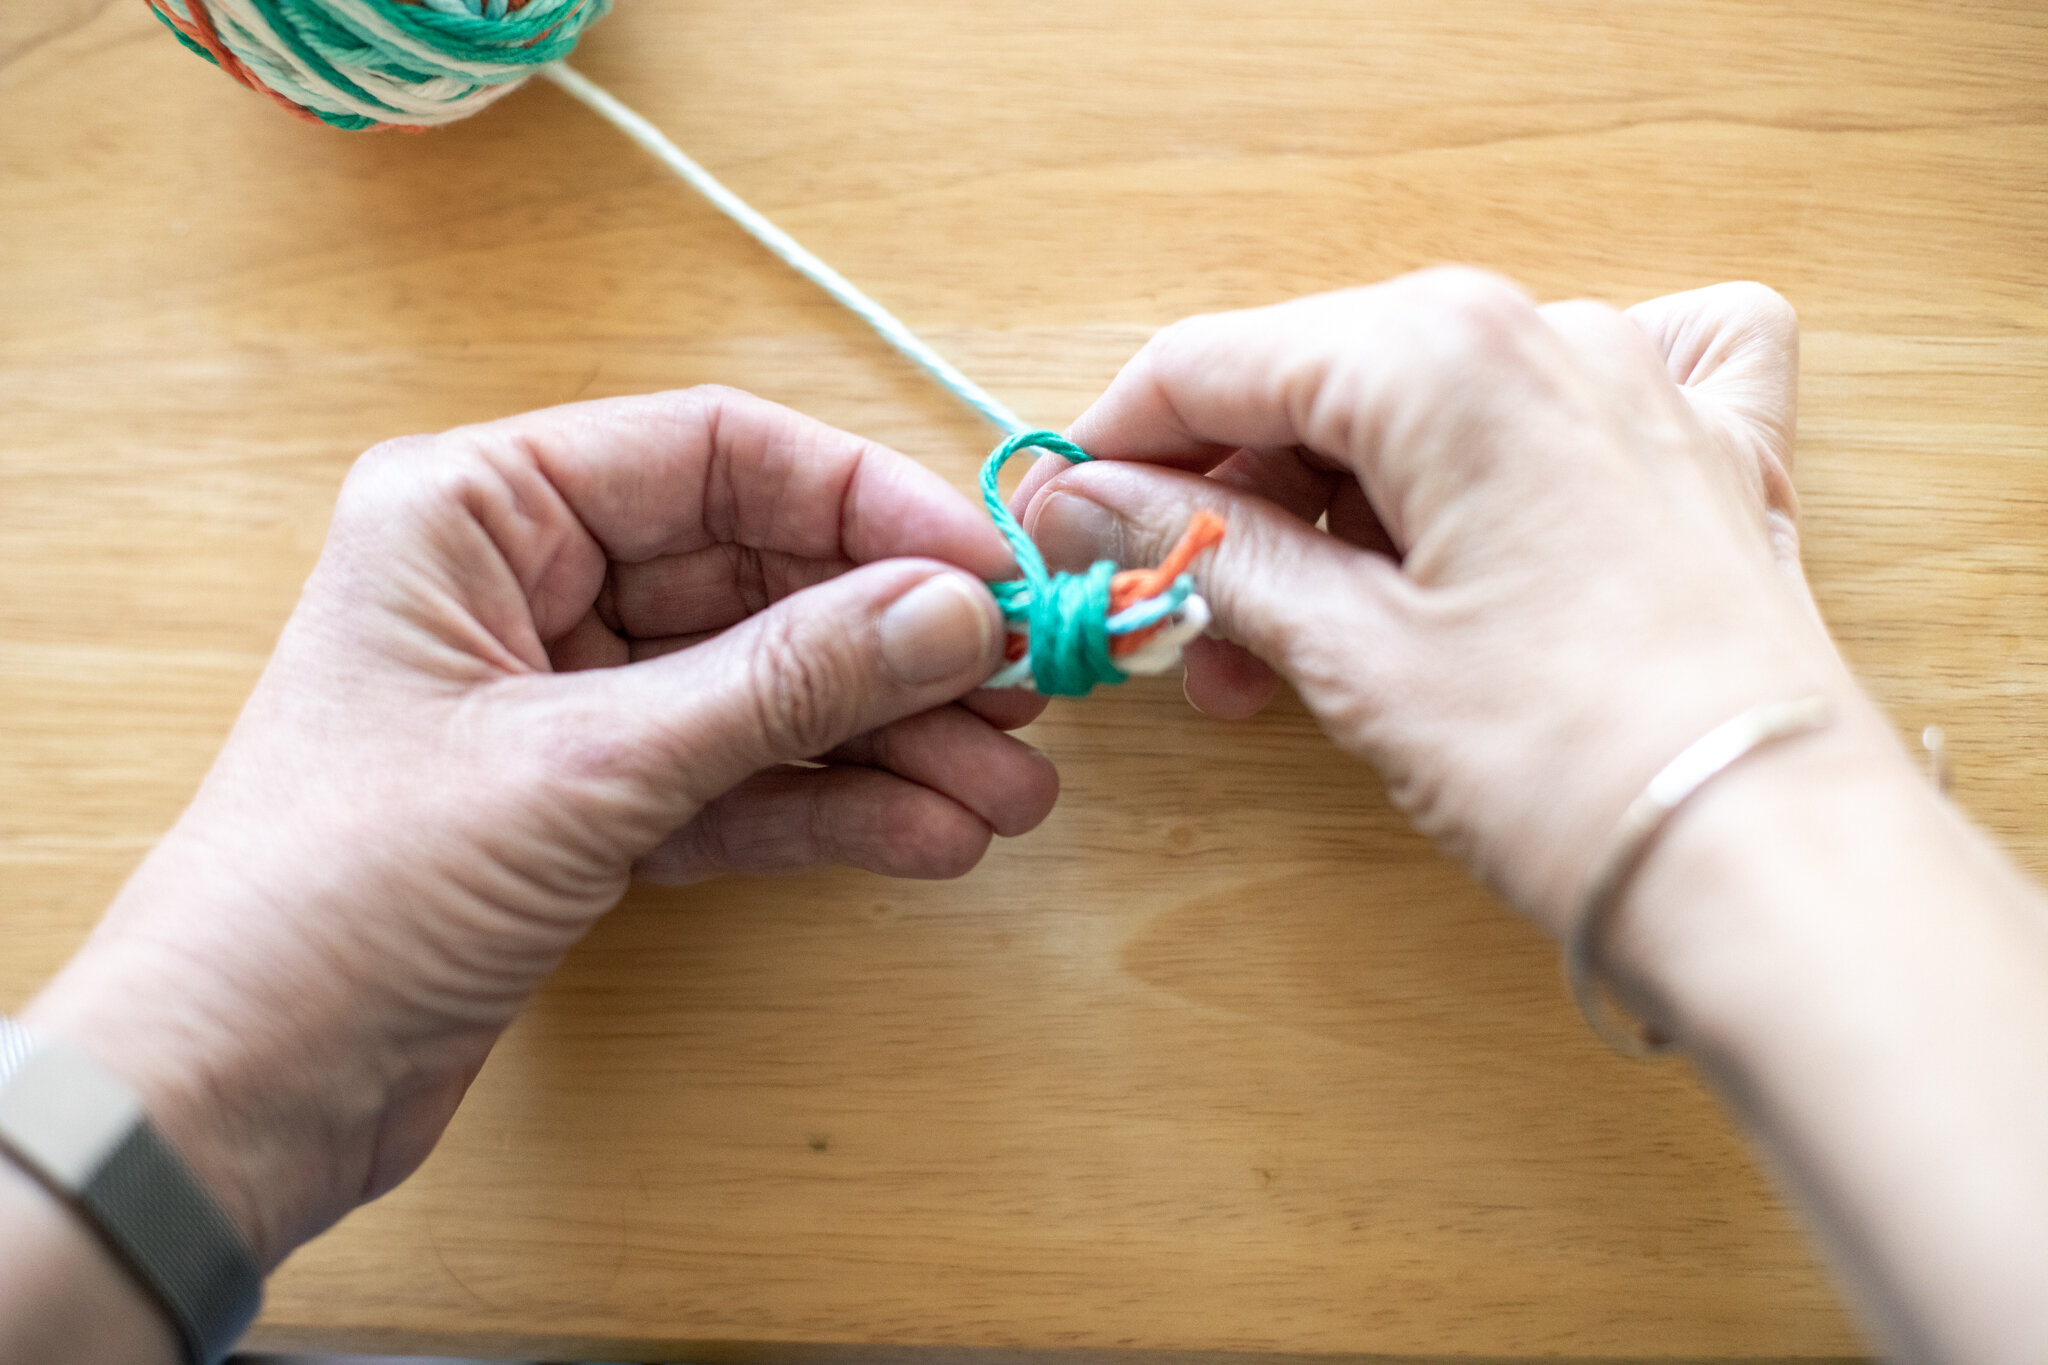
As promised, here’s another way to wind yarn balls. This way is quicker if you are making a pile of yarn balls, such as for a summer camp or basket of yarn for children to choose from. This technique doesn’t give the same level of fine motor skills, though, and it’s harder for little hands to control the yarn from slipping off of their fingers. So it’s a friendly version for adults or older children. But the other way gives children more winding practice around their fingers. Choose which one feels easier for you.
The beauty of handwork is that we all get to choose what works best for us. And I’m sure there’s even more ways to start winding yarn. It may be a worthy experiment to teach both methods to children and then ask them which way works better for them. The results may surprise you!
Onward to another way to wind yarn balls :)
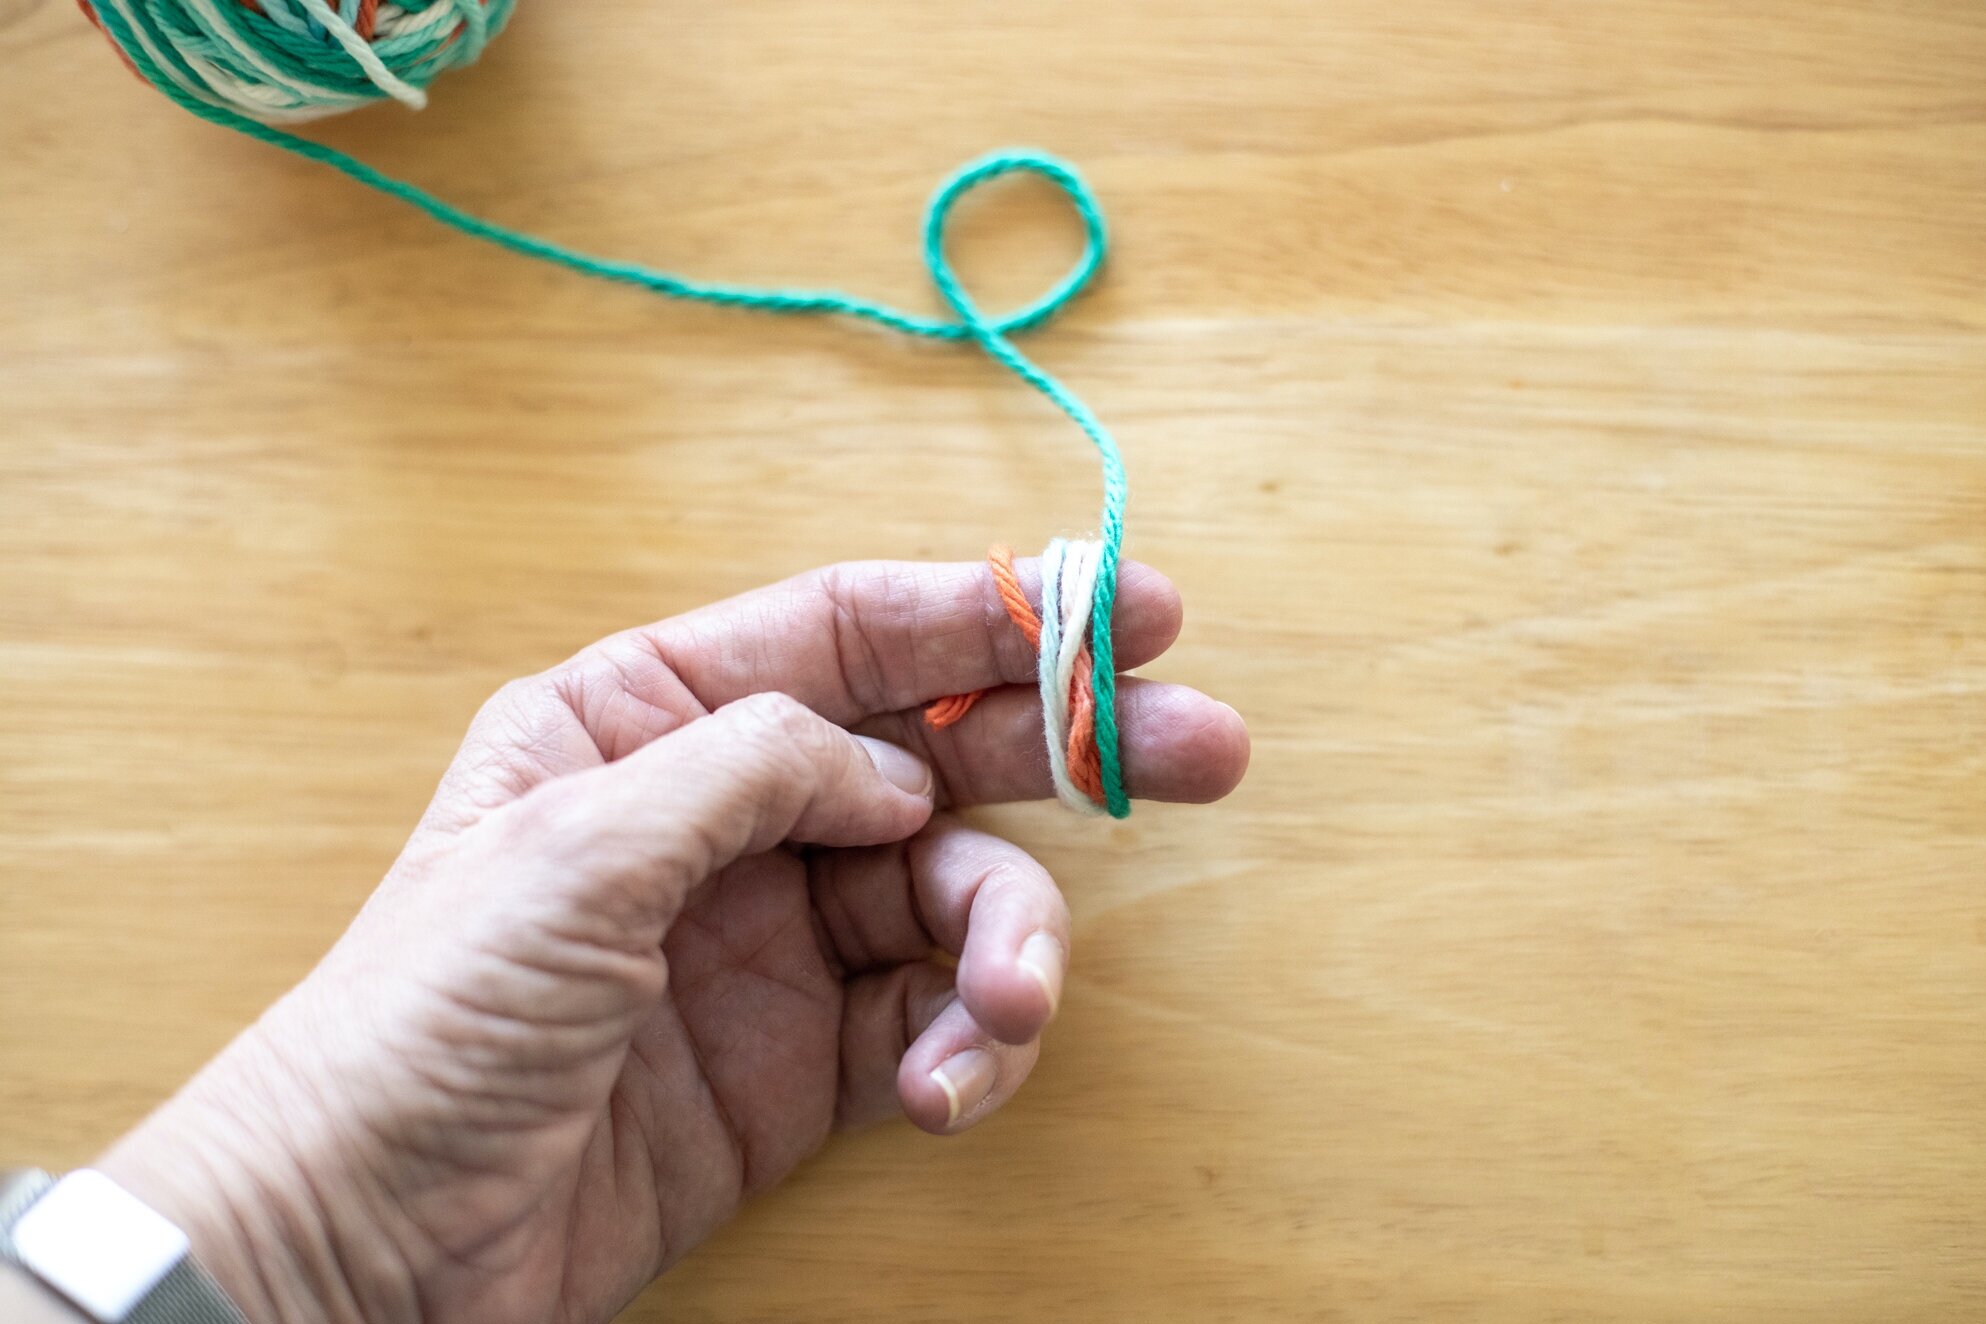

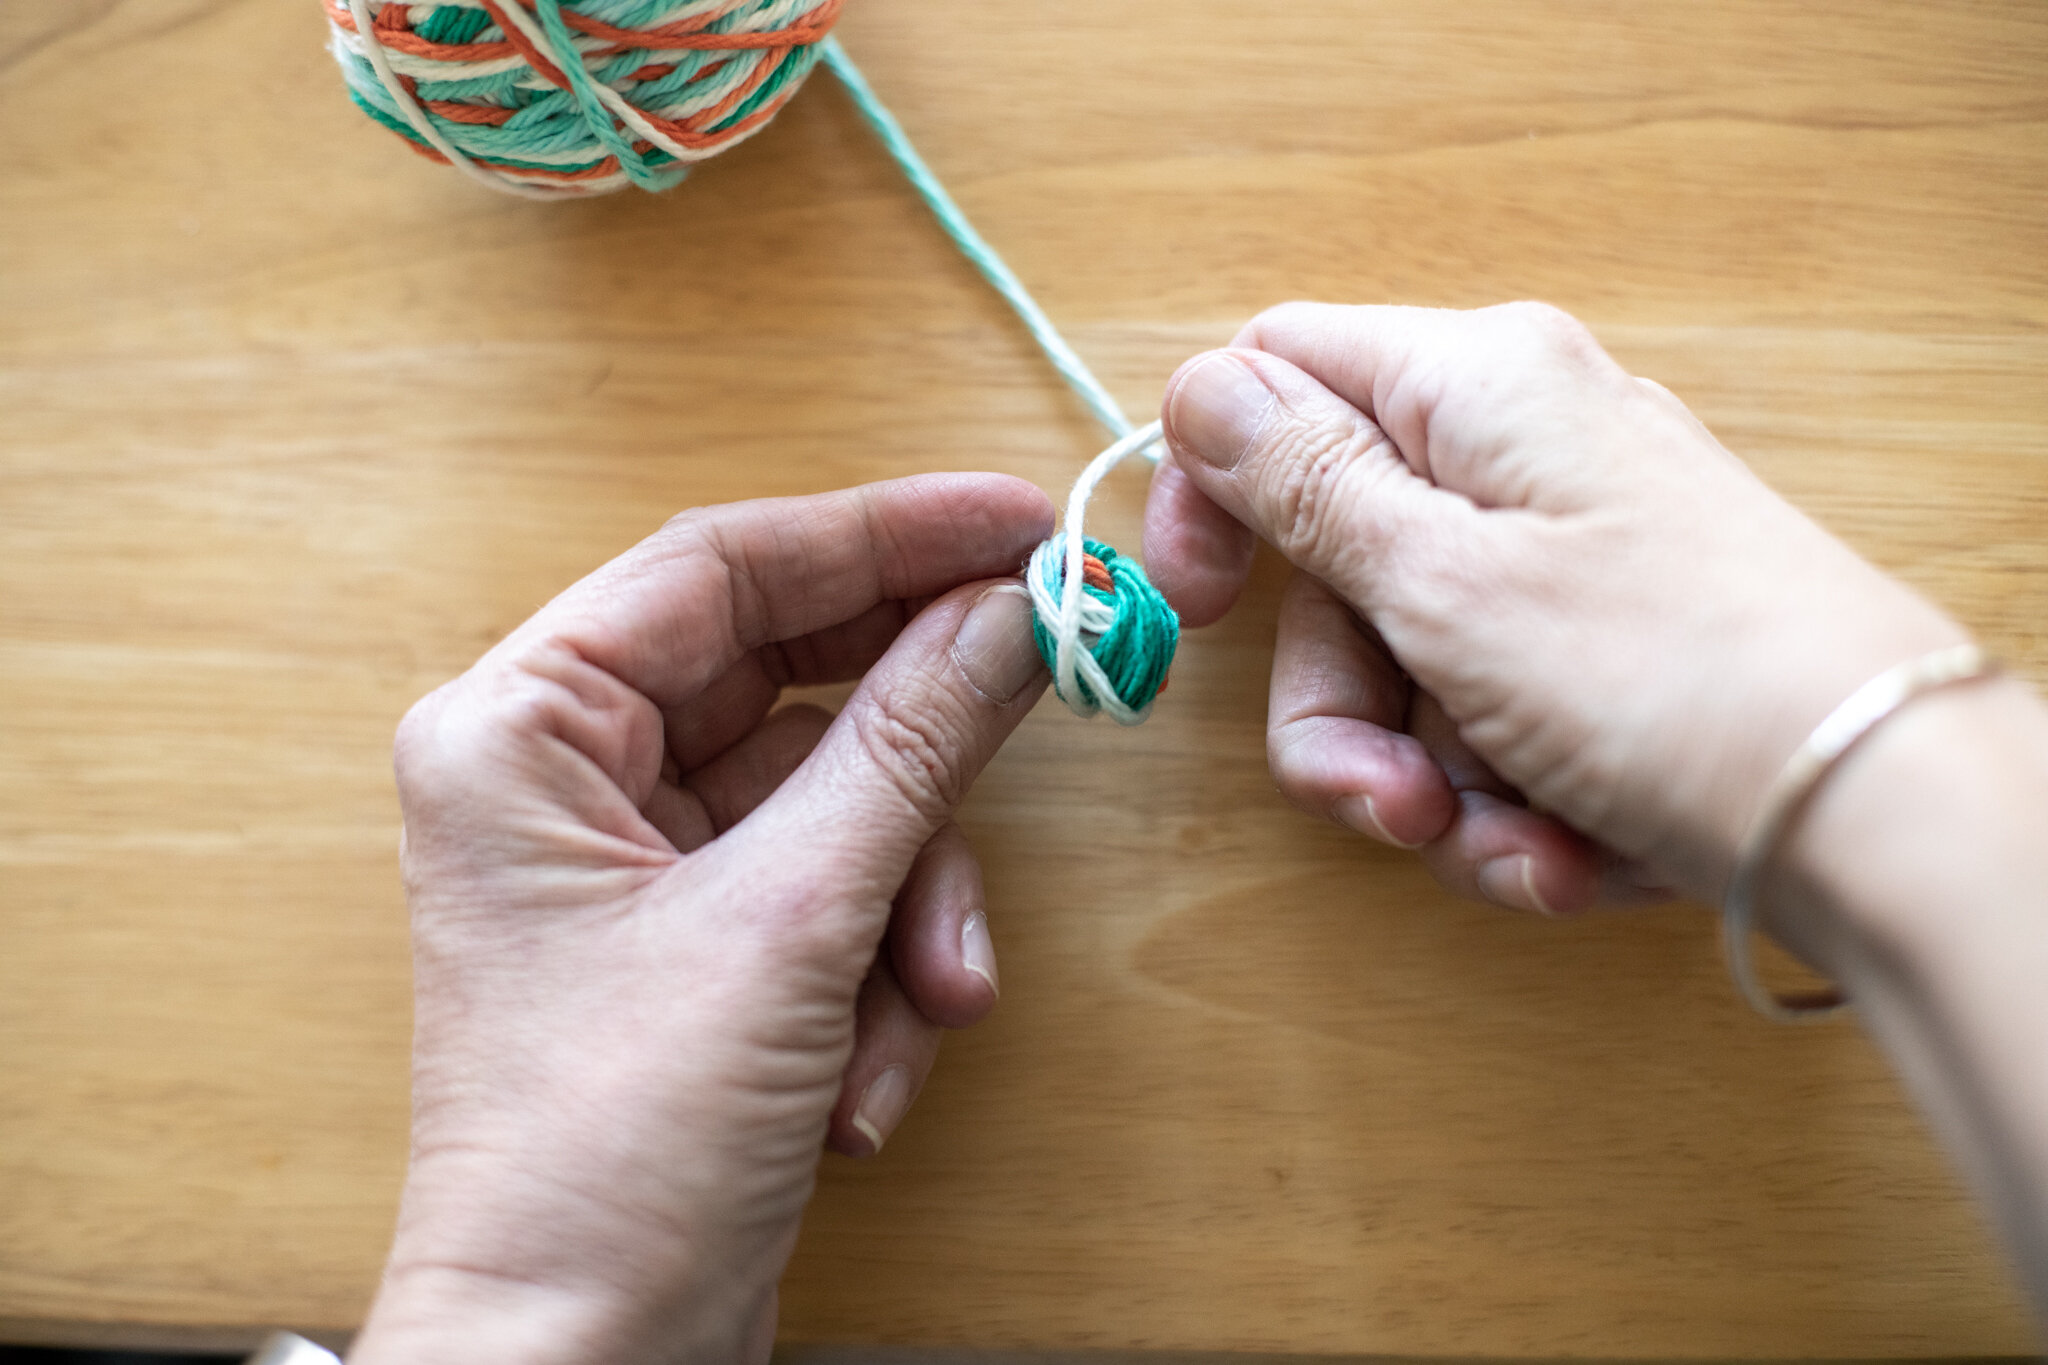


For young-young children, you can start the ball, then hand it over to them once it’s past the super-fiddly-fall-apart-if-you-let-go phase of creating them. They enjoy winding the yarn around and around. You can work towards a point where they can then use your hand to start the yarn ball. So you would hold the yarn between your fingers and they wrap it around your fingers for the first step. Eventually, they will develop the skills to hold and start the ball all on their own. It’s tricky to do two different activities with different hands.
If you know how to make a slip-knot, that’s another way to start where children' won’t pull the tail loose during the very first step. If you make a slip knot that can fit over a finger, that would hold the yarn on their finger for the first step.
The other trouble-spot that children fall into is winding the yarn way too tight around their fingers, which makes it difficult to pull off for the next step. Learning tension is a big skill. With this mistake, it’s pretty simple to unwind and start over. It’s best to supervise until they have the hang of it on their own.
We hope these techniques help you tame your yarn collection so children can easily select different colors for different projects. The calming winding of yarn is a lovely way to pass the time. You can even wind yarn balls while reading or watching a documentary. Children love to see their yarn in a tidy collection.
We hope this week finds you healthy and inspired. And, if productivity is a struggle, that’s okay too.
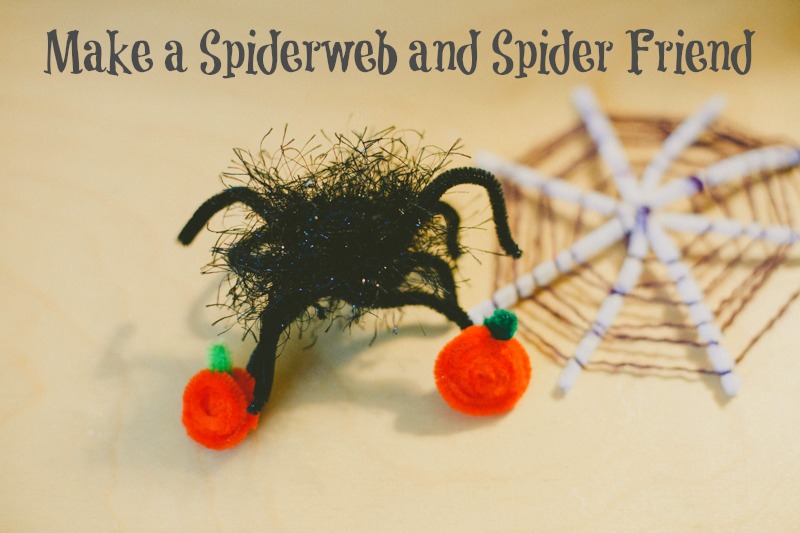
Spiderwebs and Spider Craft
My girl and I love Halloween! As we brought out this year's decorations, she really really wanted to decorate her room. In our family, that means creating new goodies!
She wanted to create cute spiderwebs and spiders. They're fun, easy, and quick. My niece visited and she had just finished reading Charlotte's Web so this craft especially inspired her. That gave my girl the chance to be Teacher, which is always fun.
Along the way, we learned more techniques for different looks. We hope you enjoy!
Supplies:
- Pipe Cleaners
- Wire Clippers (or scissors if you don't mind possible nicks in the metal when cutting wire)
- Yarn
- Fuzzy Yarn (we used Festive Fur)
The Making:
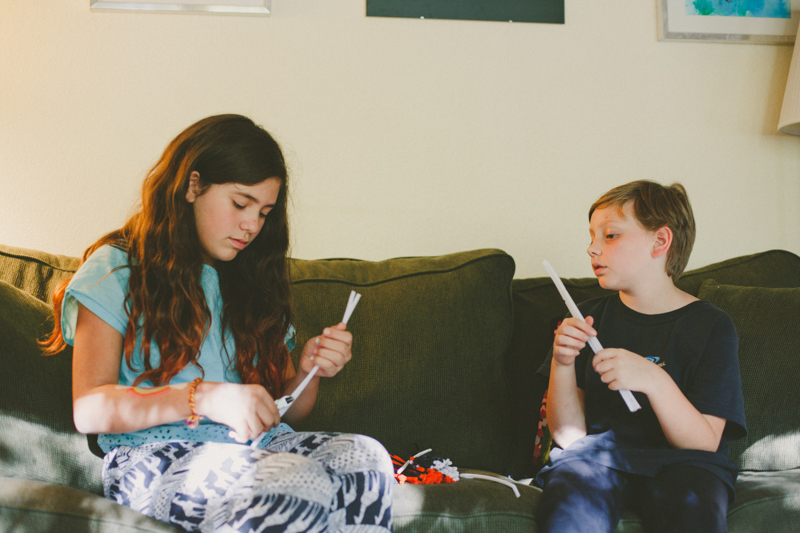
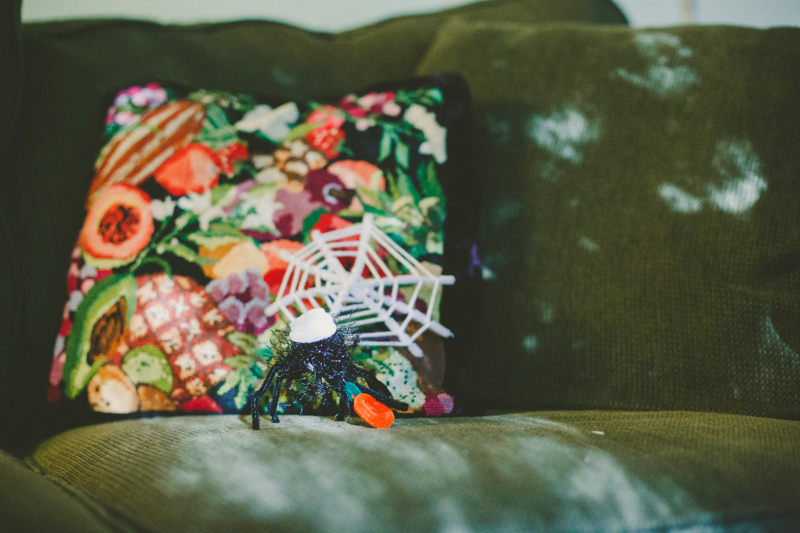
Clip three pipe cleaners in half so you have six in all. If you don't clip the pipe cleaners, they get weak towards the outer edges of the circle. I've also seen this project made with dowels which lets you make larger spiderwebs. The fuzzy pipe cleaners are easier for the yarn to stick in a spread out design.
Lay them them down and tie a piece of yarn around the middle. Spread them out and start winding the yarn around the center to hold them together.

The yarn can be white or black or purple (or any color). You can tie the pipe cleaners together while they are straight and then fan them out. My daughter insisted on tying them while they were all spread apart, which is trickier but still doable.

Start wrapping the yarn around the pipe cleaners, going around one, then the next one and the next one. Give yourself a little space between each layer as you go around and around the spiderweb. It may take a few passes to get the hang of it, but even spiders must practice making their webs (don't they?).
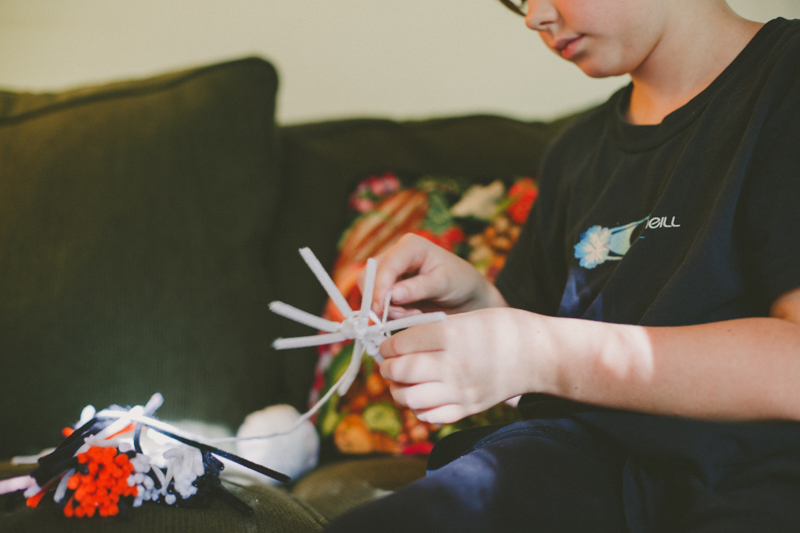

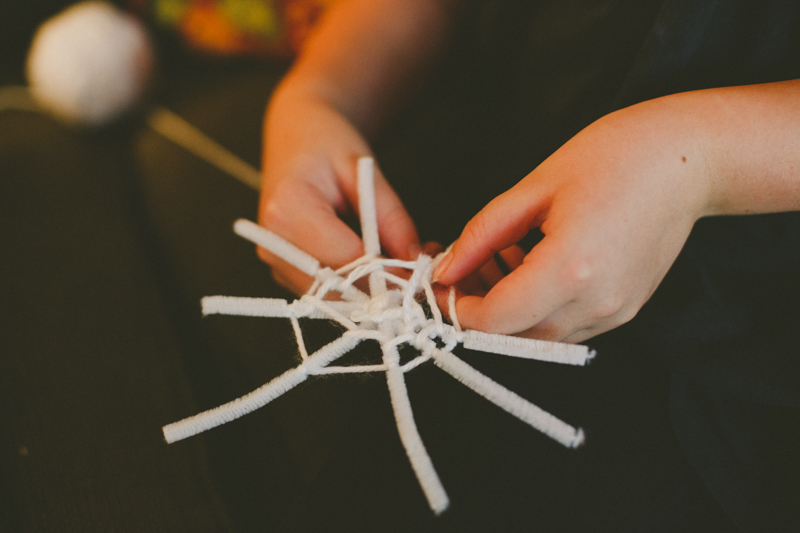
Continue to the outer edge of your spiderweb. Clip the yarn and tie around a pipe cleaner. Leave a little extra that you can use to hang the web.
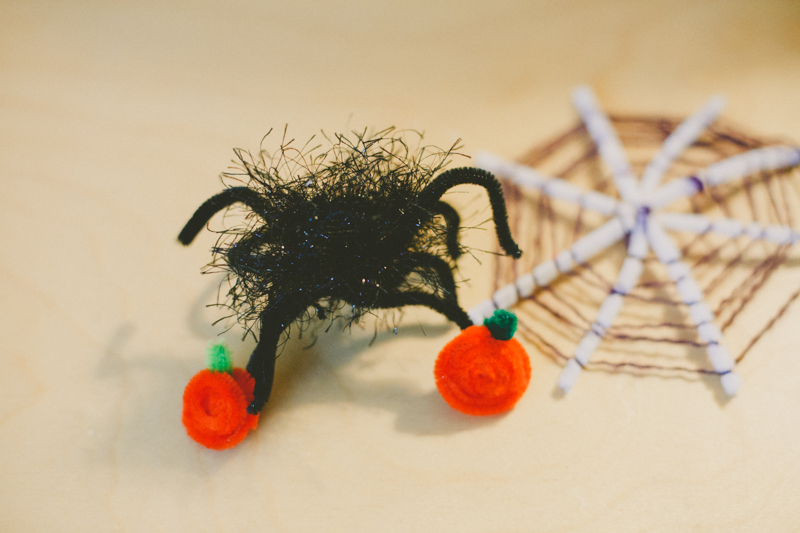
For the spider, clip three pipe cleaners again to make six. The fuzzy yarn is a little tricky for little hands, so I helped with making the first spiders. We tried two ways that both worked.
First, we wrapped the fuzzy yarn around three fingers a few times. We clipped a length of plain purple yarn and tied around the middle. After our little fuzzy ball was secure, we tied it again around the middle of the three pipe cleaners to give our spider six legs.

Spread out the legs and bend to give your spider personality.
This version of the spider was a little flopsy (which was totally fine) except it inspired us to try again.
This time, we wrapped the fuzzy yarn into a ball. To learn how make a yarn ball, you can visit here. Basically, wrap the yarn around a few fingers, take off your fingers, wrap a few times in another direction, and again, and again. Once you get the hang of it, yarn balls are simple and fun.
Once the ball was about the size of a grape, we laid the three pipe cleaner legs across and wound around them too. Now we had six legs. We could fan them out and wrap the yarn between the legs. This technique made the spider more durable.

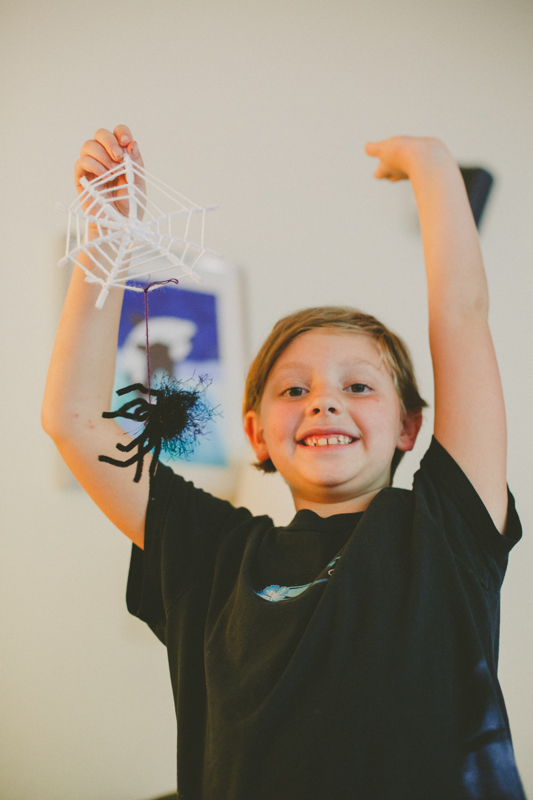
Isn't she cute?
Once our spider was nice size, we tied the yarn around the middle to secure it. The nice thing about fuzzy yarn is that it hides all the knots and loose ends. We tied a strand of plain yarn around it to give a thread/web for hanging.
Hurrah! The excitement kids show when they love their creating gets me every time!
Meanwhile, the girls realized they could spin a piece of orange pipe cleaner in a spiral to make pumpkins! So many pumpkins! A tiny pice of green tucked into the spiral became perfect stems.

What lucky spiders getting decorations of their own!
Then, my favorite part of creating! The kids took off with their own ideas. My niece spiraled a white piece of pipe cleaner into a hat.
And my girl realized white pipe cleaners and white yarn can make an awesome ghost. Little pieces of orange pipe cleaner tucked into the yarn made perfect eyes.

Sometimes, all we need to do is give children the opportunity (and supplies). I am constantly amazed!
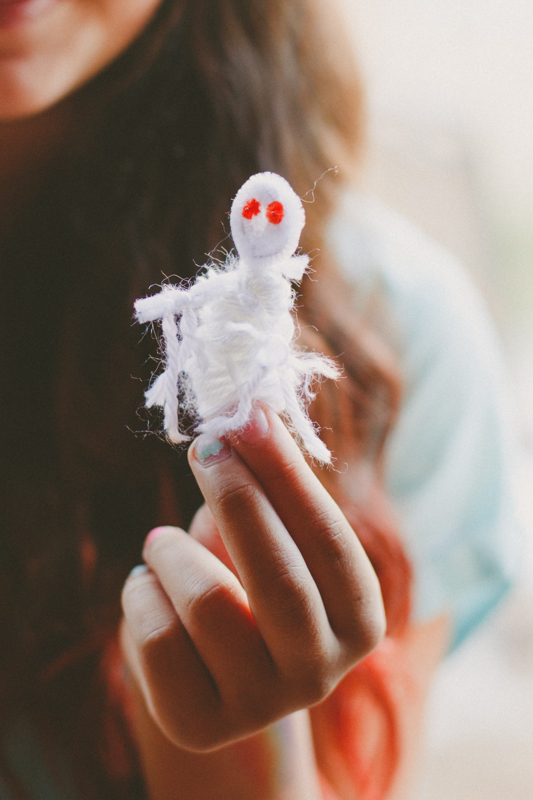
What a darling little ghost!
*I might need to write a tutorial for her ghost because I'm so curious how she made it :)
I hope these inspire your own decorations. A few pipe cleaners and yarn sure gave us a fun afternoon. And now our house is pleasantly spooky!

Magic Wands with Yarn

So simple and so fun for the class today. I collected fallen branches about a foot in length. I brought sandpaper, yarn, and a few beads to class. Students chose the branch that "spoke" to them. They could use sandpaper to smooth rough patches. A few spent ages making their sticks all smooth.
I showed them how to tie a knot around the branch- the short end dives through the loop, wrapping around the long end. I showed them how to hide the short tail by wrapping around it. We discussed layering colors and adding beads. I said they could fingerknit then wrap the knitted chain. They wanted to engage quickly so no one tried that. Another day :)
Their wands went home with them today, all unique and beautiful! Just like the children :)
Sew a Book
Once upon a time, books were treasures. They were kept in castles. They were guarded. And only a few very chosen people were allowed to read them. They were valued like gold and jewels. Because each and every book was made by hand. People worked hard to create paper. They lettered each word with ink and a feather. And then they had all these pages. How did they hold the pages together?
They sewed them.
Children found this idea fascinating. We looked in books to see the bindings. Most have modern glues. We did find a few with stitching.
I shared a few ideas for stitching their own books. They loved becoming authors and illustrators after sewing. I invited them to write about anything they wanted. What freedom! It could be fiction or non-fiction. A field guide to flowers in your yard or to dragons. We saw books about kittens. Books about the seasons. Books about unicorns. And books about flowers. I plan to revisit the idea and make more complex designs throughout the year. A wonderful first sewing project for all ages.
Ages
- All ages (these were with 5-8 year olds). Older children got into the history of bookmaking. They also dove into the writing and illustrating of their own stories. Younger children enjoyed threading beads and sequins.
Supplies
- Paper
- Construction Paper (or watercolor, anything for a cover)
- Needle and Thread
- Hole Punch
- Binder clip
- Sequins and beads
Preparation
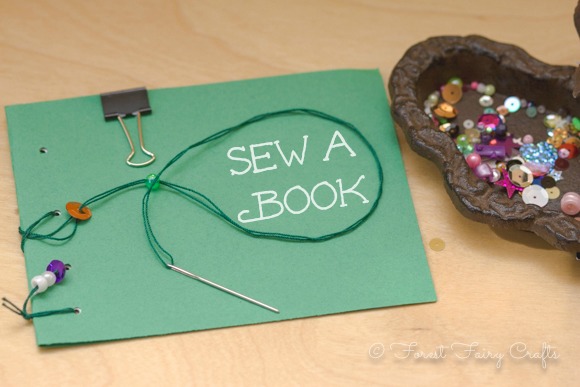
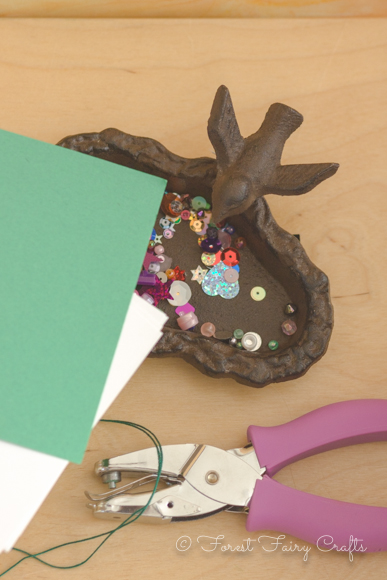
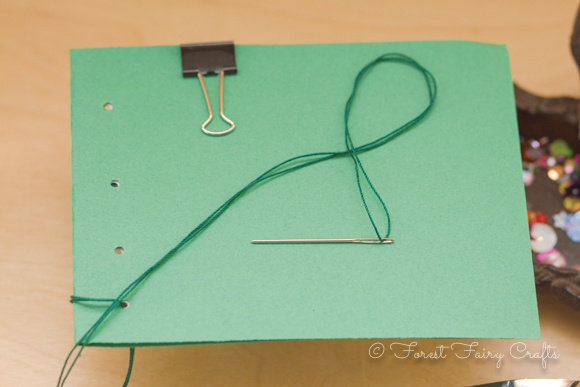
- I cut the paper (any size works). I cut the construction paper so it could fold around the white paper (double the length of the white paper)
- I folded the construction paper around the white paper and secured with a binder clip
- I punched four holes along the folded binding edge. All the papers were now held together with the binderclip, keeping the holes aligned. Aha! moment :)
- I doubled and knotted thread on the needles (tips about our needle and thread choices are in our book
)
- I tied the thead around the first hole- actually went through and then back up through the loop in the thread. Any knotting will do. The books were ready for sewing!
With Children
- We talked about history and sewing. We talked about taking our time. I showed how the needle can go back through a hole more than once to create a decorative binding.
- We talked a lot about not taking the binderclip off until after you sew through the holes. Pages will slip!
- Children threaded beads and sewed beads and sequins along the way.
- They discussed what they would write and draw. We talked about books with no pictures and books with no words. They really got to thinking about the process of creating a book.
I tied off threads and they drew and wrote. As long as the threads didn't wrap around the open side of the book, it was all good. They loved their books for many reasons. And wanted to make more! Which is always good. Love inspiration :)

Wishing you happy sewing today!
Please note: This post contains an affiliate link. Should you decide to purchase our book, a small percentage returns to the forest. Your price remains the same. Thank you!
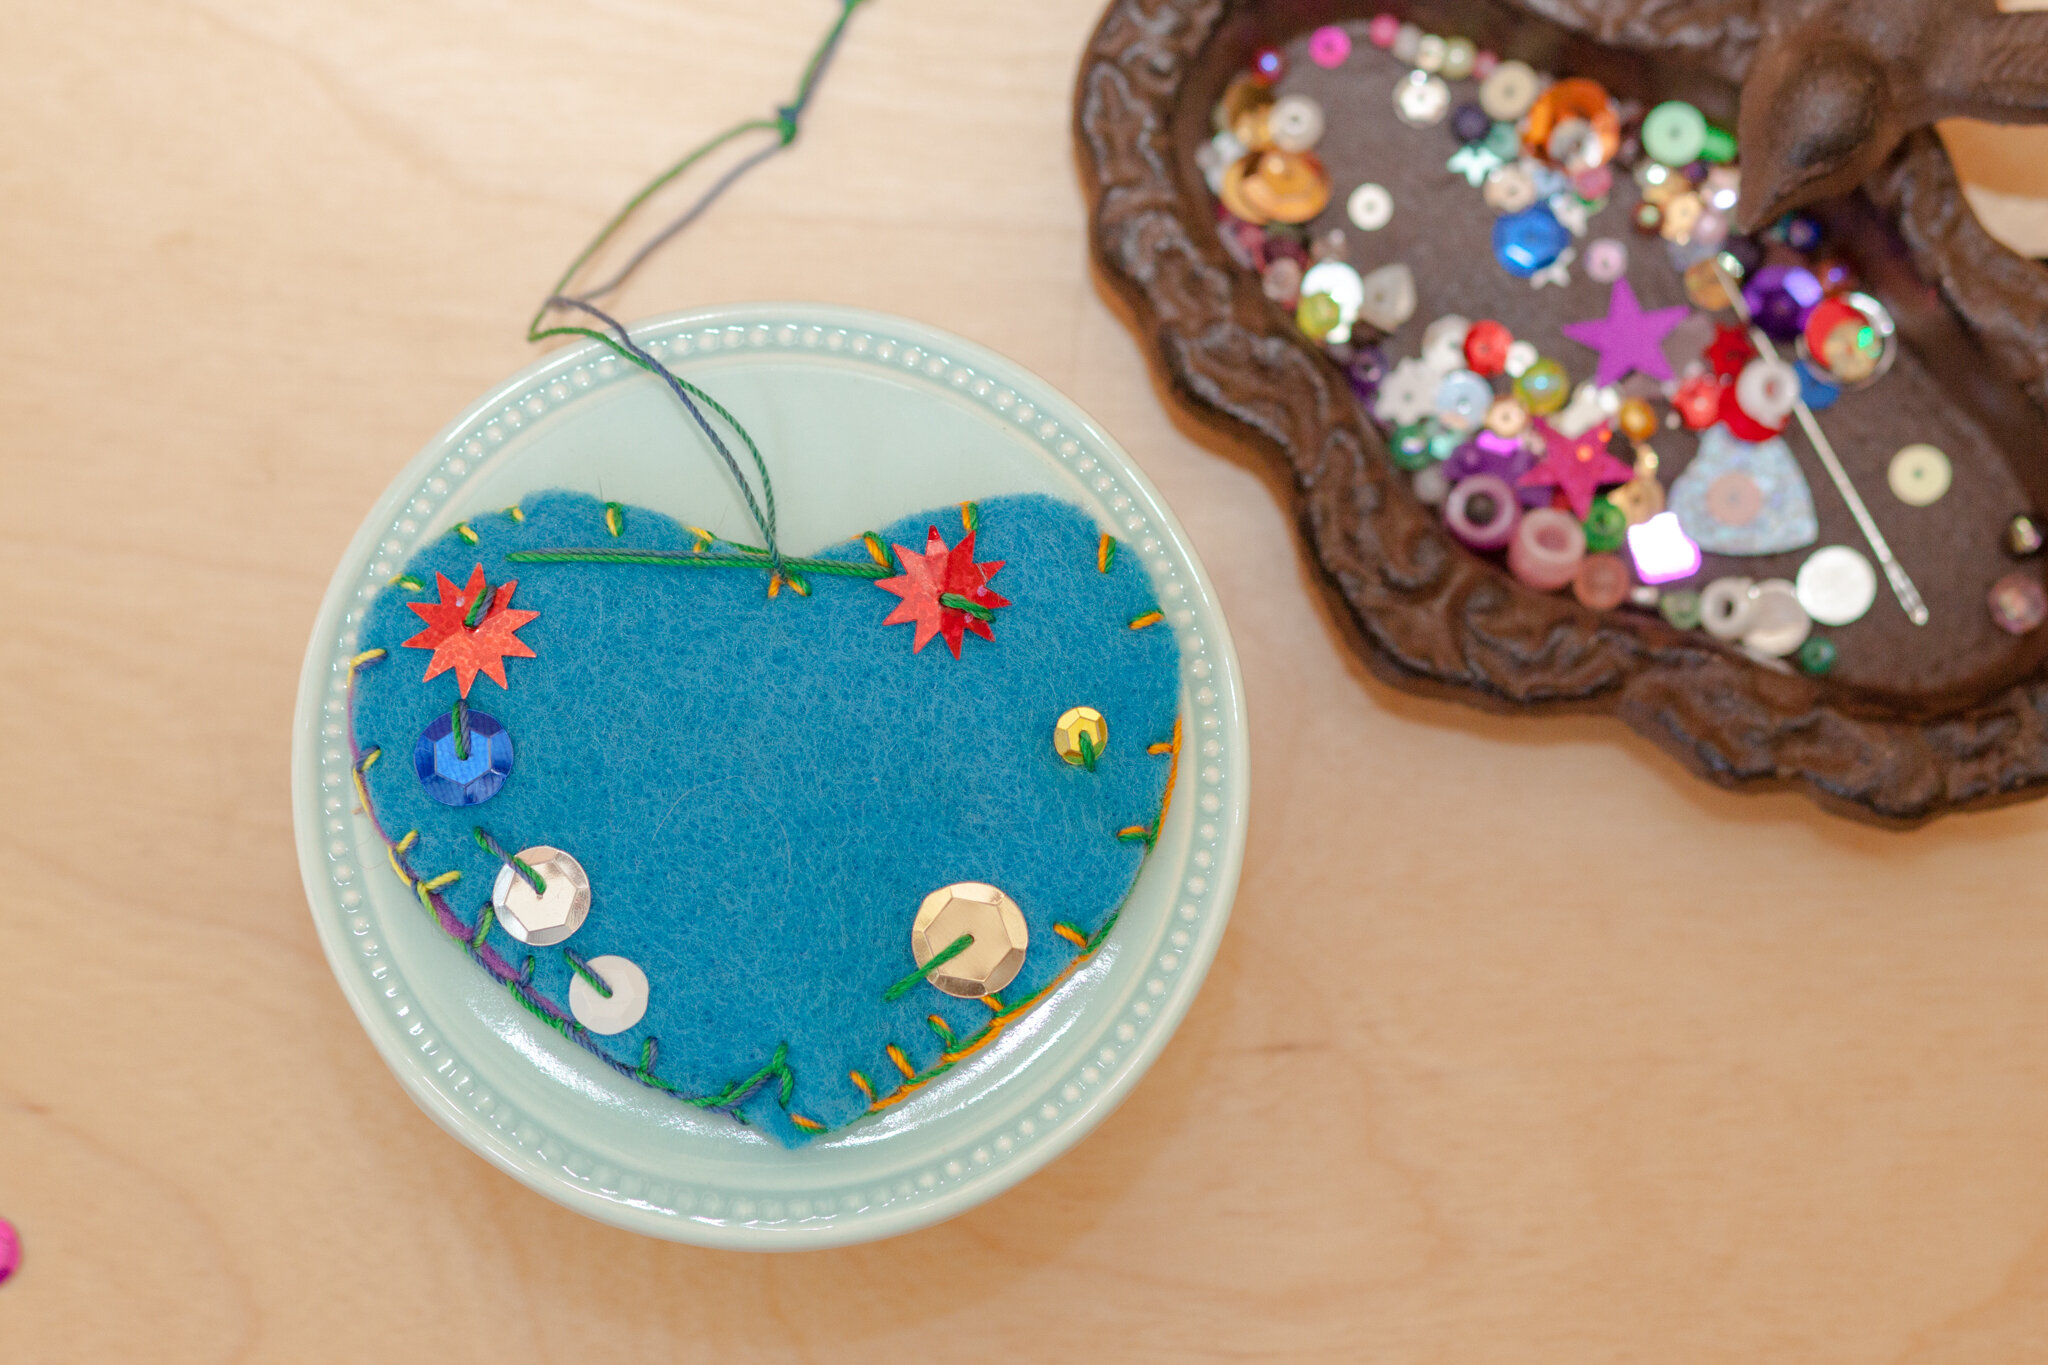
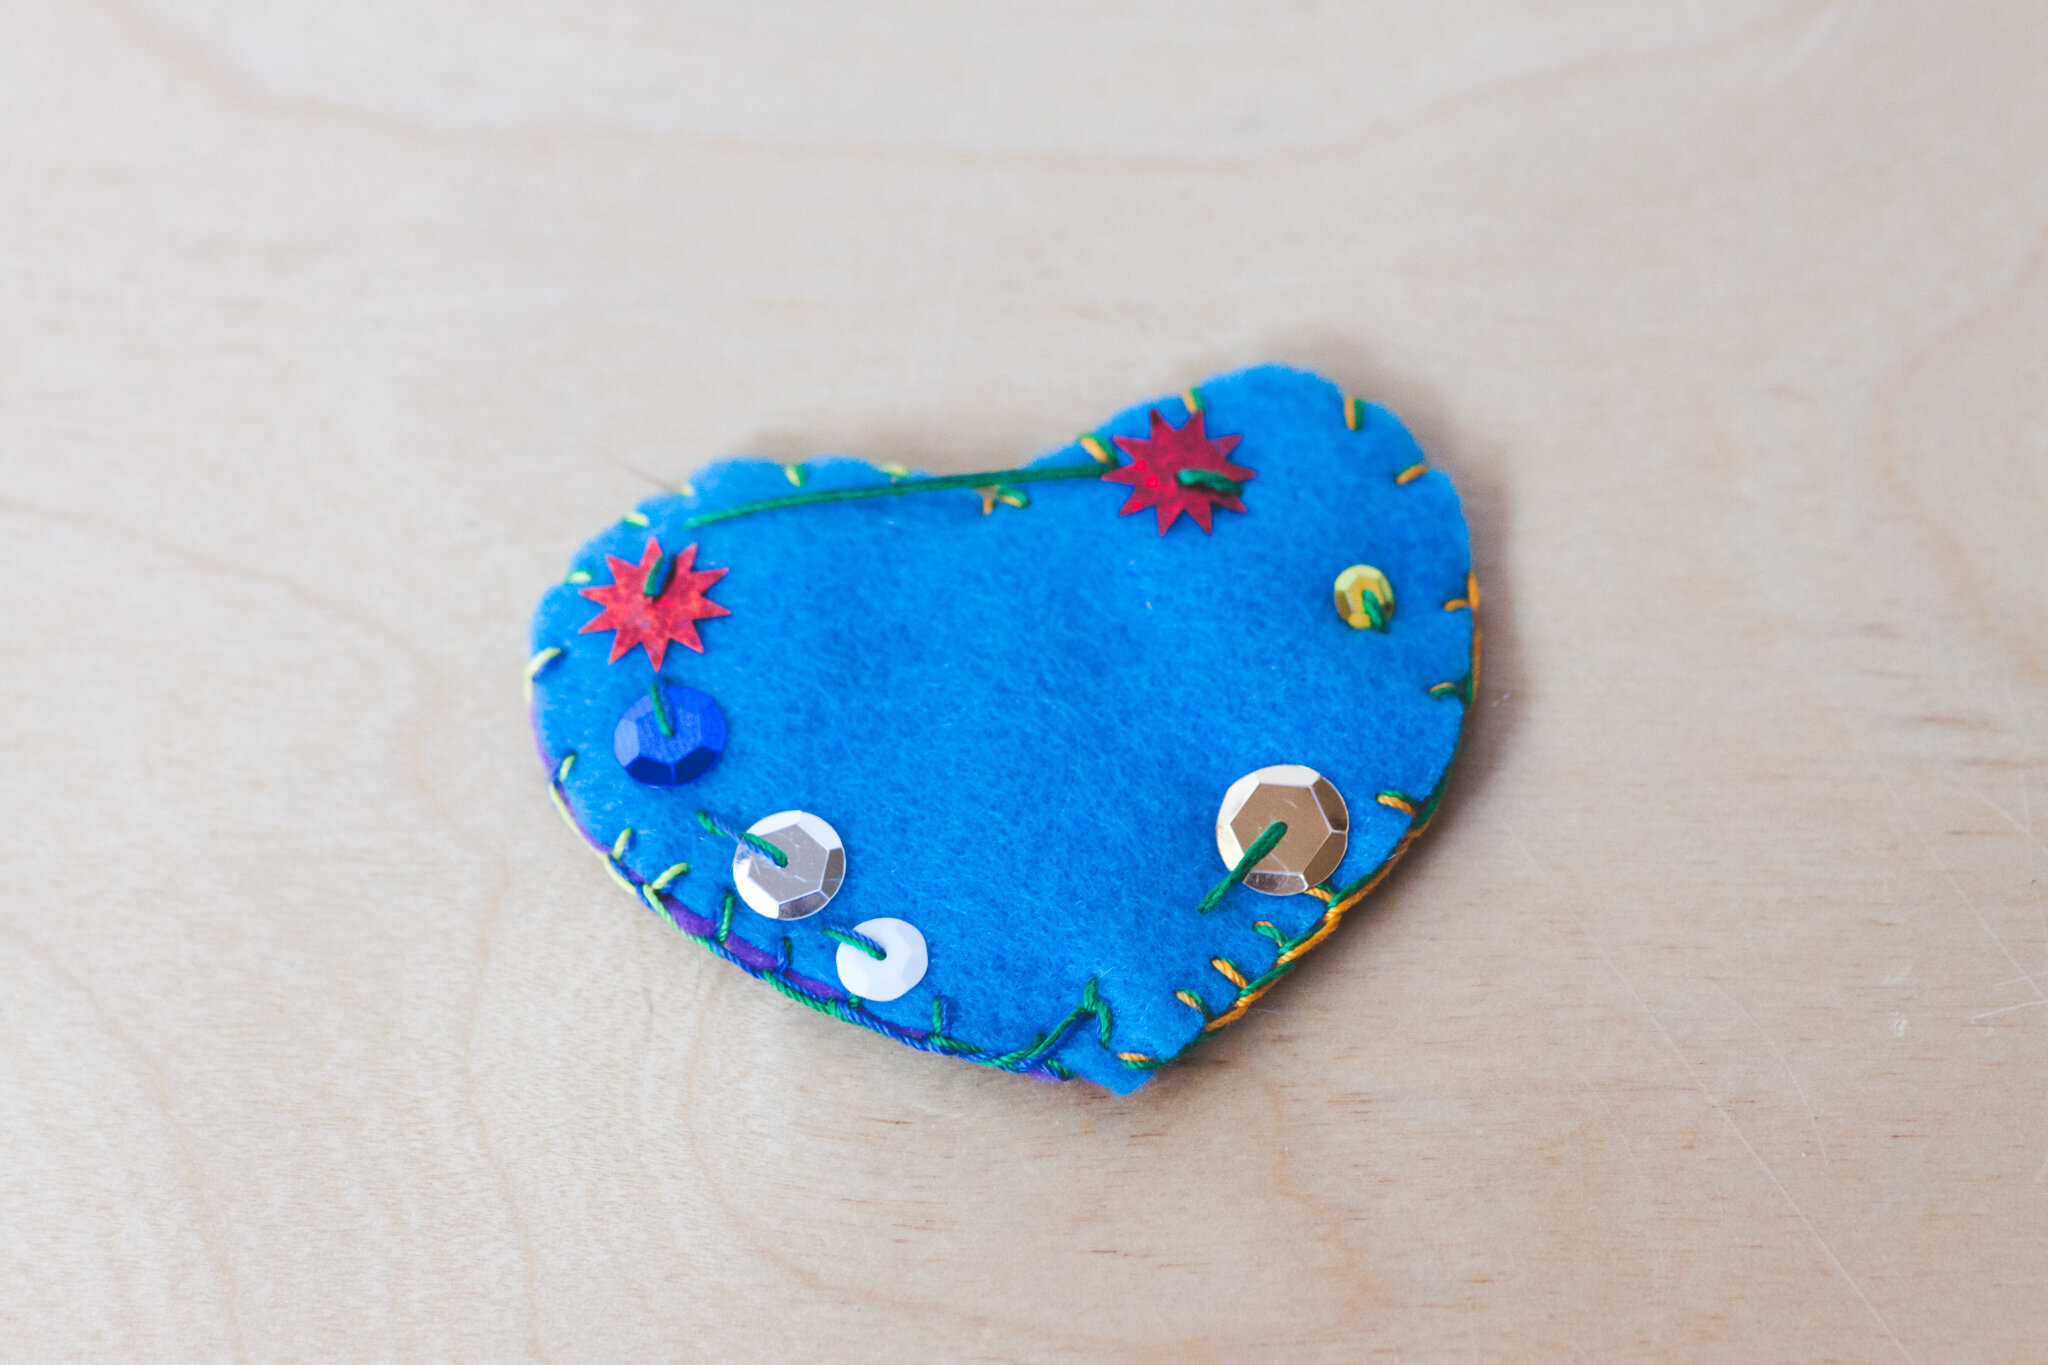
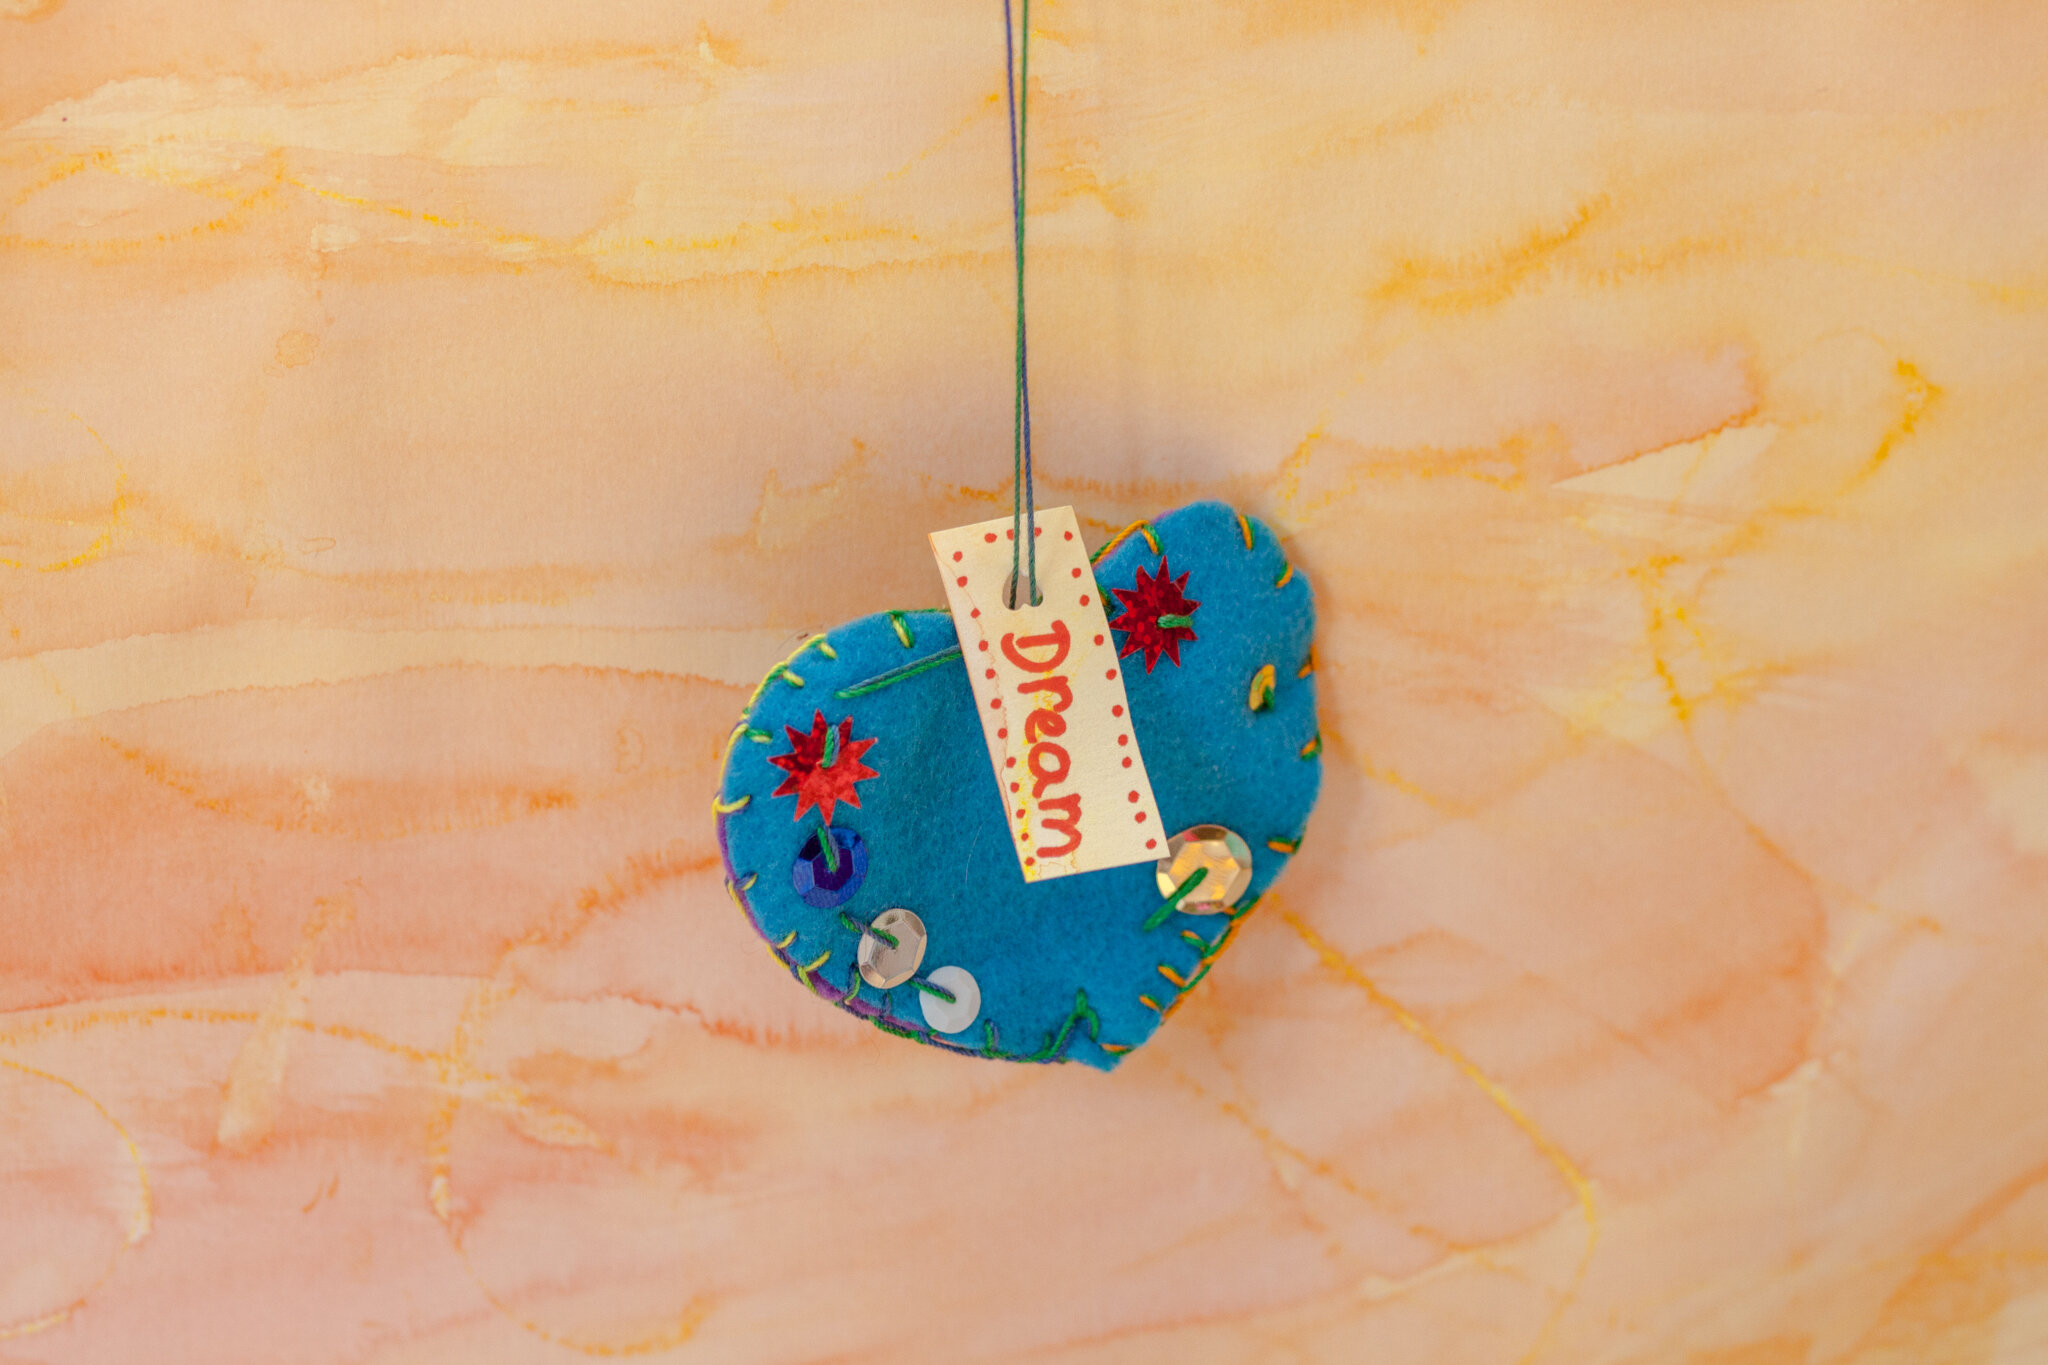
Wishing Heart
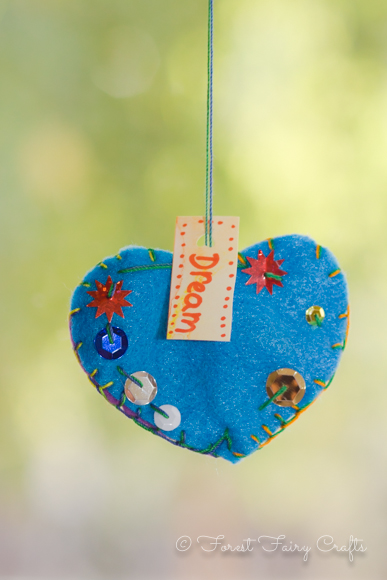
Let's begin with a wish. A hope. A dream. Let's made crafts to celebrate our wishes. Because the best wishes are from the heart.
This was my first sewing project of the year with second and third grade students (7-9 years old). Most had used needle and thread before. I wanted a project that would let them explore. A project that let everyone be successful. Whether they wanted one decoration. Or a hundred and one :)
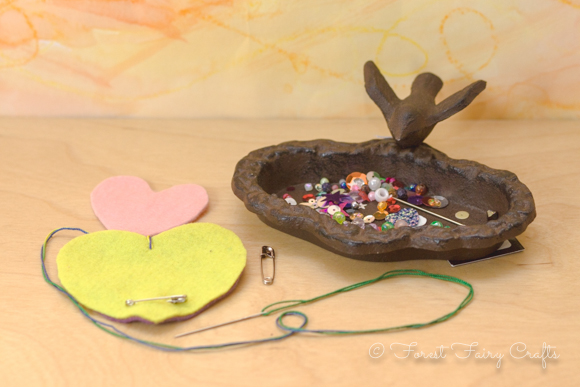
Supplies:
- Felt (two colors for each heart)
- Needle and thread (chenille needles and crochet thread)
- Safety pin
- Beads and sequins
- Slip of pretty paper for name and wish
- Optional: a third, smaller felt heart to decorate
Age: 6+
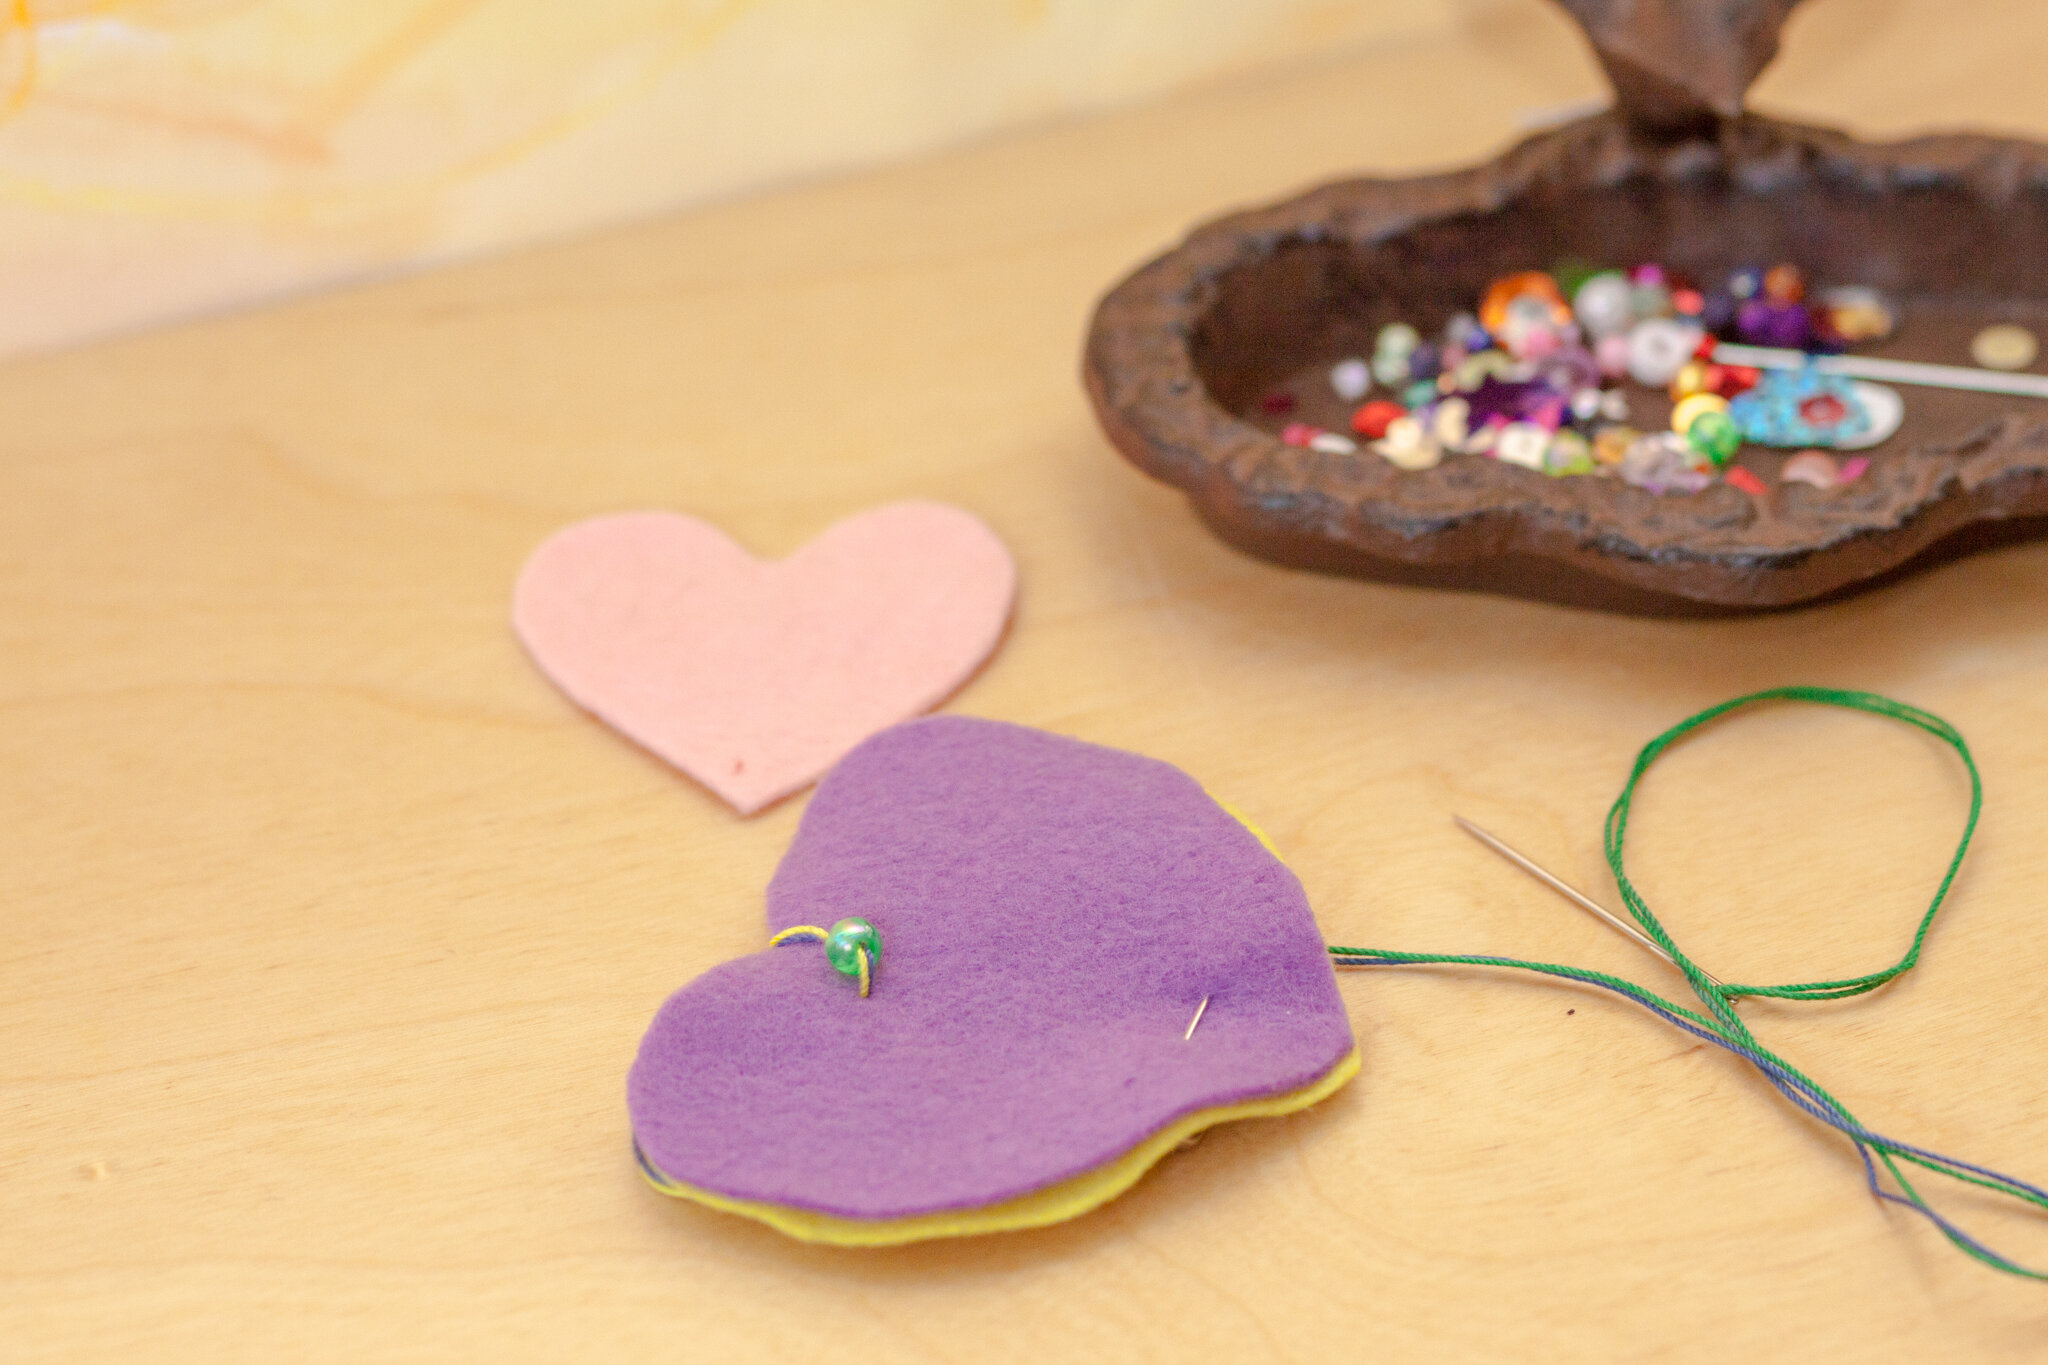
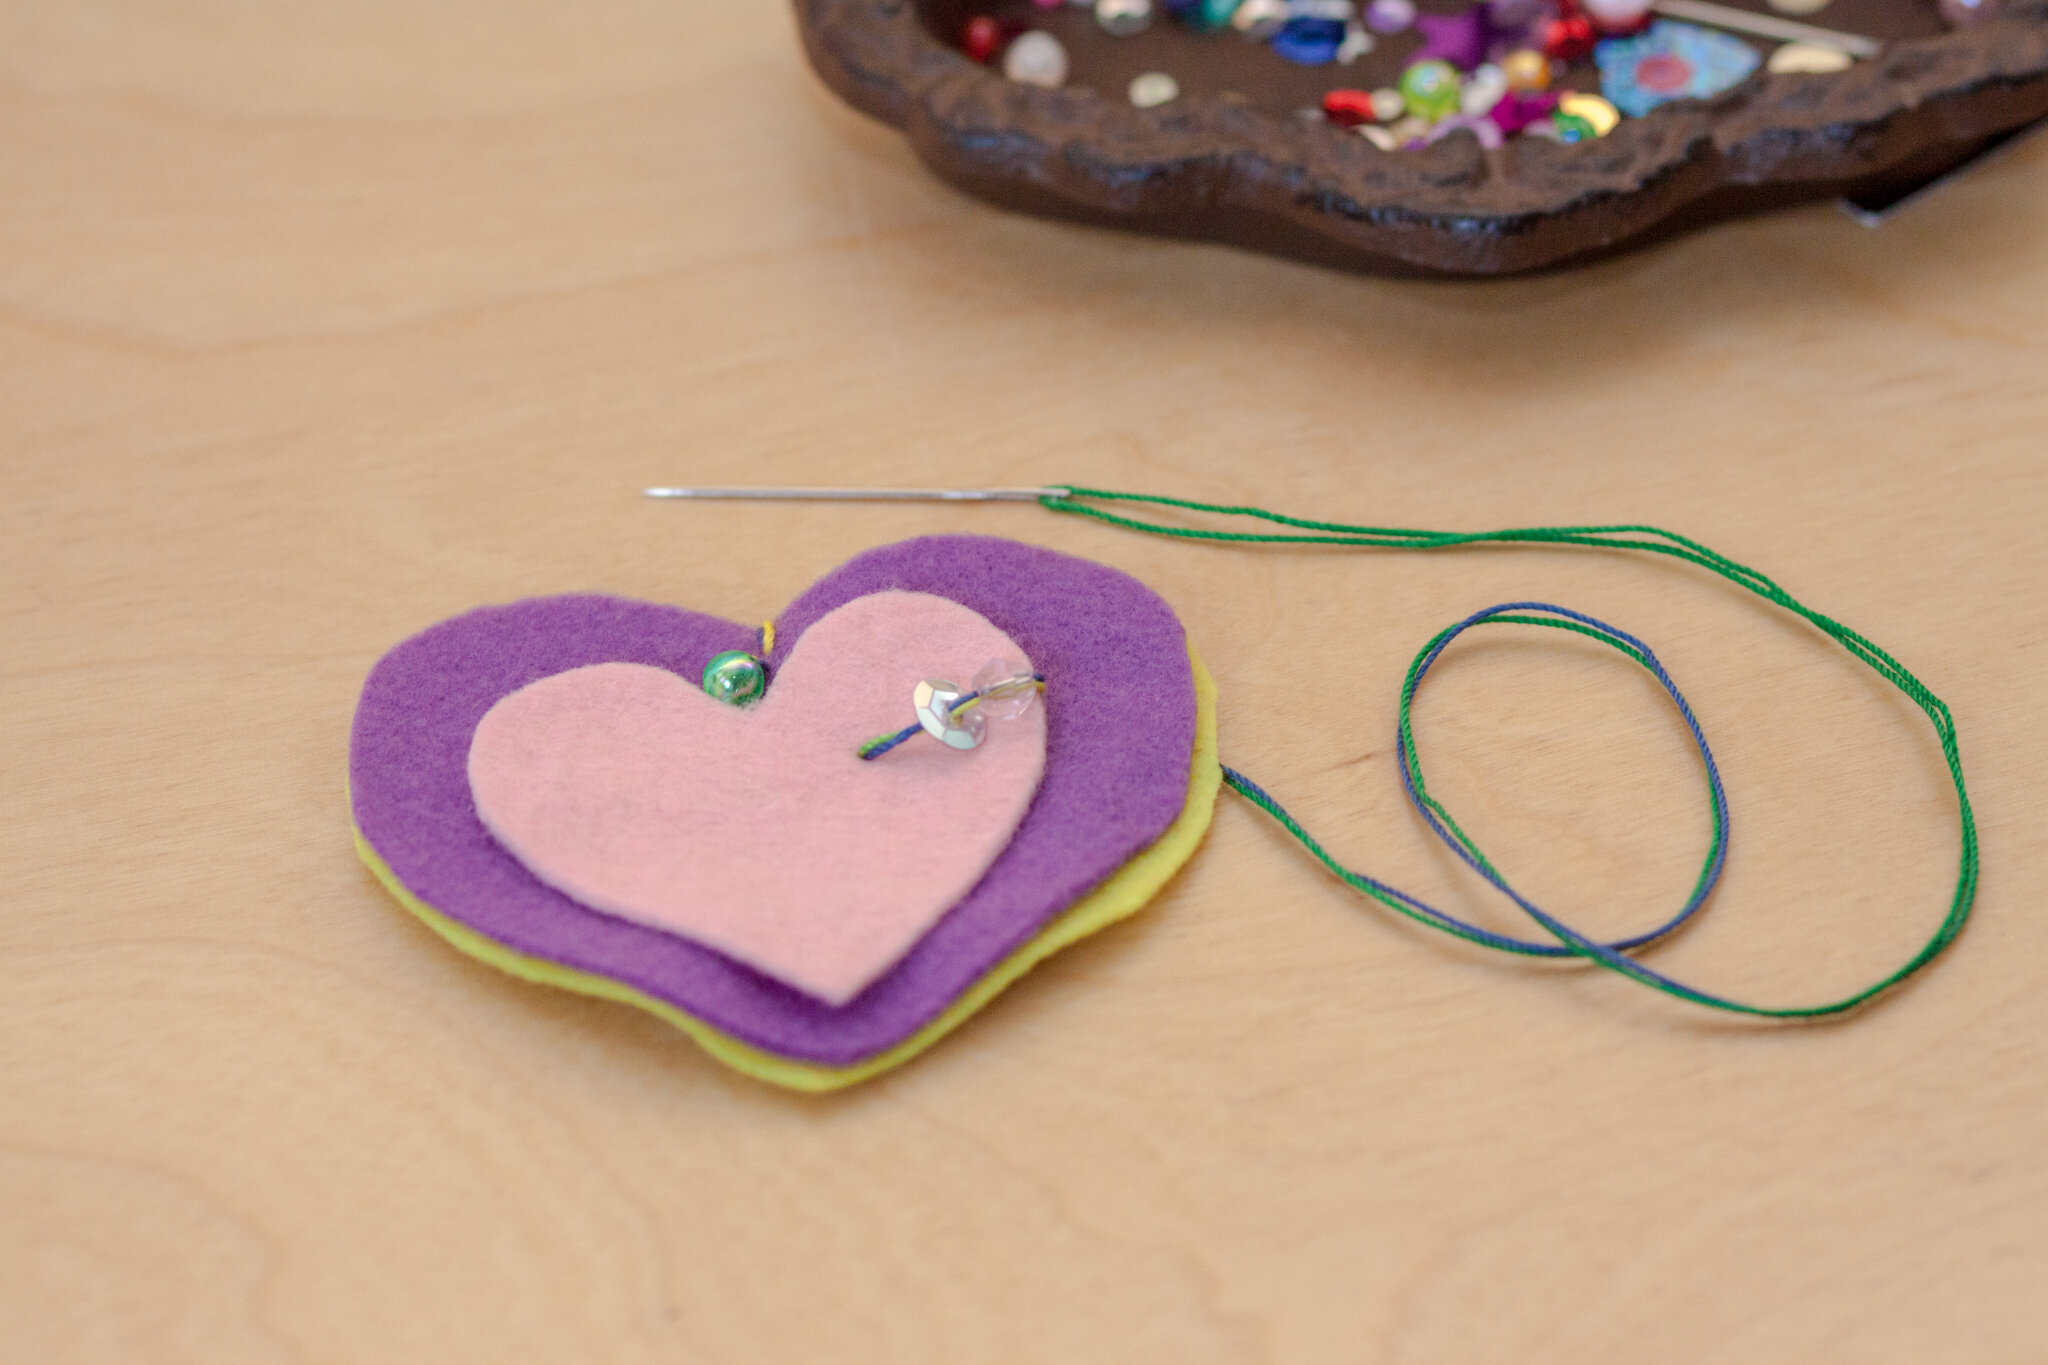
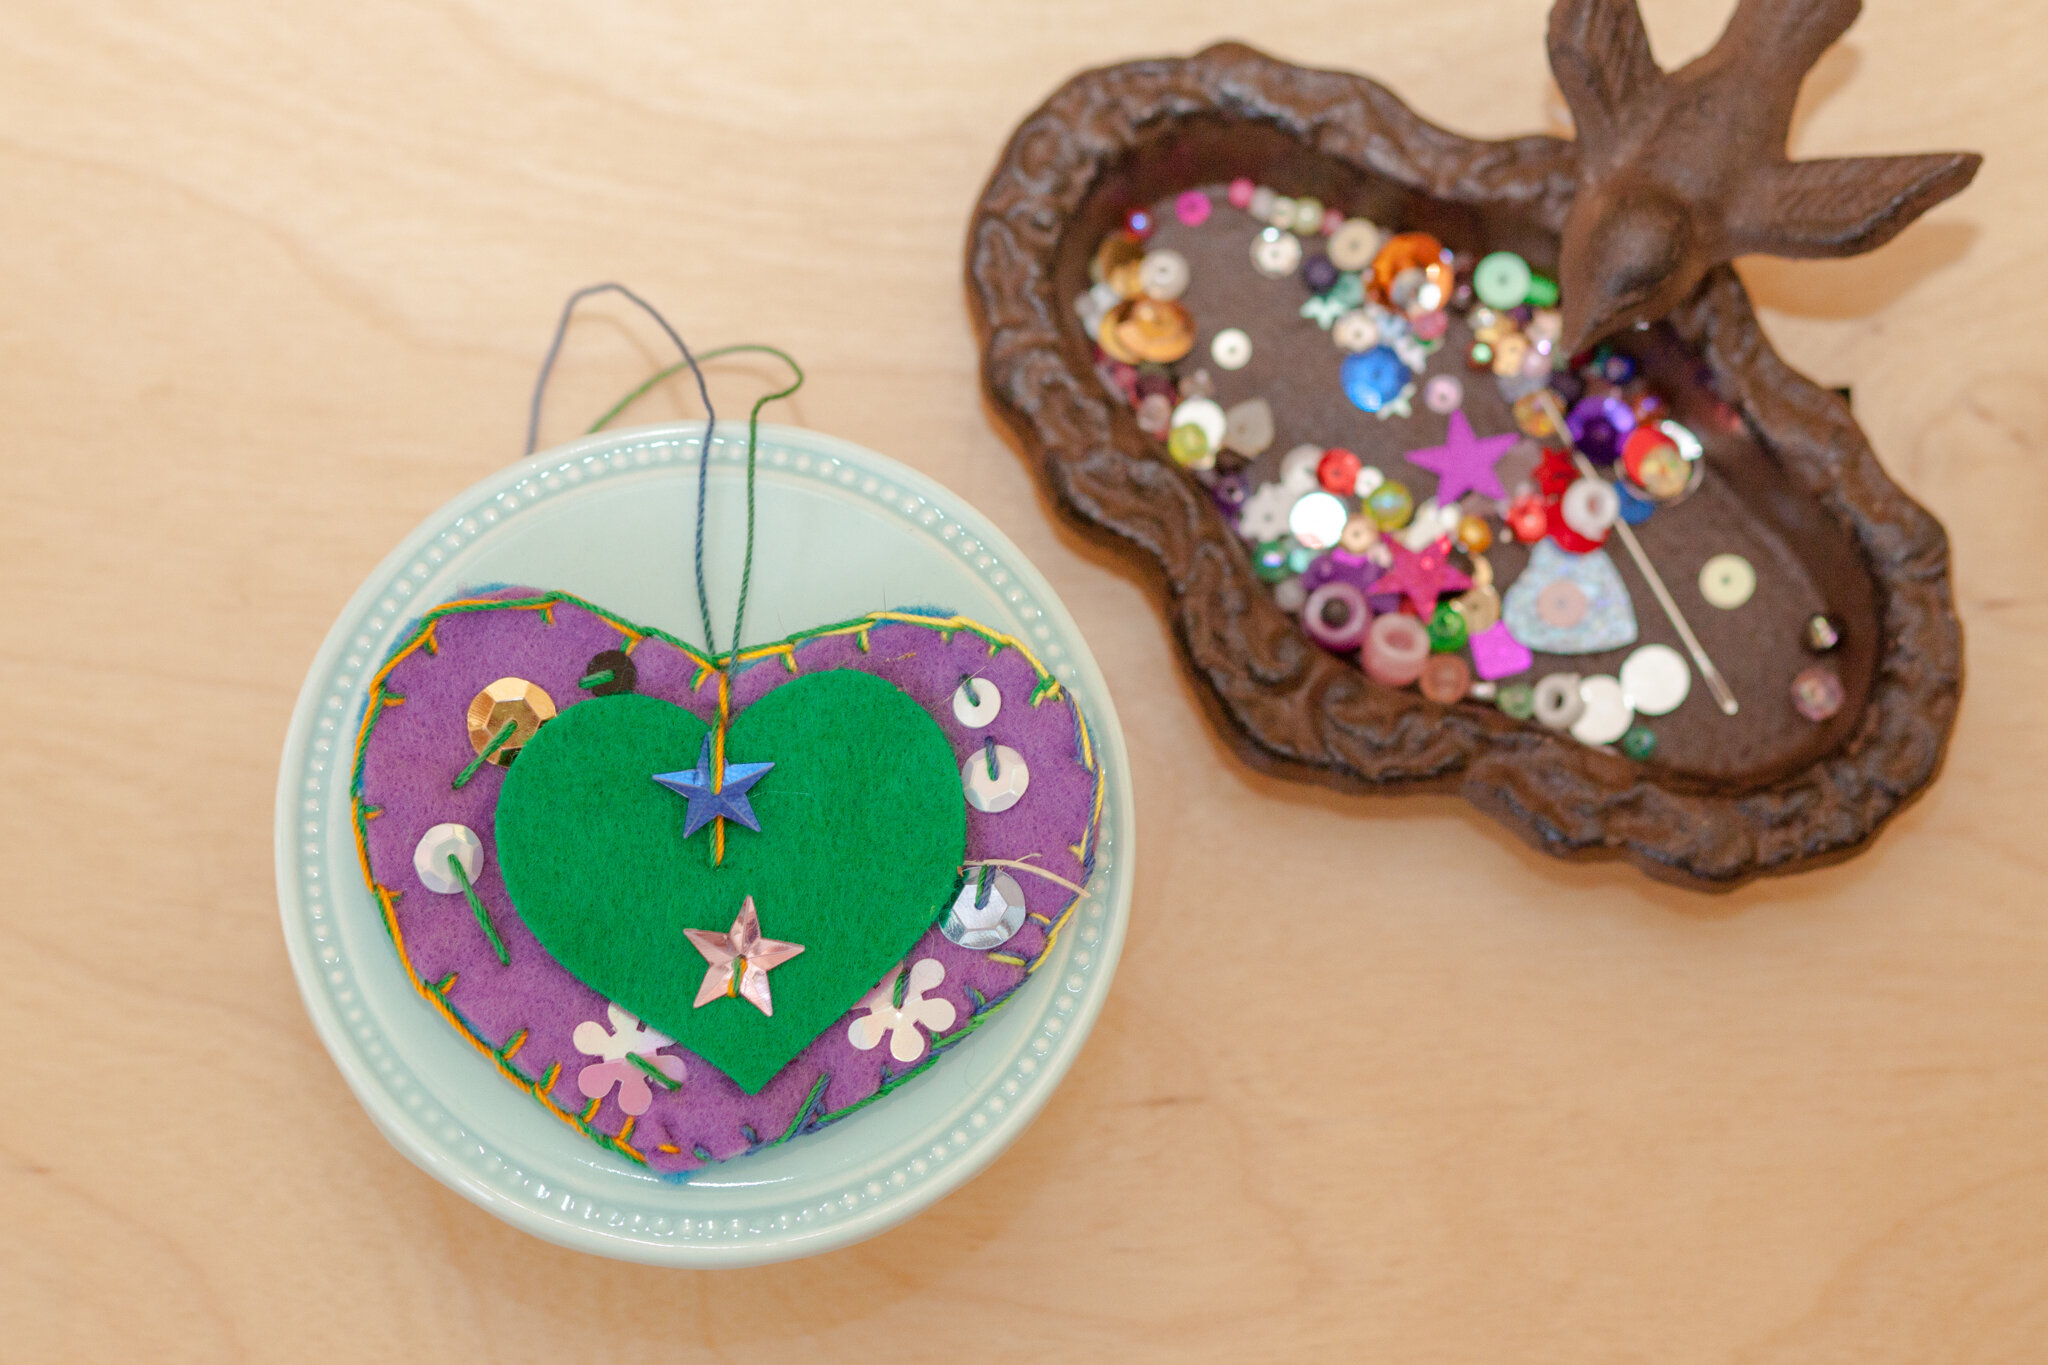
Prep: Cut hearts. Secure them together with a safety pin. Double and knot thread on the needle. Sew one stitch at the top hiding the knot between the two hearts. The stitch and the safety pin keep the felt together while children sew.
Children: These hearts are a lovely first sewing activity because almost everything is beautiful (expect for tangles). Children add a bead or sequin to one side of the heart. They push the needle through felt anywhere they like. Big stitches work just fine.
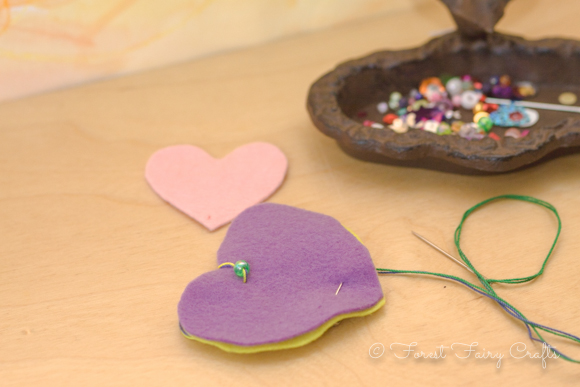
Now the needle and thread is on the other side. Add another sequin, bead, or both.
You can also add the little felt heart. Be careful when going through three layers of felt. It may take a little practice.
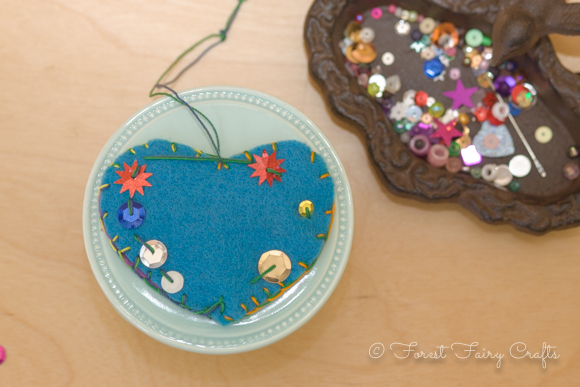
Add all of the sequins and beads that make your heart happy.
Helper: Just encourage. Sort out any tangles. Take off the safety pin once the two pieces of felt are secure.
Most design choices will be fine. Long strings of beads. Loops around the outside of the heart. Crisscross stitching. It's all okay. This allows children to experiment with sewing. And have fun! They can stitch around the outside if they like, but it's not needed.
Tie a knot. Move the string to the center for hanging if there is enough string left. If not, add a string. Many children strung beads on their hanging thread to catch the light. If beads go on the hanging thread, be sure to tie a knot around the last bead so they don't slip off.
Children: Write your name and a wish on a pretty slip of paper.

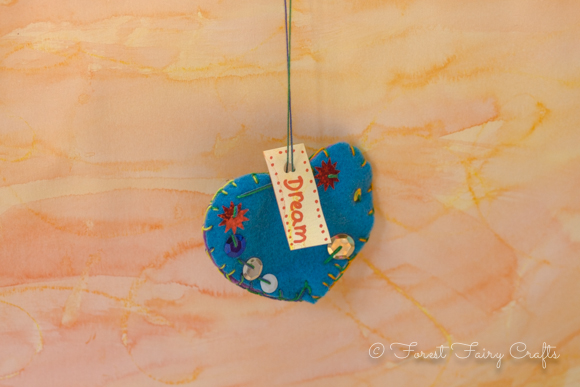
Each class hung their hearts in a special area of the room.
One is lovely. A collection is gorgeous.
Have fun sewing this week!
For more insights about sewing with children and teaching children how to sew, consider our Forest Fairy Crafts book. It shares our favorite needles and threads along with stitches, troubleshooting, and more. The link is an affiliate link. Should you decide to purchase, a small amount returns to the Forest. Enjoy :)
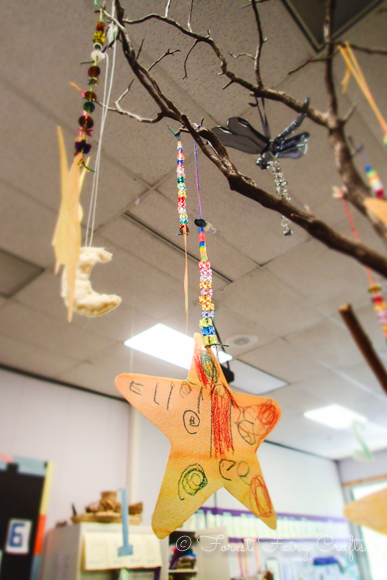
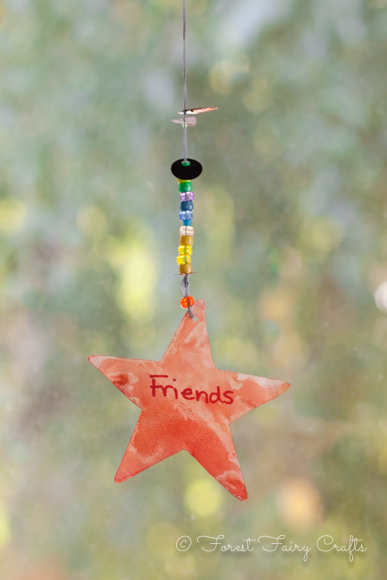
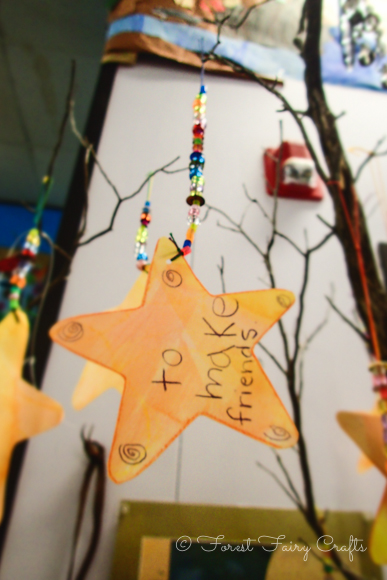
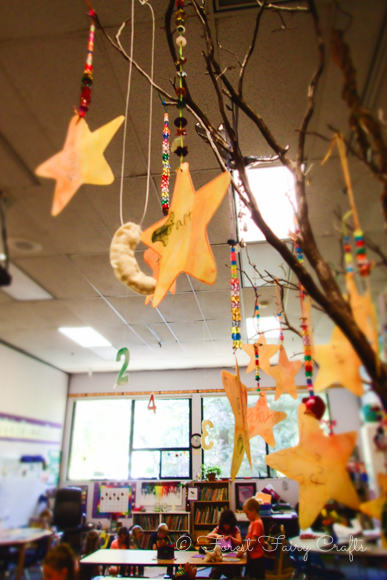
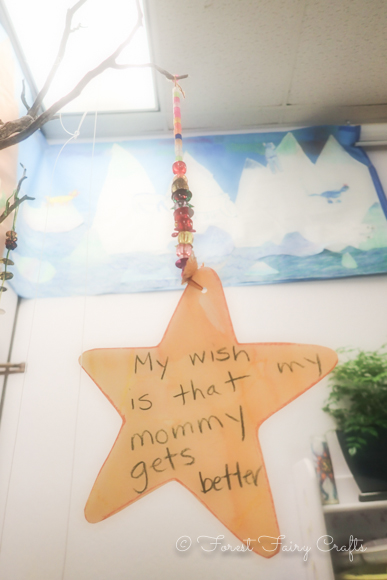
Wishing Stars
We start a journey with expectations. And children are often told "don't do this," or "don't do that," as they start an adventure (like a new school year). Think of all the rules, the rules, the rules :)
So I like to think of the things we do want for our adventure. What do we want to create? How do we want to feel? What should we bring to this journey?
Children often wish for things. Things like ponies or candy. I want to wish for things we cannot touch. Kindness. Friends. Creativity. Beauty. Hope. Love.
And, every once in awhile, a child cracks my heart wide open with a wish. Like this one.
Something about crafting allows us to feel deeply. To share deeply. Creating a space where we can express ideas that are big and mighty. They connect us. As we sew or bead or knit, we create together. We create community.
The stars can be very simple or made fancier.
Optional: Children can watercolor or decorate their own paper. We have painted squares on both sides, then we cut into stars. For time's sake, I watercolored and cut these stars.
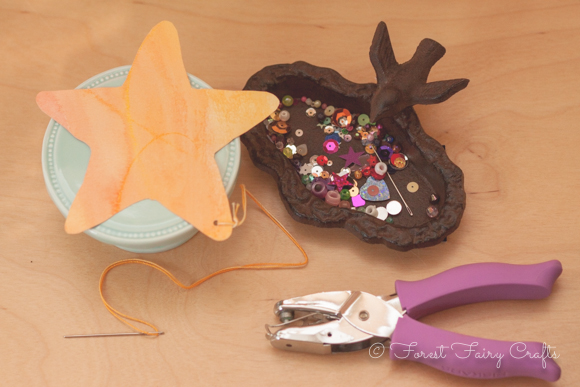
Supplies:
- Stiff paper
- Needle and thread (I used friendly blunt needles and crochet thread)
- Beads and sequins
- Hole punch
Prep:
Watercolor paper on both sides and punched a hole. Double the thread and tie a knot. Go through the hole, then back through the loop in the thread. The thread is now attached to the star and ready for decorating.
Ages: 5-7
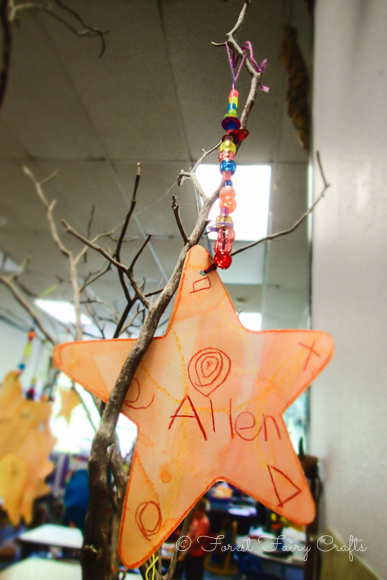
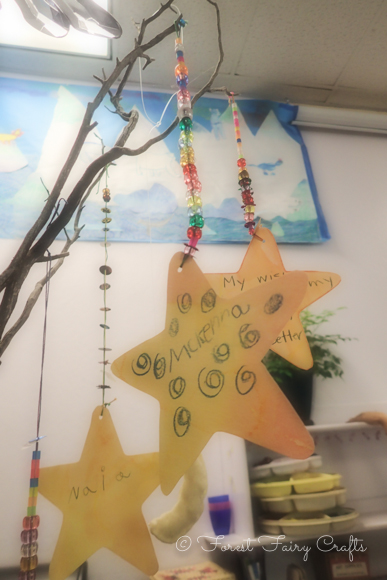
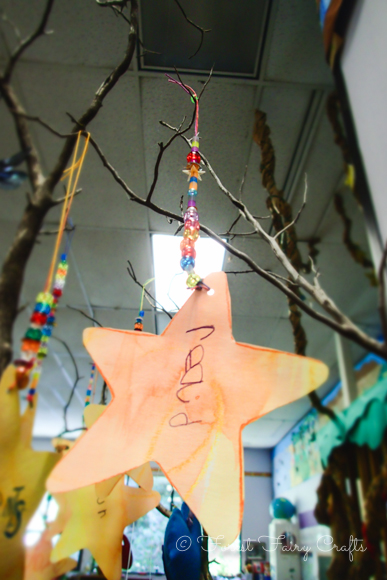
For children:
Write name on one side of the star and a wish on the other side. If a wish is hard to choose, add a few beads while thinking. Wishes can take time. Decorating the star is also lovely. Thread sequins and beads. Hang in a sunny place to see the sun shine on your wishing star.
Helper: When tying off, be sure to tie around the last bead, or else they can all slide right off the thread. I loop the needle through the last bead a couple of times to secure all the other beads on the thread.
Enjoy! One class hung them on a branch. Another hung them from the ceiling over their gathering space. All those wishes watching over the children. Beautiful! These inspire a lot of discussion and create a lovely space where children celebrate wishes coming true :)
This wish? To read. May all your wishes come true :)